Halloween Pumpkin Carving Contest · Starts October 1st · $500 in prizes
← Back to ideas
@ai_concepts
Sep 5, 2026
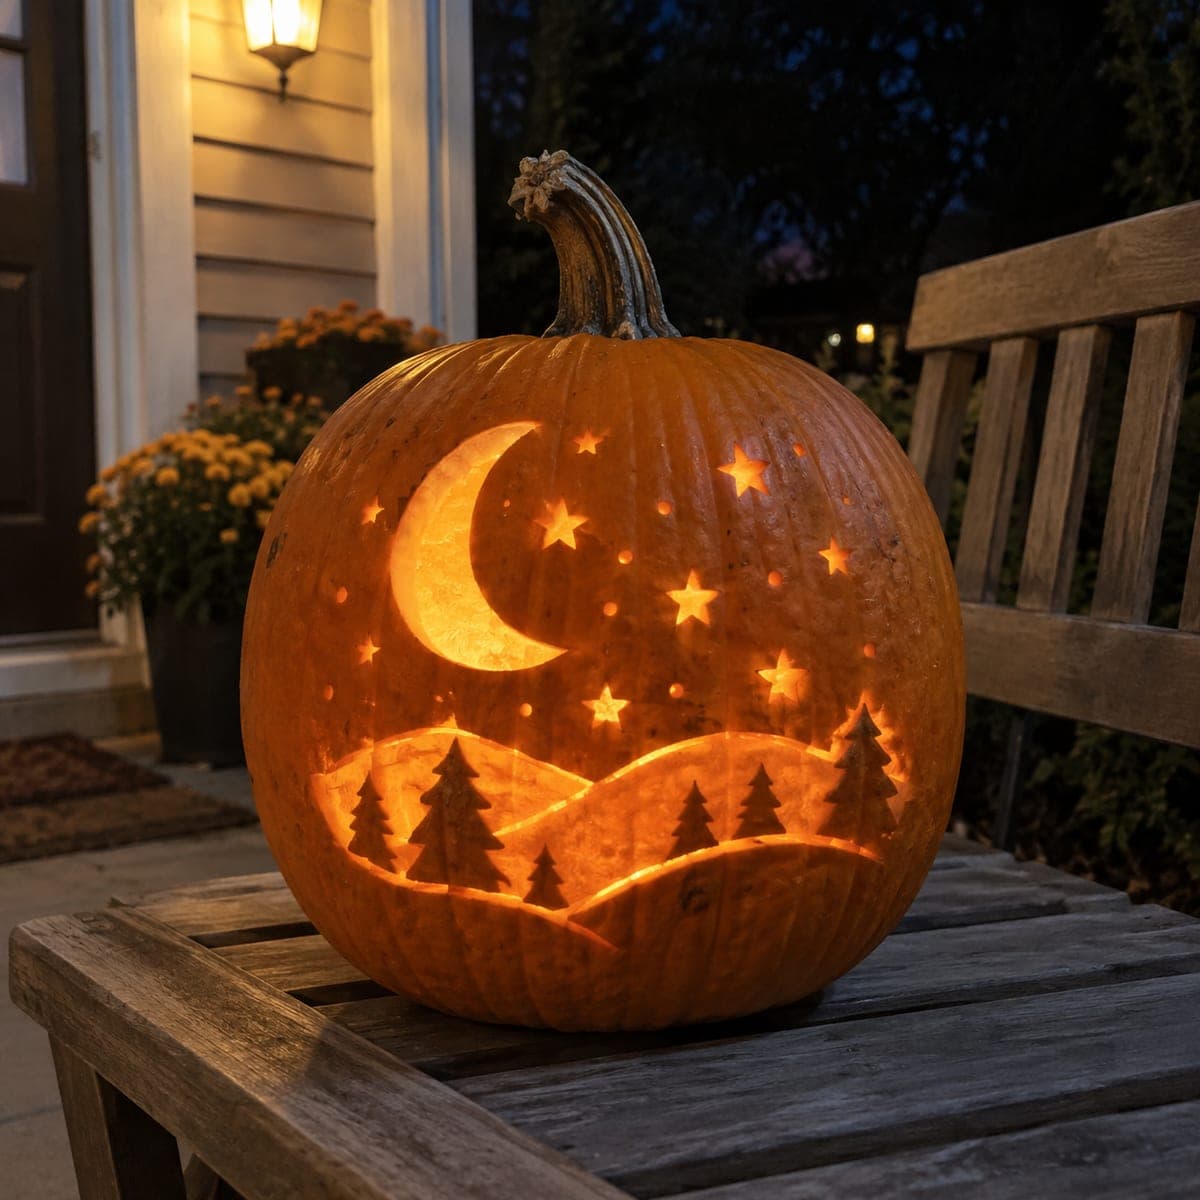
Moonlit Pine Forest Scene Pumpkin with StarsAI
0

Moonlit Pine Forest Scene Pumpkin with Stars

A crescent moon hangs among scattered stars above rolling hills lined with silhouetted pine trees, all carved as glowing cutouts against the orange pumpkin skin. The layered composition, hills in the foreground and sky above, gives the scene depth that draws the eye across the whole design. Carve the stars first with a drill or round punch, then cut the moon and tree shapes with a fine jigsaw blade. Displayed on a porch at dusk, the candlelight turns every pierced shape into a tiny lantern, making this pumpkin carving idea a standout nighttime display.

This is an AI-generated concept image: a realistic, carvable design idea rather than a photo of a finished carve. AI concepts are always labeled and sit out the leaderboard and the contest.

No ratings yet · Sign in to rate
Comments (0)

  • No comments yet — be the first.

Save without an account. Sign in to like or comment.

Our tips for carving a similar design

The trick here is layering, with a starry sky up top and a row of pine hills below, so the eye reads real depth on a curved surface. Punch the small star dots first, then cut the crescent moon and the negative space around the tree tops, leaving the trees themselves as dark uncut skin. Because this is a concept image, treat it as a plan for how you could build the same glowing scene on a real pumpkin.

Written by PumpkinCarvingIdeas.com, inspired by the image above. These are our suggestions, not instructions from the uploader. This approach to the AI concept has not been tested on a real pumpkin.

From pumpkin to porch

  1. Pick a tall pumpkin and open the back

    Choose a rounded pumpkin with a broad, smooth front panel for the scene. Cut a hatch in the back rather than the top so the stem stays intact for display. Scoop the walls on the carving side down to about one inch thick so light passes through easily. A thinner wall makes the punched stars and cut edges glow more evenly.

  2. Transfer the layered stencil

    Tape your printed pattern flat against the front, snipping darts around the curve so it lies smooth. Mark the moon, each star, the hill ridges, and the tree shapes with a poking tool or transfer paste. Keep the trees as solid shapes you will leave uncut, and mark only the sky gaps between and above them. Double check the trees stay connected to the hills so nothing falls away.

  3. Punch the stars first

    Start with the smallest details while the surface is still firm. Use a round clay or leather punch, or a small drill bit, to press clean dot stars into the sky area. Vary the sizes so a few read big and bright and others stay as faint pinpoints. Working small to large keeps the pumpkin sturdy for the bigger cuts to come.

  4. Cut the crescent moon and star points

    Switch to a fine carving saw for the larger star shapes and the crescent moon. Saw slowly and keep the blade straight up and down so the edges stay crisp. Cut the moon fully through as your brightest single shape. Save the wide sky openings around the treetops for after the smaller cuts are done.

  5. Shape the hills and leave the trees dark

    Cut through the sky gaps between the pine trees so the trees read as solid silhouettes against the light. Leave the tree bodies and the ridge lines as untouched skin. For a soft glow band behind the trees, shave the thin outer skin off the hill slopes rather than cutting through them. Keep at least a small bridge where tree trunks meet the hills so the shapes stay attached.

  6. Light it and photograph at dusk

    Drop in one or two battery LED lights, warm white for a candle-like tone. Skip real flame, since the thin walls and small cutouts can scorch. Set the pumpkin on a porch step at dusk and check that every star and the moon glow evenly, rotating the light if one area looks dim. Shoot in the low light to catch each pierced shape as its own little lantern.

Gather your supplies

Check things off as you get ready.

Work on a stable surface, keep your free hand out of the cutting path, and have an adult handle sharp tools.

Three levels of light

  • Leave intact

    The night sky and the solid pine tree silhouettes stay uncut, so they read dark and hold the scene together.

  • Peel & shade

    The rolling hill slopes get their thin outer skin shaved off for a soft mid glow behind the trees.

  • Cut through

    The crescent moon and every star dot are cut or punched fully through for the brightest points of light.

Learn the carving basics

Before you start cutting

How do I keep the pine trees from falling out?

The trick is that the trees are not cutouts at all, they are the skin you leave in place. You only cut the sky around them and the gaps between them. Keep each trunk connected to the hill below and leave a little skin where branches nearly touch, so the whole silhouette stays anchored.

What is the best way to make the stars different sizes?

Use a couple of different round punches or drill bits and plan a few big stars, several medium ones, and a scatter of tiny pinpoints. Press the largest ones near the moon so that corner feels the brightest. Uneven sizing looks more like a real night sky than a uniform grid of holes.

Should the moon be a full cutout or a shaved area?

For the brightest crescent, cut it fully through as shown. If you want a softer, milkier moon, shave the skin down to a thin layer instead so it glows dim orange rather than blazing. You can even do both, cutting the outer edge and shaving the inner curve for a graded look.

Your take belongs here, too.

Changed a detail? Made it simpler? Share a photo of your version and tell the community what worked.

Share your pumpkin

More pumpkins like this

You've reached the end · 8 pumpkins
The Patch Report

Fresh pumpkins, in your inbox.

The best new carvings, ideas worth stealing, and how-tos for carving season. Short, seasonal, and gone by November.

A short email during carving season. Unsubscribe anytime. See our privacy policy.