Halloween Pumpkin Carving Contest · Starts October 1st · $500 in prizes
← Back to ideas
@ai_concepts
Jul 8, 2026
No-Carve Spider Web Painted Pumpkin CraftAI
0

No-Carve Spider Web Painted Pumpkin Craft

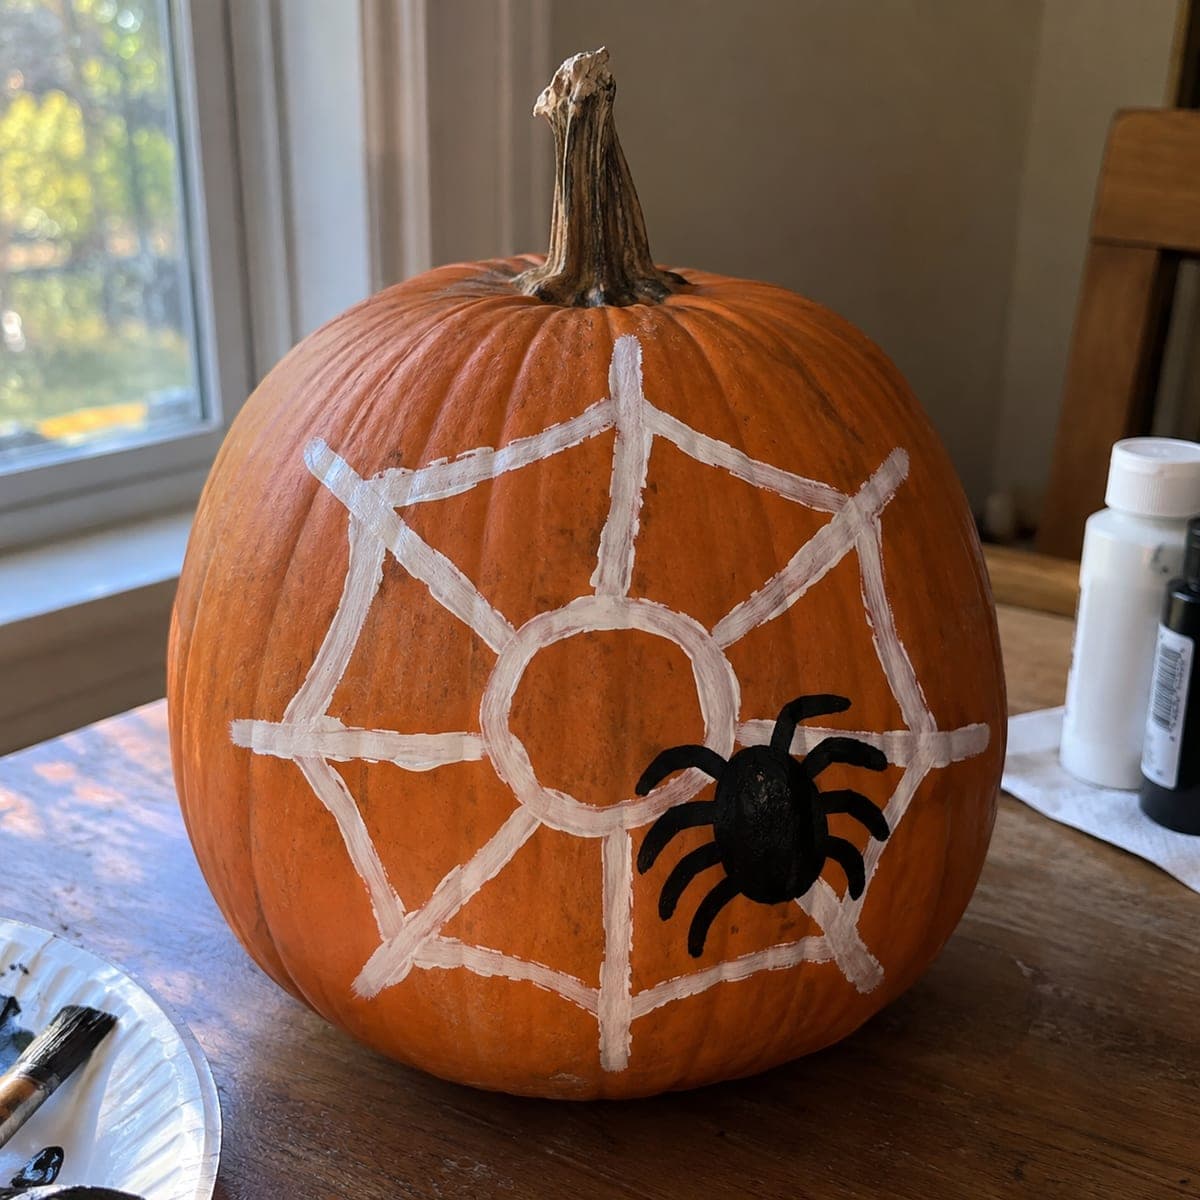
A hand-painted white spider web spans the whole pumpkin, with a chunky black spider perched on the lower strands. Since nothing is cut, this no-carve pumpkin lasts for weeks indoors and is safe for little hands to make. Chalk the web lines lightly first, paint the spokes before the connecting arcs, and give the spider two coats of black craft paint so it reads bold from the sidewalk.

This is an AI-generated concept image: a realistic, carvable design idea rather than a photo of a finished carve. AI concepts are always labeled and sit out the leaderboard and the contest.

No ratings yet · Sign in to rate

Comments (0)

  • No comments yet — be the first.

Save without an account. Sign in to like or comment.

Our tips for carving a similar design

The core trick here is building the web outward like a real spider does, painting the straight spokes first and then linking them with gentle curved arcs so the lines stay even. Everything is painted, not cut, so the pumpkin lasts for weeks and stays safe for young helpers. A chunky black spider on the lower strands gives the whole thing a bold focal point.

Written by PumpkinCarvingIdeas.com, inspired by the image above. These are our suggestions, not instructions from the uploader. This approach to the AI concept has not been tested on a real pumpkin.

From pumpkin to porch

  1. Clean and plan the layout

    Wipe the pumpkin with a dry cloth so paint grips the skin. Pick the flattest, roundest face as your canvas and decide where the web center will sit, usually a little above the middle. Keep the stem area clear so the design reads well from the side. Set the spider low and off to one side rather than dead center for a more natural look.

  2. Chalk the web guides lightly

    Use white chalk or a chalk pencil to sketch a small circle at the center, then draw six to eight straight spokes radiating out toward the edges. Keep the pressure light so you can wipe away and redraw any line that drifts. Chalk brushes off easily, so this is your free practice round before any paint touches the surface. Step back and check that the spokes are spaced evenly around the center.

  3. Paint the spokes first

    Load a thin round brush with white craft paint and trace over each chalked spoke, working from the center circle outward. Painting the straight lines first gives you a stable frame to hang the curves on. Keep strokes slightly wobbly and hand-drawn rather than ruler-straight, since real webs are never perfect. Let this first pass dry to the touch before adding more.

  4. Add the connecting arcs

    Between each pair of spokes, paint a gently curved line that dips inward, then repeat in rings moving outward toward the rim. Rest your painting hand on your other hand to steady long sweeps. If a line looks too thin once dry, go back over it with a second light coat so the web reads clearly from the sidewalk. Wipe away any leftover chalk with a barely damp cloth once the paint is fully set.

  5. Paint the chunky spider

    On the lower strands, paint a solid black oval body with a smaller round head above it. Add four legs on each side as bent lines, painting them thick so they stay bold at a distance. Give the whole spider two coats of black once the first has dried so it looks deep and even. Keep the legs simple and evenly spaced rather than fussing over tiny detail.

  6. Seal and stage the finished pumpkin

    Let all paint cure for a few hours, then brush on a coat of matte clear sealer if you want extra durability indoors. Place the pumpkin on a windowsill or shelf with the web facing the room. Since nothing is cut, skip the candle and simply aim a small lamp or LED puck nearby to make the white lines pop. Snap your photo in soft daylight so the web and spider both stay crisp.

Gather your supplies

Check things off as you get ready.

Work on a stable surface, keep your free hand out of the cutting path, and have an adult handle sharp tools.

Three levels of light

  • Leave intact

    The orange skin across the whole face stays untouched and forms the dark background the web sits on.

  • Peel & shade

    Nothing is peeled on this painted design, though a light scuff-sand under the web lines could catch a bit of glow if you added a nearby light.

  • Cut through

    No cutouts here, since this is a no-carve craft; if you ever want a glow, add a few tiny pinholes along the outer web rings and set an LED behind them.

Learn the carving basics

Before you start cutting

Do I need a real pumpkin or will a fake one work?

Either works well since nothing is cut. A real pumpkin painted and sealed can last a few weeks indoors, while a foam or plastic craft pumpkin will keep the design for years. Because this is a painted concept image, treat it as a look you can recreate on whichever base you prefer.

How do I keep the web lines from looking shaky?

Chalk every line first and wipe away any that drift before you commit to paint. Paint the straight spokes before the curved arcs so you always have a frame to align to. Resting your brush hand on your free hand steadies long strokes, and a light second coat evens out any thin spots.

What if the white paint soaks in and looks patchy?

Pumpkin skin can drink up that first coat, so plan on two thin passes rather than one heavy one. Let the first coat dry to the touch before adding the second. A craft paint made for multi surfaces covers better than watery school paint.

Your take belongs here, too.

Changed a detail? Made it simpler? Share a photo of your version and tell the community what worked.

Share your pumpkin

More pumpkins like this

You've reached the end · 8 pumpkins
The Patch Report

Fresh pumpkins, in your inbox.

The best new carvings, ideas worth stealing, and how-tos for carving season. Short, seasonal, and gone by November.

A short email during carving season. Unsubscribe anytime. See our privacy policy.