Halloween Pumpkin Carving Contest · Starts October 1st · $500 in prizes
← Back to ideas
@ai_concepts
Sep 14, 2026
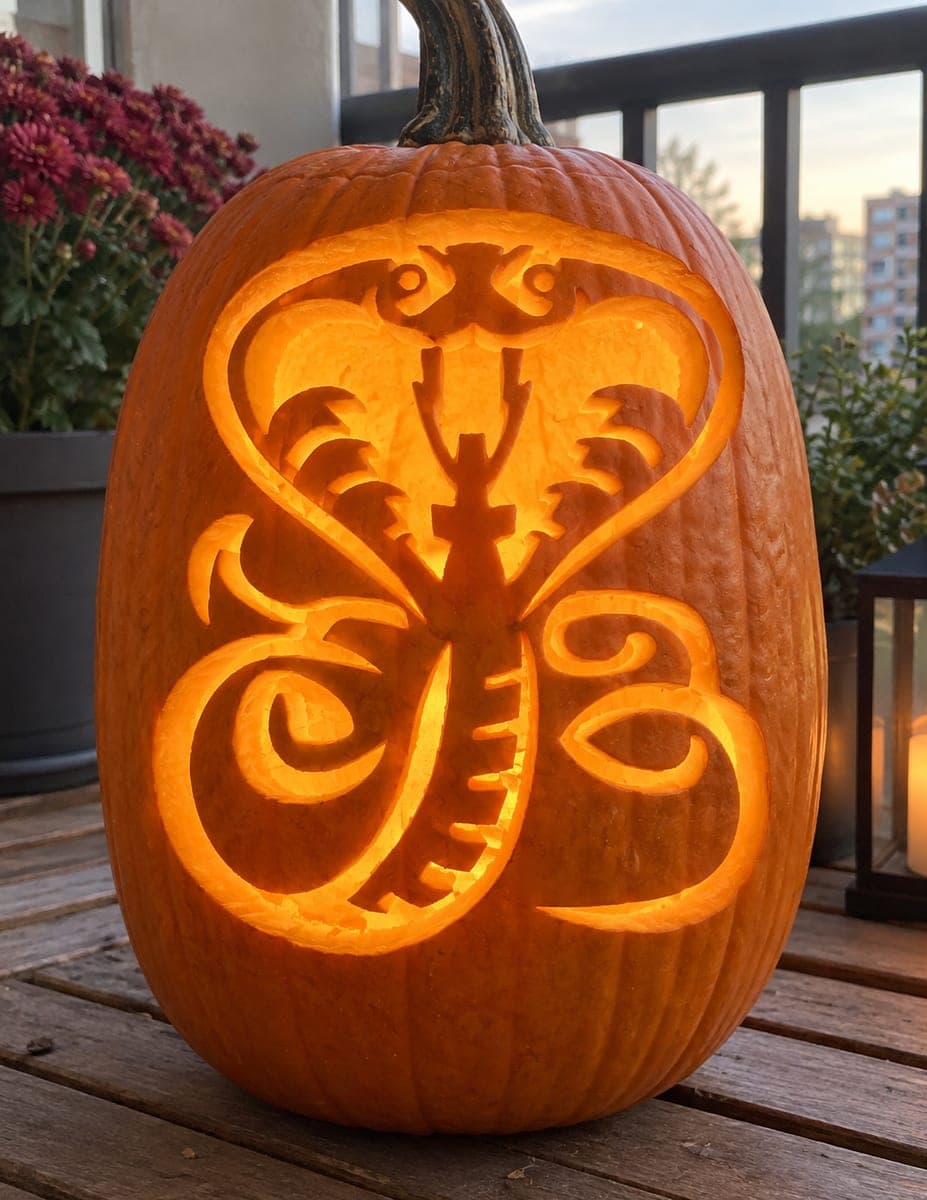
Ornamental Cobra With a Wide Hood PumpkinAI
0

Ornamental Cobra With a Wide Hood Pumpkin

A highly ornamental cobra spreads its full hood at the top of the design, its body curling into symmetrical loops decorated with scrollwork and scale-like interior details, all carved as a complex cutout that fills the tall pumpkin from top to bottom. The scrolling body coils and the decorative elements inside the hood are pierced as separate channels with dark skin acting as the linework, giving this pumpkin carving idea an almost tribal tattoo quality when lit. Tape the pattern securely along the hood's widest point before starting, and cut the fine interior scroll channels before the outer body outline so the design stays anchored to the pumpkin skin.

This is an AI-generated concept image: a realistic, carvable design idea rather than a photo of a finished carve. AI concepts are always labeled and sit out the leaderboard and the contest.

No ratings yet · Sign in to rate

Comments (0)

  • No comments yet — be the first.

Save without an account. Sign in to like or comment.

Our tips for carving a similar design

The core trick here is treating the untouched pumpkin skin as the linework, so the whole design reads like a tribal tattoo when lit from behind. You cut narrow channels for the scrolls, scales, and hood details while leaving thin ribbons of skin between them to hold everything together. Work the fine interior lines first and save the big open areas for the very end so the pattern stays anchored the whole time.

Written by PumpkinCarvingIdeas.com, inspired by the image above. These are our suggestions, not instructions from the uploader. This approach to the AI concept has not been tested on a real pumpkin.

From pumpkin to porch

  1. Prep the pumpkin and pick a tall canvas

    Choose a tall, fairly smooth pumpkin so the cobra can stretch from the hood at the top to the coiled loops at the bottom. Cut a lid from the back rather than the top so the front stays uninterrupted, and scoop the inside until the front wall is about one inch thick. A thinner wall makes the fine channels much easier to cut cleanly. Dry the inside with a towel before you tape on the pattern.

  2. Transfer and tape the pattern securely

    Center the printed pattern and tape it down firmly along the hood's widest point first, since that is where the paper wants to lift. Poke closely spaced transfer dots along every scroll line, scale mark, and the outer body outline. Pull the paper and connect the dots lightly with a washable marker if the pattern feels busy. Take a photo of the full design so you have a reference once the paper is off.

  3. Cut the fine interior scroll and scale channels first

    Start with the thin decorative channels inside the hood and along the body, using a small detail saw or a fine gouge. Keep each channel narrow and leave a ribbon of skin between neighboring cuts so the linework stays crisp and the piece stays strong. Cutting these interior details before the big outline keeps the design anchored to the surrounding skin. Go slow and let the tool do the work rather than forcing it.

  4. Open the symmetrical loops and coils

    Move to the curling body loops at the bottom, cutting the scrollwork openings that separate the coils. Work from the center outward so both sides stay balanced and matched. Leave clear bridges of skin at the tightest curls so the loops do not collapse into one big hole. Check often against your reference photo to keep the symmetry even.

  5. Cut the wide hood opening last

    Save the largest openings in the spread hood for the end, since removing them earlier would weaken everything around them. Cut just inside your marked lines, then clean the edges with gentle bevel passes for a smooth glow. Ease each freed piece out with a fingertip rather than yanking it. If a thin bridge tears, a toothpick and a dab of glue can splint it back in place.

  6. Light it and photograph at dusk

    Drop in one or two battery LED lights and skip candles, which scorch the fine bridges and dull the crisp edges. Set the pumpkin on a porch or table and shoot at dusk so the warm interior glow reads against a darker background. Rotate the light until the hood is evenly bright and the scroll lines stand out as dark tracing. A little front fill light keeps the skin from going flat.

Gather your supplies

Check things off as you get ready.

Work on a stable surface, keep your free hand out of the cutting path, and have an adult handle sharp tools.

Three levels of light

  • Leave intact

    The thin ribbons of skin between channels that form the cobra's scale lines and scroll outlines stay dark as the linework

  • Peel & shade

    Shallow-shaved edges and bevels around the hood openings for a soft mid glow that frames the shapes

  • Cut through

    The open hood areas and the negative spaces inside the scrolling coils, which read brightest

Learn the carving basics

Before you start cutting

How do I keep the scrollwork from falling apart?

The whole design relies on thin skin bridges between the channels, so cut the small interior lines before the big openings while the surrounding skin still supports them. Keep channels narrow and never let two cuts merge unless the pattern says so. If a bridge does snap, splint it with a toothpick and a little glue.

Do I need both sides of the hood to match exactly?

The symmetry is what gives this cobra its ornamental look, so it is worth the effort. Work from the center outward and cut matching elements on each side in pairs rather than finishing one whole side first. Check against your reference photo often to catch drift early.

This is a concept image, so can a real pumpkin hold this much detail?

Yes, if you thin the front wall to about an inch and keep every channel narrow with skin left between them. Simplify the busiest clusters of scrollwork if your pumpkin skin is soft or bruised. A crisp, dry surface and a fine saw make dense linework realistic to pull off.

Your take belongs here, too.

Changed a detail? Made it simpler? Share a photo of your version and tell the community what worked.

Share your pumpkin

More pumpkins like this

You've reached the end · 8 pumpkins
The Patch Report

Fresh pumpkins, in your inbox.

The best new carvings, ideas worth stealing, and how-tos for carving season. Short, seasonal, and gone by November.

A short email during carving season. Unsubscribe anytime. See our privacy policy.