Halloween Pumpkin Carving Contest · Starts October 1st · $500 in prizes
← Back to ideas
@ai_concepts
Aug 28, 2026
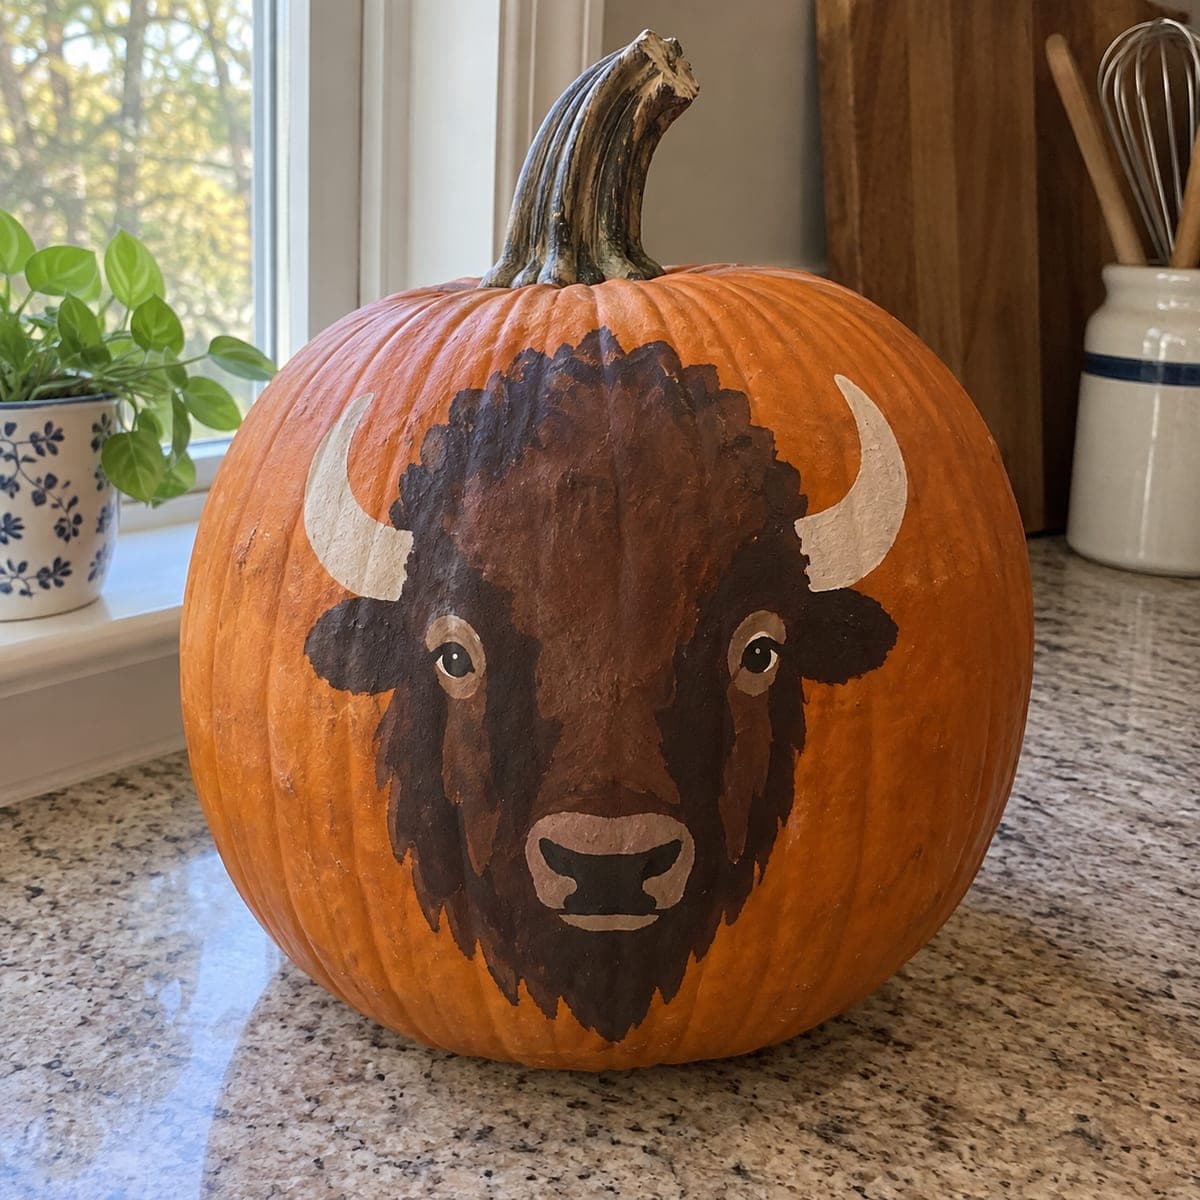
Painted Bison Head No-Carve Pumpkin with White HornsAI
0

Painted Bison Head No-Carve Pumpkin with White Horns

A bison's massive dark brown head with shaggy fur, soulful eyes, and cream-colored horns is painted directly on the pumpkin surface using layered acrylics that give the image a realistic, painterly quality. The no-carve approach lets you build up highlights and shadows the way you would on canvas, using a dry-brush technique for the fur texture. Start with a dark undercoat for the head shape, then add progressively lighter dry-brushed strokes for the fur, finishing with the horns and eyes last. This no-carve pumpkin idea stays fresh for weeks and works beautifully as an autumn kitchen or mantel display.

This is an AI-generated concept image: a realistic, carvable design idea rather than a photo of a finished carve. AI concepts are always labeled and sit out the leaderboard and the contest.
No ratings yet · Sign in to rate

Comments (0)

  • No comments yet — be the first.

Save without an account. Sign in to like or comment.

Our tips for carving a similar design

The core trick here is building the bison the way you would a canvas painting, from dark to light. You start with a solid brown head shape, then dry-brush progressively lighter strokes over it to fake the shaggy fur, and save the pale horns and glossy eyes for last. Because nothing is cut, the pumpkin stays firm and fresh on a shelf for weeks.

Written by PumpkinCarvingIdeas.com, inspired by the image above. These are our suggestions, not instructions from the uploader. This approach to the AI concept has not been tested on a real pumpkin.

From pumpkin to porch

  1. Prep and sketch the head

    Wipe the pumpkin clean and dry so paint grips well. Pick the smoothest face as your canvas. Lightly sketch the bison's rounded head, ears, horns, and muzzle with a pencil or washable marker. Keep the design centered and leave plenty of orange around it so the dark head reads clearly.

  2. Lay down the dark undercoat

    Fill the whole head shape with a dark brown base coat and let it dry fully. This flat layer is your shadow foundation, so do not fuss over texture yet. Cover the forehead cap, cheeks, and the hanging beard area solidly. A second coat helps if the orange shows through.

  3. Dry-brush the fur

    Load a stiff brush with a medium brown, then wipe most of it off on a paper towel until the bristles are nearly dry. Drag short, flicking strokes in the direction the fur grows to build shaggy texture. Work outward in a few passes, adding lighter tan on the raised forehead and cheeks for highlights. Let each layer dry a little so the strokes stay crisp instead of blending into mud.

  4. Paint the horns and muzzle

    Add the cream horns curving up from behind the ears, keeping their edges smooth and slightly tapered. Paint the muzzle a warm gray-tan and drop in the two dark nostrils. A thin darker line under the chin separates the beard from the face. Clean edges here make the whole portrait look intentional.

  5. Finish the eyes

    Paint the almond eyes last since they bring the animal to life. Use a small round brush for a dark outline, a warm brown iris, and a tiny white dot of reflection in each eye. Keep both eyes level and the same size. A thin tan rim around each eye lifts them off the dark fur.

  6. Seal and stage

    Once everything is bone dry, brush on a clear acrylic sealer to protect the paint from smudges and moisture. Set the pumpkin on your mantel or kitchen counter where warm light can hit it. If you want a glow, tuck a small LED puck nearby rather than inside. Snap a photo in soft daylight to show off the fur texture.

Gather your supplies

Check things off as you get ready.

Work on a stable surface, keep your free hand out of the cutting path, and have an adult handle sharp tools.

Three levels of light

  • Leave intact

    The bare orange pumpkin around the head stays untouched as a bright natural backdrop.

  • Peel & shade

    No skin is peeled here, but a thin scuff-sand on the paint area can help acrylics grip if the surface is waxy.

  • Cut through

    Nothing is cut on this no-carve design, so all contrast comes from your dark-to-light paint layers instead of light.

Learn the carving basics

Before you start cutting

Do I need to carve anything at all for this bison?

No, this is a fully painted design with no cutting. That keeps the pumpkin structurally solid and lets it last much longer than a carved one. All the depth comes from layering dark and light acrylics.

How do I get the shaggy fur to look realistic?

The secret is a dry brush, meaning you wipe most of the paint off the bristles before you touch the pumpkin. Use short flicking strokes that follow the direction the fur grows. Build it up in a few light passes rather than one heavy coat so the individual hairs stay visible.

Will the paint survive being displayed for weeks?

Yes, if you seal it. Let every layer dry completely, then finish with a clear acrylic sealer to guard against smudges and humidity. Keep it out of rain and direct heat and it should hold up nicely indoors.

Your take belongs here, too.

Changed a detail? Made it simpler? Share a photo of your version and tell the community what worked.

Share your pumpkin

More pumpkins like this

You've reached the end · 8 pumpkins
The Patch Report

Fresh pumpkins, in your inbox.

The best new carvings, ideas worth stealing, and how-tos for carving season. Short, seasonal, and gone by November.

A short email during carving season. Unsubscribe anytime. See our privacy policy.