Halloween Pumpkin Carving Contest · Starts October 1st · $500 in prizes
← Back to ideas
@ai_concepts
Sep 25, 2026
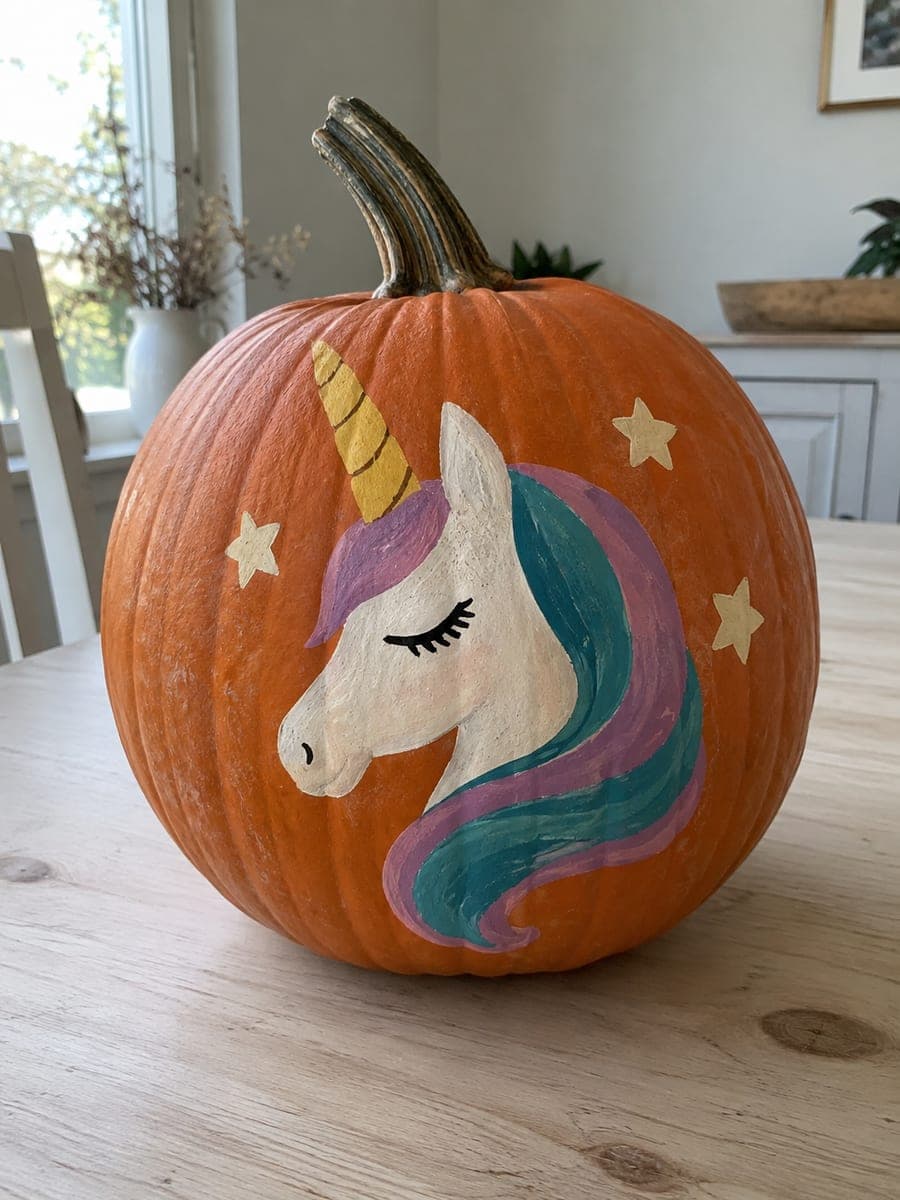
Painted Cream Unicorn Pumpkin with Mauve Mane SwishesAI
0

Report this carving

Tell us what is wrong. Reports are private.

Painted Cream Unicorn Pumpkin with Mauve Mane Swishes

A cream unicorn head with mauve and teal mane swishes, a mustard horn, a curved black eyelash, and three cream stars is painted in flat acrylics on an intact pumpkin for this easy no-carve unicorn pumpkin carving. Begin with the cream base for the face and let it dry before adding the colorful mane curves, which are the most expressive part of the design. The eyelash detail is easier to add with a thin liner brush than a regular craft brush. Soft morning light on a pale wooden table shows off the delicate pastel palette without washing it out.

No ratings yet · Sign in to rate
Comments (0)

  • No comments yet — be the first.

Save without an account. Sign in to like or comment.

Our tips for carving a similar design

A cream unicorn face with mauve and teal flowing mane swishes, a mustard horn, a fine curved eyelash, and three small cream stars is painted entirely on an intact pumpkin using flat acrylics. The most expressive element is the mane, so getting the cream base fully dry before painting the swishes is critical to keeping the colors clean and vivid. A liner brush for the eyelash and stars is the one tool upgrade that makes the biggest visual difference.

From pumpkin to porch

  1. Wipe and dry the surface

    Clean the pumpkin face with a barely damp cloth and allow fifteen minutes for it to dry completely. Acrylic will peel from a waxy surface, so a quick wipe removes any coating that was applied at harvest.

  2. Sketch the face and mane placement

    Lightly pencil in a circle for the unicorn face, the horn position above the forehead, and loose arcs for the mane swishes on the upper right side. Mark the three star positions on the left side to balance the mane.

  3. Apply the cream face base

    Use a wide flat brush to fill the face circle with cream acrylic in two thin coats. Let the second coat dry fully, at least fifteen minutes, before touching any other color on top.

  4. Paint the mane swishes

    Load a medium round brush with mauve and sweep three to four bold curved strokes across the upper right of the face, following your pencil sketches loosely. Rinse the brush and repeat with teal, layering one or two teal swishes between the mauve ones for depth.

  5. Add the horn, eyelash, and stars

    Use the round brush to paint the mustard horn as a slim triangle above the forehead. Switch to a fine liner brush for the single curved eyelash arc below the eye position. Add three simple cream star shapes on the left side with the liner brush tip.

  6. Seal and display

    Once all layers are dry to the touch, apply a thin coat of matte acrylic medium over the whole design. Display on a pale wooden table in soft morning light where the pastel palette glows without harsh shadows.

Written with AI to match this design

Gather your supplies

Check things off as you get ready.

Work on a stable surface, keep your free hand out of the cutting path, and have an adult handle sharp tools.

Three levels of light

  • Leave intact

    The bare orange rind outside the painted face circle remains as the natural background.

  • Peel & shade

    None. The shell is never broken in this no-carve design.

  • Cut through

    None. Place near a lamp or in diffuse natural light to illuminate the design from the front.

Learn the carving basics

Before you start cutting

How do I get the mane swishes to look fluid rather than stiff?

Load the brush fully and lay it on its side so the belly of the bristles make contact with the pumpkin, then sweep through the arc in a single confident motion. Short, hesitant strokes produce stiff-looking lines. Practice the stroke a few times in the air before committing to the surface.

Cream paint over orange rind looks peachy rather than cream. How do I fix this?

Apply a thin coat of titanium white first to opaque the orange, then apply the cream tone on top. Alternatively, mix a tiny amount of white into your cream paint to boost its opacity and coverage.

The eyelash looks too thick with a regular brush. What brush should I use?

A liner brush, sometimes sold as a script liner or striping brush, has extra-long bristles that hold a fine line across the full arc. If you do not have one, the tip of a toothpick dipped in paint also works for a single curved eyelash stroke.

Your take belongs here, too.

Changed a detail? Made it simpler? Share a photo of your version and tell the community what worked.

Share your pumpkin

More pumpkins like this

You've reached the end · 8 pumpkins
The Patch Report

Fresh pumpkins, in your inbox.

The best new carvings, ideas worth stealing, and how-tos for carving season. Short, seasonal, and gone by November.

A short email during carving season. Unsubscribe anytime. See our privacy policy.