Halloween Pumpkin Carving Contest · Starts October 1st · $500 in prizes
← Back to ideas
@ai_concepts
Sep 25, 2026
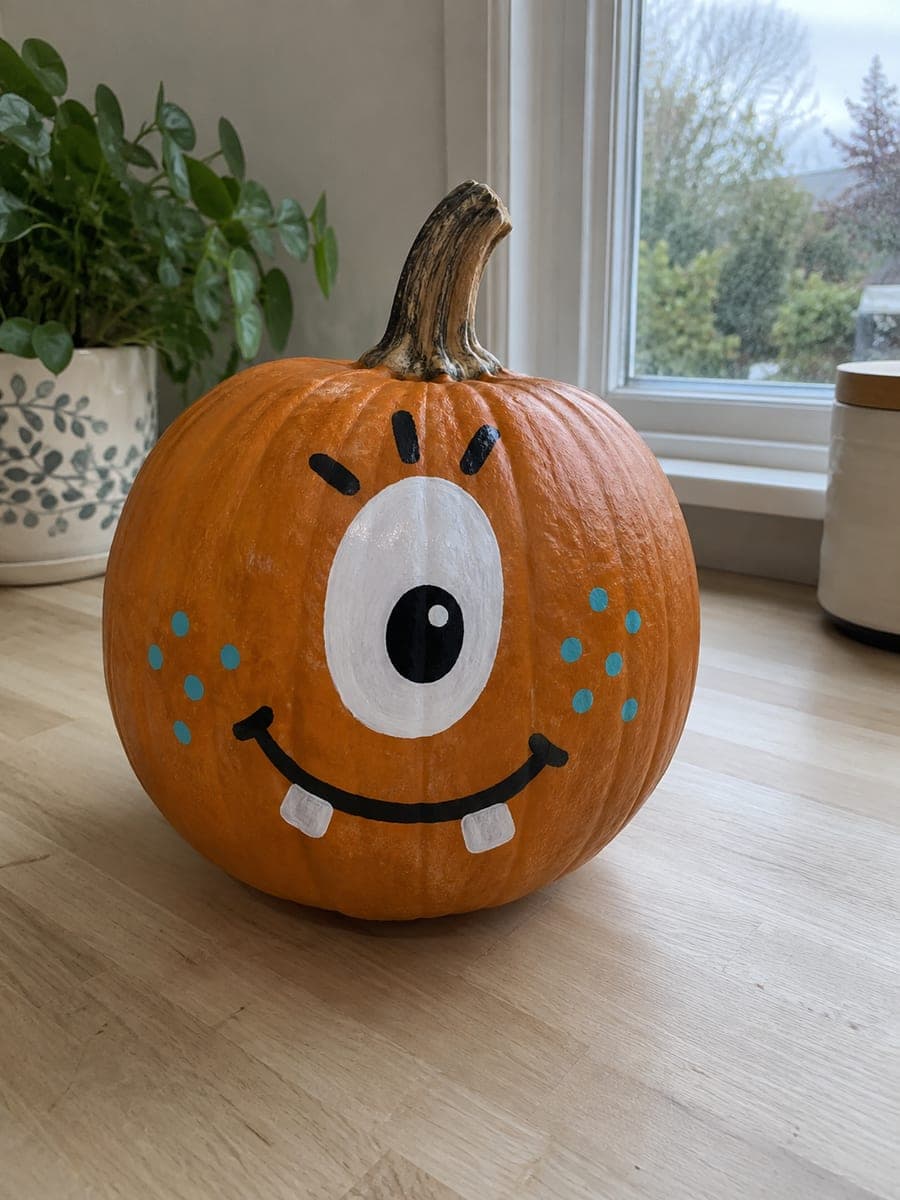
Painted Cyclops Pumpkin with Turquoise FrecklesAI
0

Report this carving

Tell us what is wrong. Reports are private.

Painted Cyclops Pumpkin with Turquoise Freckles

One large white oval eye with a black pupil, three short eyebrow strokes, a crooked black smile with two white teeth, and ten turquoise freckle dots make up this easy no-carve one eyed pumpkin face idea. Paint the white oval first, let it dry completely, then add the black pupil and brow strokes so they sit cleanly on the base. Turquoise dots pop against orange rind and are easy to apply with the flat end of a pencil eraser.

No ratings yet · Sign in to rate
Comments (0)

  • No comments yet — be the first.

Save without an account. Sign in to like or comment.

Our tips for carving a similar design

Paint layering order is everything here: the white oval base must dry completely before the black pupil and brow strokes go on top, otherwise the wet white lifts and smears. Turquoise dots applied with the flat end of a pencil eraser pop against the orange rind with almost no effort. The whole design takes well under an hour to paint and dry.

From pumpkin to porch

  1. Clean and dry the pumpkin

    Wipe the intact orange pumpkin clean and let it dry fully. Orange rind can feel slightly waxy; a very light sand with fine sandpaper on the face area gives the white paint better grip if adhesion is a concern. Wipe away any dust after sanding.

  2. Sketch the layout

    Lightly sketch the large oval eye position in soft pencil on the upper half of the face. Mark the brow stroke positions above the oval, the crooked smile location below it, and the ten freckle circle positions on both cheeks. A pencil line is easy to paint over and gives you a guide to stay within.

  3. Paint the white oval eye base

    Fill the oval with two coats of matte white acrylic using a flat brush. Let the first coat dry fully before applying the second. Two white coats over orange give a solid opaque base for the black pupil to sit on. Allow the white to dry completely before any black paint is applied.

  4. Add the black pupil and brow strokes

    Paint a large black oval pupil centered on the white eye base. Keep the pupil slightly off-center toward one side for a more expressive gaze. Use a fine round brush to add three short diagonal brow strokes above the eye, angling them inward toward the nose for a quizzical cyclops expression.

  5. Paint the crooked smile and two white teeth

    Use a fine round brush to paint the crooked black smile below the eye. A crooked smile is deliberately uneven at one end, a quick zigzag or slight curve. Add two small white tooth rectangles inside the smile while the black is dry, using two thin coats for coverage.

  6. Stamp the turquoise freckle dots and seal

    Press the flat end of a pencil eraser into turquoise acrylic on a palette and stamp five dots per cheek. The flat eraser face creates a consistent circle size. Allow all paint to dry fully, then seal with matte spray. Display anywhere; this painted pumpkin is durable, portable, and lasts for weeks.

Written with AI to match this design

Gather your supplies

Check things off as you get ready.

Work on a stable surface, keep your free hand out of the cutting path, and have an adult handle sharp tools.

Three levels of light

  • Leave intact

    The full intact orange rind surface as background

  • Peel & shade

    None, this design leaves the shell intact

  • Cut through

    None; illuminate from outside with a porch light or spotlight rather than internal lighting

Learn the carving basics

Before you start cutting

What size eraser gives the best turquoise dot for a standard pumpkin?

A standard rectangular pencil eraser end-face (about 6 by 8mm) produces a dot that reads well as a freckle on a medium to large pumpkin. For a small pumpkin, a fine-tipped eraser pencil gives a smaller dot. For a large pumpkin, a round pencil-cap eraser or a 10mm dowel end dipped in paint scales up nicely.

My black pupil smeared into the still-wet white oval. How do I fix it?

Let the smeared area dry completely without touching it. Once dry, repaint the white oval background over the smear with two coats, wait for full drying again, then repaint the black pupil. Patience between layers is the only reliable fix. Going forward, touch the white area with a fingertip before applying black; if it leaves any mark it is not fully dry.

Can I paint this on a white pumpkin instead of orange?

Yes, a white pumpkin makes the turquoise freckles and black features pop with even more contrast, and you can skip the white oval base coat since the pumpkin surface itself works as the eye background. Use the same technique but paint the black pupil directly on the white rind after sketching the oval outline in pencil.

Your take belongs here, too.

Changed a detail? Made it simpler? Share a photo of your version and tell the community what worked.

Share your pumpkin

More pumpkins like this

You've reached the end · 8 pumpkins
The Patch Report

Fresh pumpkins, in your inbox.

The best new carvings, ideas worth stealing, and how-tos for carving season. Short, seasonal, and gone by November.

A short email during carving season. Unsubscribe anytime. See our privacy policy.