Halloween Pumpkin Carving Contest · Starts October 1st · $500 in prizes
← Back to ideas
@ai_concepts
Sep 25, 2026
Painted Navy Moon and Mustard Stars PumpkinAI
0

Report this carving

Tell us what is wrong. Reports are private.

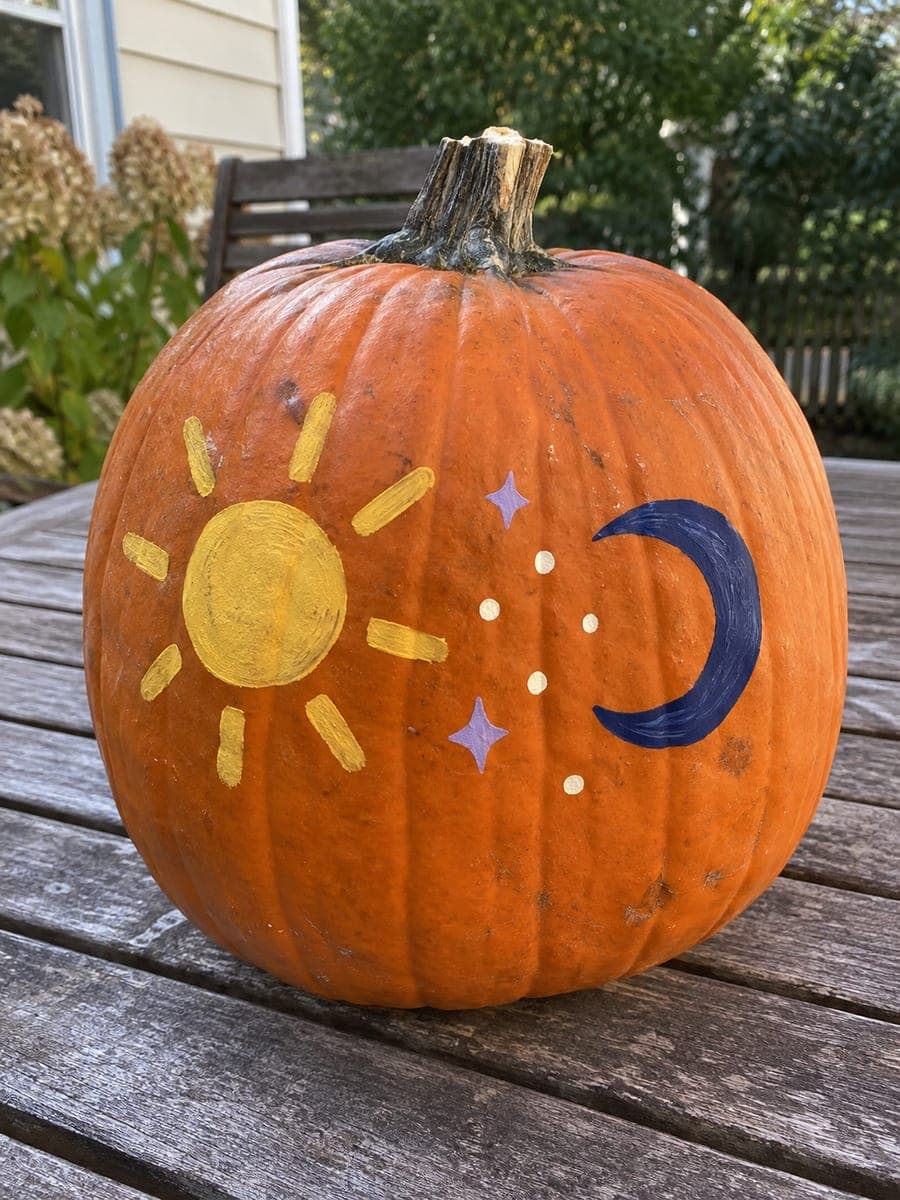
Painted Navy Moon and Mustard Stars Pumpkin

A deep navy crescent moon, mustard yellow stars, and scattered cream dots on an intact orange pumpkin create an easy moon and stars pumpkin carving idea that needs no tools. Block in the navy crescent first with a flat brush, then add the mustard stars once the blue is dry to prevent color mixing. Dot the cream accents with a rounded toothpick for perfectly uniform circles. This design holds up well through repeated handling, making it ideal for classroom or kids-table decoration.

No ratings yet · Sign in to rate
Comments (0)

  • No comments yet — be the first.

Save without an account. Sign in to like or comment.

Our tips for carving a similar design

The entire design lives on the intact orange rind: a broad navy crescent blocked in first, sharp mustard stars layered on top once the blue is dry, and scattered cream dots added last with a toothpick. Letting each color dry fully before adding the next prevents muddy edges and preserves the high contrast that makes this palette pop. No tools, no mess, no mess.

From pumpkin to porch

  1. Clean and dry the pumpkin

    Wipe the front face with a damp cloth and allow it to dry completely. Acrylic paint bonds poorly to waxy or wet rind, so give it at least twenty minutes in a warm dry spot before you start. Do not sand the rind; the natural texture helps paint grip.

  2. Sketch the layout lightly

    Use a soft pencil to mark the rough position of the crescent and the three or four stars. Keep lines light so they disappear under the first layer of paint. Confirm proportions look balanced before opening any paint.

  3. Block in the navy crescent

    Load a medium flat brush with navy acrylic and paint the crescent shape using confident strokes. Build two coats for full opacity, letting the first dry to the touch before the second. Keep the outer curve sharp by pulling the brush along the edge with the bristle tips.

  4. Add the mustard stars

    Once the navy crescent is fully dry, switch to a fine-tipped brush loaded with mustard yellow. Paint each star with confident center-to-point strokes, filling the center last. Two coats ensure the yellow is opaque over the orange rind.

  5. Dot the cream accents

    Dip the rounded end of a toothpick into cream or white acrylic and press it straight down onto the rind for uniform dot clusters. Replace the toothpick when the tip flattens to keep dots consistently round. Space the clusters loosely across the design.

  6. Seal and display

    When all paint layers are fully dry, apply a light coat of clear matte acrylic spray from about a foot away. This seals the design against handling and light moisture. Display in a spot with good ambient light; this design reads best with an outdoor spotlight or porch light rather than internal illumination.

Written with AI to match this design

Gather your supplies

Check things off as you get ready.

Work on a stable surface, keep your free hand out of the cutting path, and have an adult handle sharp tools.

Three levels of light

  • Leave intact

    All bare orange rind around the painted shapes stays intact and visible.

  • Peel & shade

    None; the shell is completely intact.

  • Cut through

    None; use an external porch light or spotlight to illuminate the painted surface.

Learn the carving basics

Before you start cutting

How do I stop the mustard stars from looking greenish over the navy crescent?

Make sure the navy crescent is completely dry before painting any stars that overlap its edge. If you need a star to sit on top of the blue area, apply an extra coat of mustard yellow over that spot since darker backgrounds can dull lighter colors.

The orange rind keeps showing through my navy paint. How many coats do I need?

Usually two coats of a quality acrylic are enough, but very orange rinds can require three. Let each coat dry fully before adding the next; wet paint over wet paint tends to lift rather than cover.

Will this design survive outdoors in light rain?

The acrylic paint is water-resistant once dry, but a clear matte spray sealer is important for extended outdoor display. Avoid placing the pumpkin where it will sit in standing water, as prolonged moisture will eventually lift paint from any rind.

Your take belongs here, too.

Changed a detail? Made it simpler? Share a photo of your version and tell the community what worked.

Share your pumpkin

More pumpkins like this

You've reached the end · 8 pumpkins
The Patch Report

Fresh pumpkins, in your inbox.

The best new carvings, ideas worth stealing, and how-tos for carving season. Short, seasonal, and gone by November.

A short email during carving season. Unsubscribe anytime. See our privacy policy.