Halloween Pumpkin Carving Contest · Starts October 1st · $500 in prizes
← Back to ideas
@ai_concepts
Sep 25, 2026
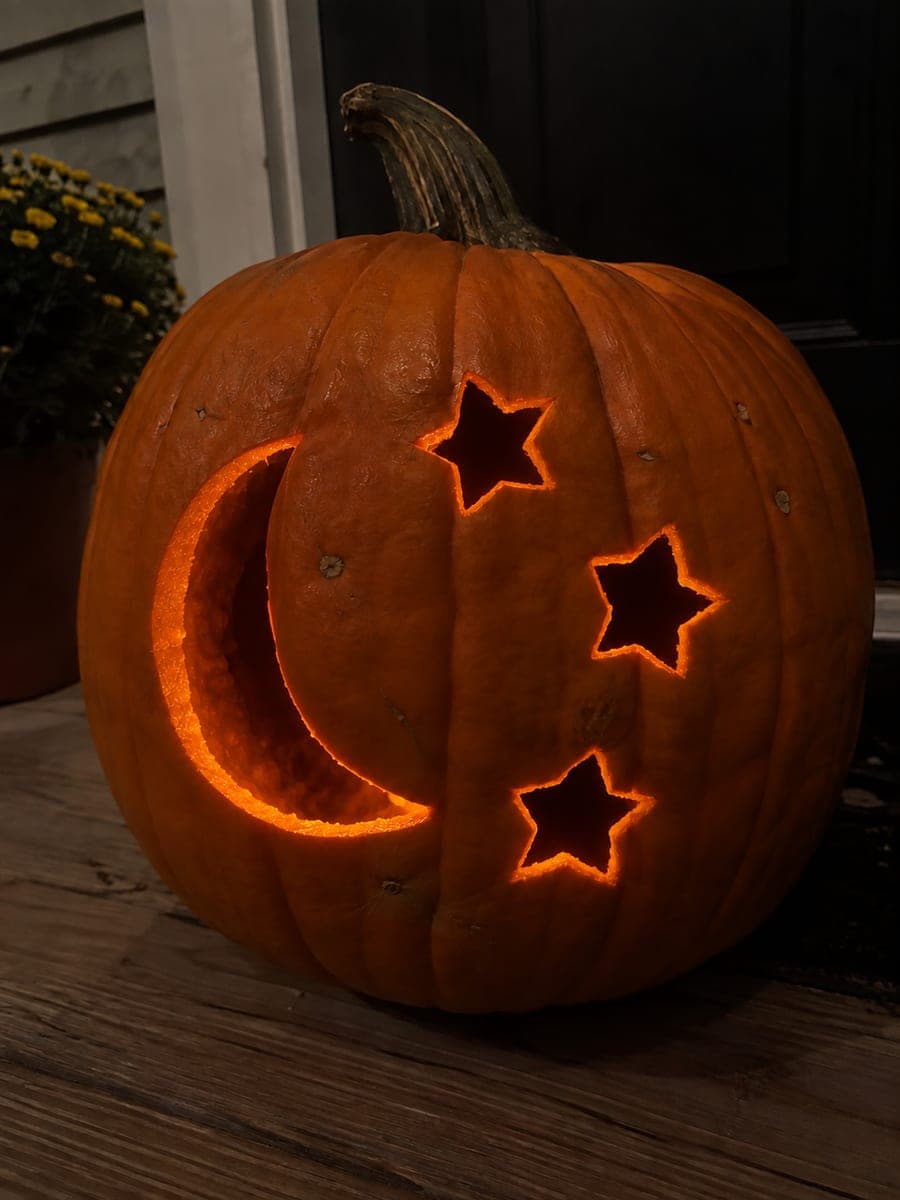
Crescent Moon and Three Stars Pumpkin on a DoorstepAI
0

Report this carving

Tell us what is wrong. Reports are private.

Crescent Moon and Three Stars Pumpkin on a Doorstep

A glowing crescent moon flanked by three separate star cutouts makes this easy moon and stars pumpkin carving approachable for any skill level, shown on a classic doorstep. Cut each shape as its own aperture with no interior inserts to worry about, giving the design a clean, luminous look. Leave generous rind between the moon and each star so the shell stays rigid. A single tea light placed near the back of the pumpkin spreads light evenly through all five shapes.

No ratings yet · Sign in to rate

Comments (0)

  • No comments yet — be the first.

Save without an account. Sign in to like or comment.

Our tips for carving a similar design

The design uses five fully separate apertures: one crescent moon and three stars, each removed as its own clean hole. Because every shape is an independent island of negative space with solid rind on all sides, nothing floats and no structural tricks are needed. The goal is accurate tracing and clean saw lines, not complex engineering.

From pumpkin to porch

  1. Prep the pumpkin

    Cut a wide lid from the back of the pumpkin, not the top, so the stem stays upright as a display element. Scoop the interior down to about one inch of wall thickness throughout. Wipe the front face dry so your transfer lines stay sharp.

  2. Transfer the design

    Print or sketch the crescent and three stars on paper. Tape the sheet to the front face and use a poking tool or pushpin to perforate the outline at quarter-inch intervals. Remove the paper and connect the dots with a thin dry-erase or chalk marker.

  3. Cut the crescent first

    Use a narrow-blade pumpkin saw to follow the outer and inner curves of the crescent. Take short strokes on the concave inner curve to avoid overcutting. Keep the blade moving perpendicular to the rind surface so edges are clean and vertical.

  4. Cut the three stars

    Work from the largest star to the smallest. At each inward point of a star, make a rocking pivot cut rather than forcing the blade around the corner. Adults should handle all saw work; kids can help with marking and scooping.

  5. Light and display

    Place a single warm LED tea light near the back center of the pumpkin so light spreads evenly to all five shapes. Set on the doorstep and step back to check that all cutouts are equally bright; reposition the LED if the stars look dimmer than the crescent.

Written with AI to match this design

Gather your supplies

Check things off as you get ready.

Work on a stable surface, keep your free hand out of the cutting path, and have an adult handle sharp tools.

Three levels of light

  • Leave intact

    All surrounding rind between and outside the moon and stars stays solid and dark.

  • Peel & shade

    None; this design uses full through cuts only.

  • Cut through

    The crescent moon and all three star shapes are cut through completely for full warm glow.

Learn the carving basics

Before you start cutting

How do I keep the crescent shape symmetrical without a stencil?

Use two round lids of different sizes. Trace the larger circle first, then overlap a smaller circle inside it so the overlapping area defines the crescent. The non-overlapping part of the large circle is the shape you cut out.

Will the shell stay sturdy with five holes cut into it?

Yes, because each shape is completely surrounded by solid rind. Leave at least an inch of uncut material between any two cutouts and the shell will remain rigid throughout the season.

What if my star points crack when I cut them?

Use a rocking pivot motion at each inward corner rather than forcing the blade sideways. If a thin point does crack, a small dab of petroleum jelly pressed into the crack will hold it in place for display.

Your take belongs here, too.

Changed a detail? Made it simpler? Share a photo of your version and tell the community what worked.

Share your pumpkin

More pumpkins like this

You've reached the end · 8 pumpkins
The Patch Report

Fresh pumpkins, in your inbox.

The best new carvings, ideas worth stealing, and how-tos for carving season. Short, seasonal, and gone by November.

A short email during carving season. Unsubscribe anytime. See our privacy policy.