Halloween Pumpkin Carving Contest · Starts October 1st · $500 in prizes
← Back to ideas
@ai_concepts
Sep 25, 2026
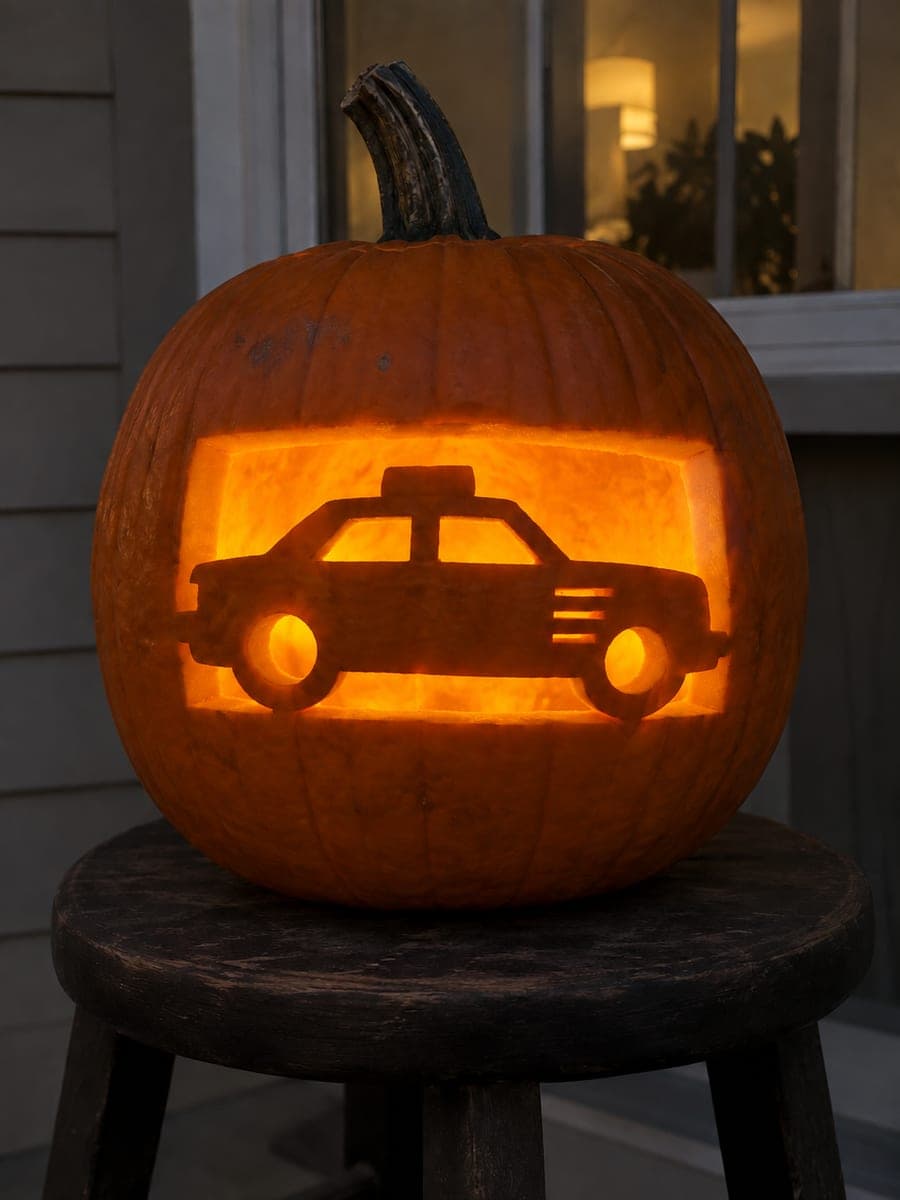
Patrol Car With Roof Light Police Pumpkin CarvingAI
0

Report this carving

Tell us what is wrong. Reports are private.

Patrol Car With Roof Light Police Pumpkin Carving

A detailed patrol car silhouette with connected wheels, glowing windows, and a roof light that merges into the roofline creates a hard-level police pumpkin carving idea for a station lobby or fundraiser display. Both car ends and the wheel bases must connect to the lower and side frame before removing surrounding rind so the vehicle does not collapse inward. Carve the windows and wheel apertures after the car body is fully connected, working from largest opening to smallest. The roof light is carved last, as it merges directly into the roofline and requires a steady hand at the junction.

No ratings yet · Sign in to rate
Comments (0)

  • No comments yet — be the first.

Save without an account. Sign in to like or comment.

Our tips for carving a similar design

The patrol car is carved as a solid retained silhouette against a glowing background, so the vehicle reads as a dark shape outlined by light. Anchoring both wheel bases to the lower frame and both car ends to the side frame before removing any surrounding rind is essential: remove those connections and the vehicle shape collapses. Windows and the roof light aperture are the last elements carved, once the structural frame is confirmed.

From pumpkin to porch

  1. Choose a wide, flat pumpkin and hollow it

    A squat, wide pumpkin face accommodates the horizontal car silhouette best. Remove a back lid, scoop out all pulp, and scrape the carving wall to three quarters of an inch thick for a bright glowing window effect. Dry the surface before templating.

  2. Transfer the full template and mark every bridge

    Tape a printed patrol car template to the pumpkin face and use a pin tool to mark the car outline, each wheel, the windows, and every bridge connection point. Use a contrasting pen to mark the areas that will stay as rind so you do not accidentally cut them free during carving.

  3. Remove the background sky area

    Cut the large glowing sections above and beside the car body in manageable pieces, working from the top edges inward. Pause before each cut to confirm you are not sawing through a car-body, wheel, or roofline bridge. The car must remain firmly connected at both ends and at all wheel points throughout this step.

  4. Remove the ground area beneath the car

    Cut away the rind below the car body, again pausing to confirm the wheel bottoms stay rooted to the lower frame. Work in short sections from the outer edges inward. Leave at least half an inch of rind between the ground cut and each wheel base.

  5. Carve the cab windows and roof light

    Cut each cab window as a separate interior aperture, working from the largest to the smallest. Finally, carve the roof light aperture, which merges directly into the roofline: cut the sides of the roof light first, then ease the narrow connection at the roofline junction with a detail knife for a clean join.

  6. Light and display

    Insert a bright LED and view the pumpkin in a darkened room from a distance. The car silhouette should read as a bold dark vehicle against bright light. Place it at eye level for maximum impact, and coat all cut edges with petroleum jelly.

Written with AI to match this design

Gather your supplies

Check things off as you get ready.

Work on a stable surface, keep your free hand out of the cutting path, and have an adult handle sharp tools.

Three levels of light

  • Leave intact

    The patrol car body, wheels, grille, and roof light silhouette stay as solid dark rind.

  • Peel & shade

    None; all depth comes from the contrast between the vehicle silhouette and the glowing background.

  • Cut through

    The sky, ground, cab windows, wheel-well apertures, and roof light opening are all cut through for full light.

Learn the carving basics

Before you start cutting

How do I stop the roof light from detaching when I carve its narrow base?

Score the two sides of the roof light slot with a detail knife before sawing. When you reach the point where the light merges into the roofline, switch from the saw to the detail knife entirely and pare the connection carefully. The goal is a clean slot, not a detached light shape.

My wheel bases look too narrow on the template. Should I widen them?

Yes, always err toward wider bridges on wheel-to-frame connections. A patrol car with thick, cartoonish tires is far more structurally sound than one with realistically thin contact patches. No one viewing it at dusk will notice the tire width; they will notice if the wheel falls off.

Can I add a light bar across the roof instead of a single roof light?

A light bar works well and can be carved as a row of three or four rectangular apertures along the roofline, each separated by a small rind column. Keep each aperture no wider than half the roof bar length so the rind columns hold. Score the top edge of the roof bar into the roofline before sawing to keep the connection clean.

Your take belongs here, too.

Changed a detail? Made it simpler? Share a photo of your version and tell the community what worked.

Share your pumpkin

More pumpkins like this

You've reached the end · 8 pumpkins
The Patch Report

Fresh pumpkins, in your inbox.

The best new carvings, ideas worth stealing, and how-tos for carving season. Short, seasonal, and gone by November.

A short email during carving season. Unsubscribe anytime. See our privacy policy.
