Halloween Pumpkin Carving Contest · Starts October 1st · $500 in prizes
← Back to ideas
@ai_concepts
Aug 15, 2026
Pink Frosted Donut No-Carve Painted PumpkinAI
0

Pink Frosted Donut No-Carve Painted Pumpkin

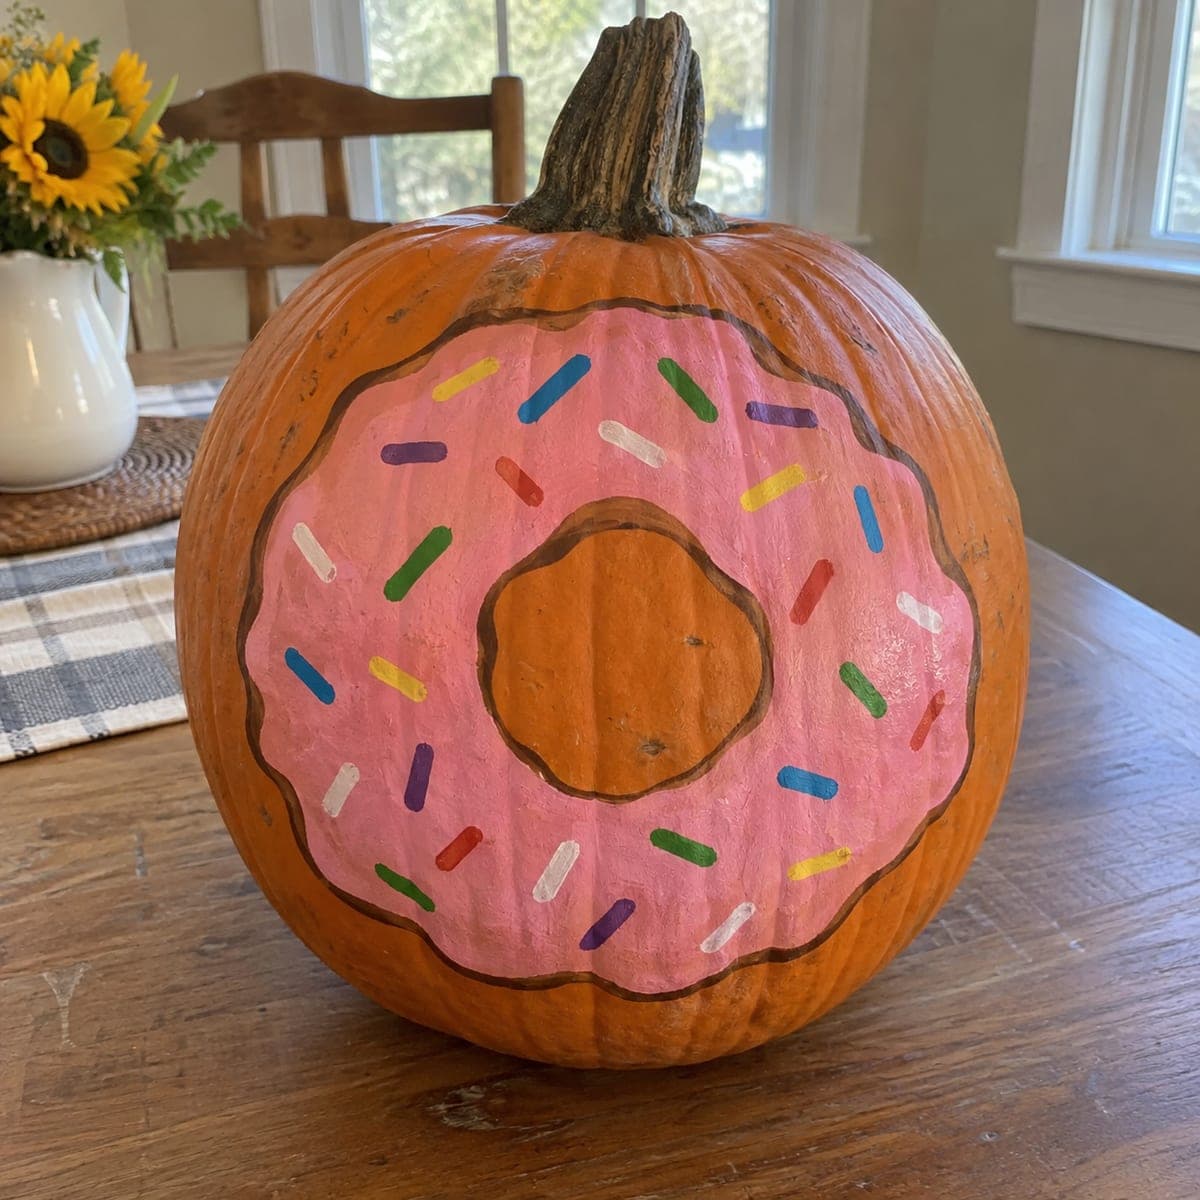
A pink-iced donut with colorful rainbow sprinkles is painted in cheerful detail on this uncut pumpkin, the circular frosting and donut hole perfectly centered to create a sweet trompe l'oeil effect. Acrylic craft paints in pink, white, and six sprinkle colors are all you need, and no special tools are required. Sketch the outer circle and hole in pencil first, fill with base coats, then add the scalloped frosting edge and individual sprinkle rectangles once the base is dry.

This is an AI-generated concept image: a realistic, carvable design idea rather than a photo of a finished carve. AI concepts are always labeled and sit out the leaderboard and the contest.

No ratings yet · Sign in to rate

Comments (0)

  • No comments yet — be the first.

Save without an account. Sign in to like or comment.

Our tips for carving a similar design

The whole trick here is trompe l'oeil: the pumpkin's own round shape becomes the donut, and its natural orange skin doubles as both the background and the donut hole in the center. You block in a pink frosting ring with a wavy drip edge, then scatter individual rainbow sprinkles on top once it dries. Because nothing gets cut, the plan is all about clean sketching and patient layering.

Written by PumpkinCarvingIdeas.com, inspired by the image above. These are our suggestions, not instructions from the uploader. This approach to the AI concept has not been tested on a real pumpkin.

From pumpkin to porch

  1. Clean and sketch

    Wipe the pumpkin with a damp cloth and let it dry fully so paint grips the skin. Using a soft pencil, draw a large circle for the outer frosting edge and a smaller centered circle for the donut hole. Keep the hole slightly below the true center so it reads right when the pumpkin sits on a table. Step back and check the shapes look even before you commit to paint.

  2. Base coat the frosting ring

    Fill the ring between your two pencil circles with pink acrylic, leaving the center hole bare so the orange skin shows through. Two thin coats look better than one thick one, so let each dry before adding the next. Keep your edges just inside the pencil lines for now. You will refine the drip shape in the next step.

  3. Add the scalloped drip edge

    Once the pink is dry, paint a slightly darker pink or brown outline along the outer and inner edges to suggest frosting. Give the outer edge gentle rounded bumps so it looks like icing dripping down. A thin round brush helps you control the curves. Take your time, since this outline is what sells the donut shape.

  4. Scatter the sprinkles

    When the frosting is fully dry, paint small rectangles in six colors: white, yellow, blue, green, purple, and red. Angle each sprinkle in a different direction so they look randomly scattered rather than lined up. Load only a little paint per stroke so each sprinkle stays crisp. Space them out and leave some pink showing between them.

  5. Seal and style

    Let everything cure for a few hours, then brush on a clear matte or gloss acrylic sealer to protect the paint. Set the finished pumpkin on a table with the donut facing out. For a soft evening glow, tuck a battery LED puck beside it rather than trying to light the pumpkin from inside. Snap your photo in daylight to catch the bright sprinkle colors.

Gather your supplies

Check things off as you get ready.

Work on a stable surface, keep your free hand out of the cutting path, and have an adult handle sharp tools.

Three levels of light

  • Leave intact

    The natural orange skin stays untouched as the donut hole in the center and the background around the frosting ring.

  • Peel & shade

    No peeling is needed on this no-carve design, but you could lightly sand a dull spot so the pink base coat sits smoother.

  • Cut through

    Nothing is cut on this painted pumpkin; if you want glow, set a battery LED beside it instead of hollowing it out.

Learn the carving basics

Before you start cutting

Do I need to hollow out the pumpkin for this?

No, this is a fully no-carve design, so the pumpkin stays whole and solid. That also means it lasts longer than a carved one since there is no cut flesh to rot. If you want a bit of evening light, just place a battery LED nearby.

What if my sprinkles look messy or crooked?

A little variation actually helps, since real sprinkles land at random angles. If one goes wrong, let it dry and dab pink over it, then repaint once that patch dries. Working with a thin brush and a small amount of paint gives you the most control.

Will acrylic paint stick to the pumpkin skin?

Yes, acrylic craft paint adheres well to a clean, dry pumpkin. Wipe off any wax or dirt first and use two thin coats for even color. A coat of clear sealer at the end keeps the colors from smudging.

Your take belongs here, too.

Changed a detail? Made it simpler? Share a photo of your version and tell the community what worked.

Share your pumpkin

More pumpkins like this

You've reached the end · 8 pumpkins
The Patch Report

Fresh pumpkins, in your inbox.

The best new carvings, ideas worth stealing, and how-tos for carving season. Short, seasonal, and gone by November.

A short email during carving season. Unsubscribe anytime. See our privacy policy.