Halloween Pumpkin Carving Contest Β· Starts October 1st Β· $500 in prizes
← Back to ideas
@ai_concepts
Aug 23, 2026
Proud Lion Silhouette Glowing Jack-O-LanternAI
0

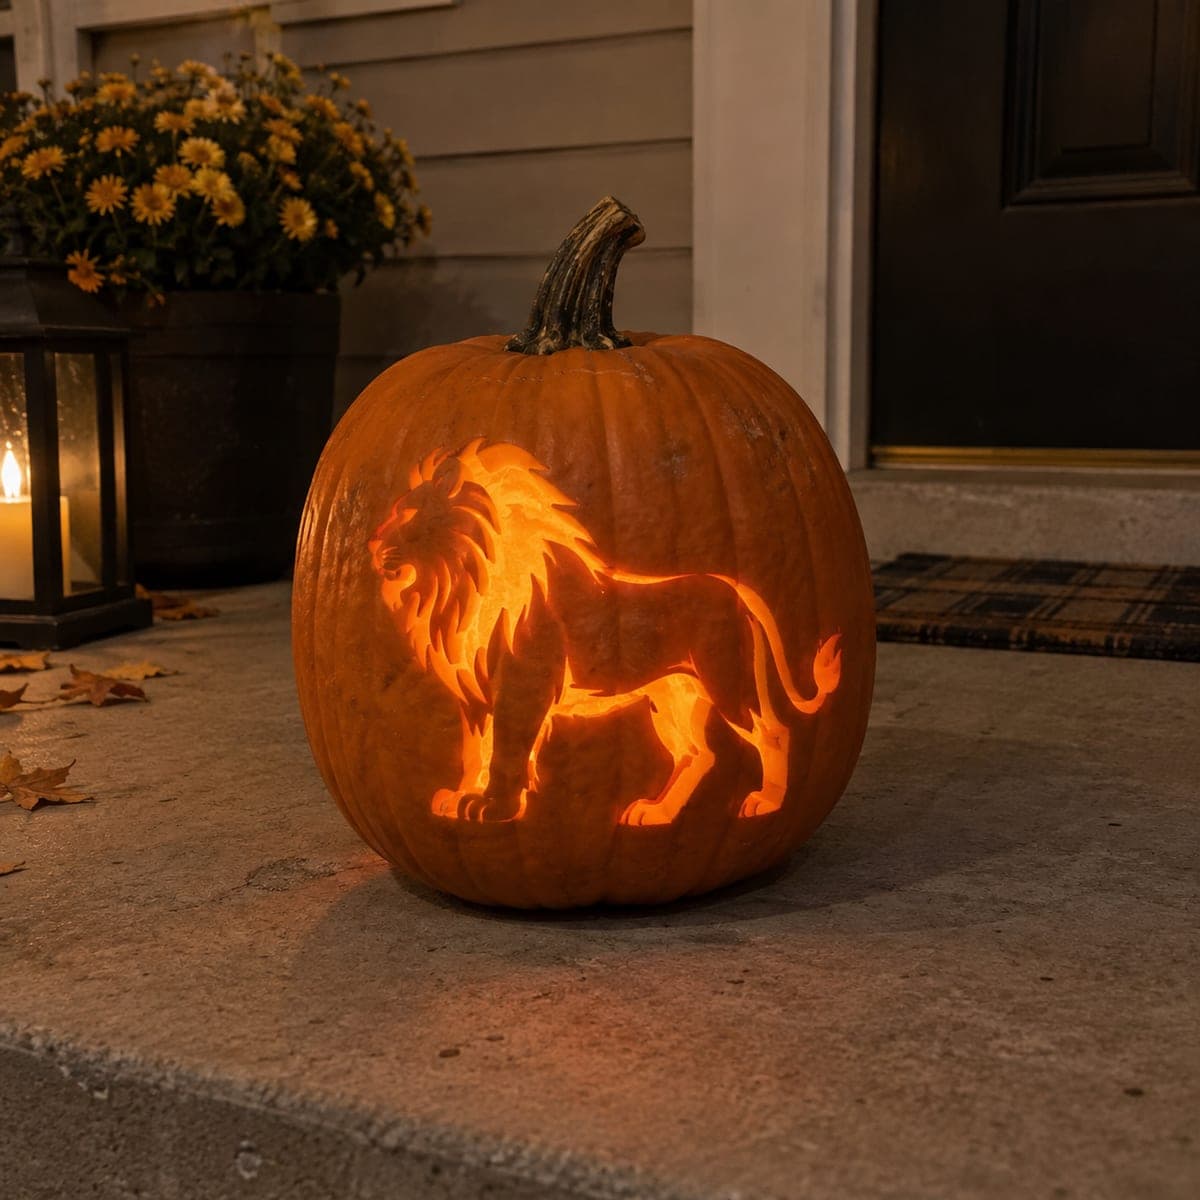
Proud Lion Silhouette Glowing Jack-O-Lantern

A full-body lion in profile stands with its mane flowing and tail curling, cut as a glowing silhouette against the orange wall of a Jack-O-Lantern. The entire figure is pierced through so warm candlelight outlines every detail of the mane, legs, and tail from within. Print a lion template to the pumpkin's scale, tape it on, and use a poking tool to transfer the outline before cutting with a thin detail saw blade. For the best silhouette effect, keep the interior of the pumpkin clean and position a bright LED directly behind the center of the design.

This is an AI-generated concept image: a realistic, carvable design idea rather than a photo of a finished carve. AI concepts are always labeled and sit out the leaderboard and the contest.

No ratings yet Β· Sign in to rate

Comments (0)

  • No comments yet β€” be the first.

Save without an account. Sign in to like or comment.

Our tips for carving a similar design

The whole trick here is a single clean silhouette: the lion is cut all the way through so the light inside becomes the animal itself, while the surrounding pumpkin skin stays dark. Print a lion template sized to fill one flat face of the pumpkin, transfer the outline carefully, then saw out the interior shapes and leave narrow skin bridges wherever the mane, legs, and tail need support. Keep the inside wall thin and clean so a single bright LED throws an even, warm glow through every opening.

Written by PumpkinCarvingIdeas.com, inspired by the image above. These are our suggestions, not instructions from the uploader. This approach to the AI concept has not been tested on a real pumpkin.

From pumpkin to porch

  1. Open the pumpkin and hollow it well

    Cut a lid from the bottom rather than the top so the design face stays intact and the pumpkin sits flat and stable. Scoop out all the seeds and pulp, then scrape the inside wall behind the design down to about one inch thick. A thinner wall makes the saw glide and lets more light pass through. Let an adult handle the large opening cut.

  2. Size and tape the template

    Print a full-body lion profile scaled to fill the front face without crowding the ribs. Trim the paper close, then tape it flat, snipping small darts around the curve so it lies smooth over the round surface. Center it so the mane sits toward the brightest part of your future light placement. Double check the whole figure fits before you mark anything.

  3. Transfer the outline

    Use a poking tool or a pushpin to punch closely spaced dots along every edge of the lion, the mane strands, the leg gaps, and the tail curl. Space the dots close together on tight curves like the mane tips and the tail tuft so you do not lose the shape. Peel the paper and connect any faint areas with a washable marker. Step back and confirm the silhouette reads clearly before cutting.

  4. Saw the small interior shapes first

    With a thin detail saw blade, start with the smallest enclosed openings, the gaps between legs and the negative spaces in the flowing mane. Hold the saw straight up and let it do the work with light pressure. Cutting the small shapes before the big ones keeps the pumpkin wall strong while you work. Push each freed piece inward and out.

  5. Cut the large body opening last, keep bridges

    Save the biggest cutout, the main body, for the end so the face does not weaken early. Leave a few narrow strips of skin as bridges where the mane meets the body and where the tail loops, so those slender parts stay attached and do not snap. Round and clean each cut edge with the tip of your saw. Work slowly around the flowing tail curl since it is the most fragile part.

  6. Light it and photograph

    Place one bright LED puck or battery pillar directly behind the center of the design and keep the interior clear of pulp so nothing blocks the beam. A single strong light gives the cleanest silhouette; skip candles since the open cutouts and thin wall make flame risky. Test in a dark room and nudge the light until the mane, legs, and tail all glow evenly. Shoot at dusk on the porch for that warm outline effect.

Gather your supplies

Check things off as you get ready.

Work on a stable surface, keep your free hand out of the cutting path, and have an adult handle sharp tools.

Three levels of light

  • Leave intact

    The orange wall surrounding the lion stays untouched so the animal reads as a dark-framed glowing shape.

  • Peel & shade

    Optional shallow skin-peeling just inside the mane edges can add a softer dim halo around the brightest cuts.

  • Cut through

    The entire lion body, mane gaps, leg spaces, and tail curl are cut fully through for the strongest light.

Learn the carving basics

Before you start cutting

How do I keep the thin mane and tail from breaking?

Leave small skin bridges where the mane meets the head and where the tail loops back, rather than cutting every line free. These little connections hold the slender parts in place and are barely visible once lit. Cut the large body opening last so the face stays firm while you work the delicate edges.

Why does the caption mention candlelight if I should use an LED?

The warm glow look is what you want, but an open flame is a poor match for a design with this many large cutouts and a thin wall. A single bright battery LED gives the same warm color safely and evenly. Place it dead center behind the lion for the cleanest silhouette.

This is a concept image, so can a real pumpkin actually look like this?

Yes, a design like this is very achievable on a real pumpkin if you pick a tall one with a smooth flat face. Keep the wall thinned to about an inch and use skin bridges on the mane and tail so nothing collapses. Just work the small shapes first and save the big body cutout for last.

Your take belongs here, too.

Changed a detail? Made it simpler? Share a photo of your version and tell the community what worked.

Share your pumpkin

More pumpkins like this

You've reached the end Β· 8 pumpkins
The Patch Report

Fresh pumpkins, in your inbox.

The best new carvings, ideas worth stealing, and how-tos for carving season. Short, seasonal, and gone by November.

A short email during carving season. Unsubscribe anytime. See our privacy policy.