Halloween Pumpkin Carving Contest · Starts October 1st · $500 in prizes
← Back to ideas
@ai_concepts
Aug 5, 2026
Realistic Tortoise Relief Carved Pumpkin CenterpieceAI
0

Realistic Tortoise Relief Carved Pumpkin Centerpiece

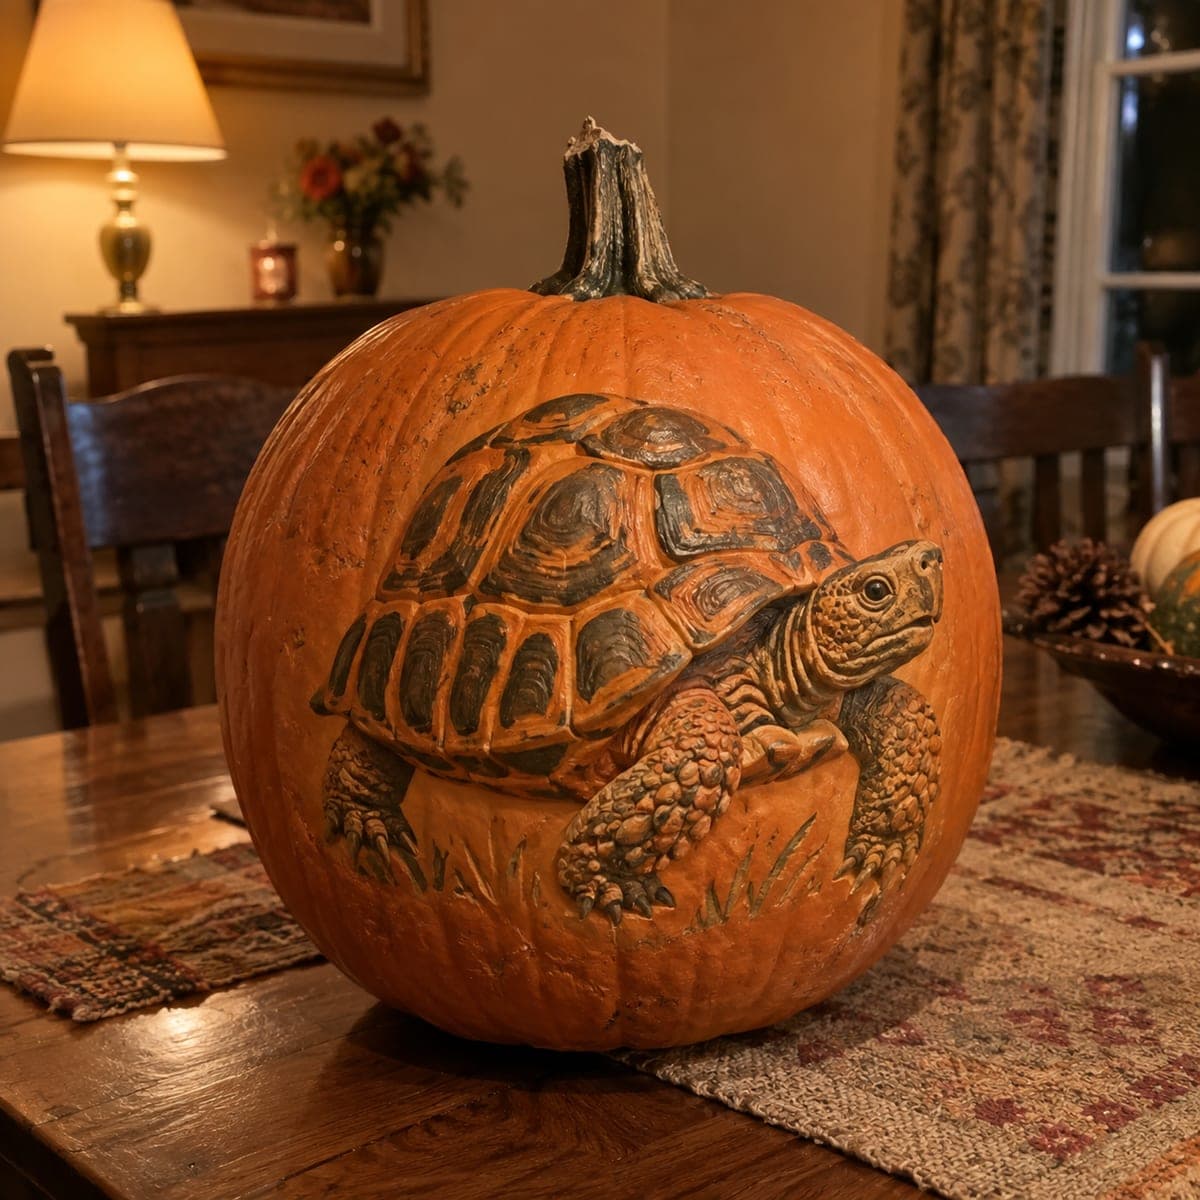
A tortoise ambles through carved grass on this dining table centerpiece, its shell scutes cut in swirling relief and shaded with darker stain for contrast. Carve the shell pattern first since its geometry anchors the whole design, then texture the scaled legs with a small v-gouge. A wash of diluted brown paint rubbed into the recesses and wiped off the high spots makes every ridge pop under indoor light.

This is an AI-generated concept image: a realistic, carvable design idea rather than a photo of a finished carve. AI concepts are always labeled and sit out the leaderboard and the contest.

No ratings yet · Sign in to rate
Comments (0)

  • No comments yet — be the first.

Save without an account. Sign in to like or comment.

Our tips for carving a similar design

The core trick here is skin-deep relief carving rather than cut-through openings, so the whole tortoise is built by shaving the pumpkin skin to different depths. Start with the shell scutes because their geometry anchors every other shape, then work outward to the legs and grass. A wash of diluted brown paint rubbed into the recesses and wiped off the ridges is what makes each scute pop under indoor light.

Written by PumpkinCarvingIdeas.com, inspired by the image above. These are our suggestions, not instructions from the uploader. This approach to the AI concept has not been tested on a real pumpkin.

From pumpkin to porch

  1. Prep and transfer

    Pick a large pumpkin with a broad, smooth side facing the room, since this is a surface relief and never needs a light inside. Wipe it clean and dry, then tape your tortoise stencil flat over the best face. Poke the outlines with a transfer tool or pin so the shell, legs, head, and grass all show as dotted guides. Because this is an AI concept and no real pumpkin exists, treat these as suggestions and adjust the layout to fit your own pumpkin's curve.

  2. Outline the shell first

    Use a fine detail knife to score the outline of the whole shell and each individual scute, cutting only shallow lines into the skin. Getting the shell geometry locked in early gives you a map for everything else. Keep the blade shallow and let an adult handle all the sharp tools. Work slowly around the domed center scutes so the swirling pattern stays even.

  3. Peel the shell to reveal the pattern

    Switch to a ribbon or loop tool and shave away the outer skin inside each scute, leaving raised ridges between them. Go slightly deeper toward the recessed seams so the rings read as separate plates. Leave a thin wall of flesh so the surface never breaks all the way through. Test the depth on one scute, then match the rest for a consistent glow.

  4. Texture the legs and grass

    Use a small v-gouge to carve the scaled texture on the legs and the pointed claws, keeping each scale attached to its neighbors. Add short upward strokes for the grass blades at the base so the tortoise looks like it is walking through them. Shave the head and neck a touch shallower than the shell so it stands forward. Keep any thin grass tips connected at the bottom so they do not snap off.

  5. Add the stain wash

    Mix diluted brown acrylic or watercolor and brush it into all the carved recesses. Immediately wipe the high spots with a dry cloth so the ridges stay light and the seams stay dark. This contrast is what gives the shell its depth and the scales their definition. Let it dry fully before moving the pumpkin.

  6. Light and photograph

    Set a warm LED puck or a small battery lamp beside the pumpkin, not inside it, so the relief catches side light. Angle the light low to throw soft shadows into every scute and scale. Place the finished piece on a runner or mat as a centerpiece and shoot from the tortoise's eye level. Snap a few photos while the shading is crisp before the surface starts to dry out.

Gather your supplies

Check things off as you get ready.

Work on a stable surface, keep your free hand out of the cutting path, and have an adult handle sharp tools.

Three levels of light

  • Leave intact

    The untouched orange skin around the tortoise stays darkest, framing the animal against the pumpkin.

  • Peel & shade

    The peeled scutes, scaled legs, and grass glow a soft orange, with the stain wash deepening the seams.

  • Cut through

    No full cutouts here, so keep the brightest accents to the shallowest shaved highlights on the shell ridges and head.

Learn the carving basics

Before you start cutting

Do I need to cut all the way through the pumpkin?

No. This is a relief carving, so you only shave the skin and outer flesh at different depths. Leaving a solid wall keeps the tortoise looking sculpted rather than backlit, and it makes the piece much sturdier as a centerpiece.

How do I keep the shell pattern looking even?

Carve the shell outline and every scute seam before you remove any flesh, so you have a full map to follow. Test your shaving depth on one central scute, then match that depth across the rest. Consistent depth is what makes the swirling geometry read cleanly.

Will the stain wash damage the pumpkin or dry it out fast?

A thin diluted wash is fine and mostly sits in the recesses. Wipe the high spots right away and let it dry before handling. Since relief carving exposes more flesh, expect this piece to last a few days, so carve it close to when you want it on display.

Your take belongs here, too.

Changed a detail? Made it simpler? Share a photo of your version and tell the community what worked.

Share your pumpkin

More pumpkins like this

You've reached the end · 8 pumpkins
The Patch Report

Fresh pumpkins, in your inbox.

The best new carvings, ideas worth stealing, and how-tos for carving season. Short, seasonal, and gone by November.

A short email during carving season. Unsubscribe anytime. See our privacy policy.