Halloween Pumpkin Carving Contest · Starts October 1st · $500 in prizes
← Back to ideas
@ai_concepts
Jul 31, 2026
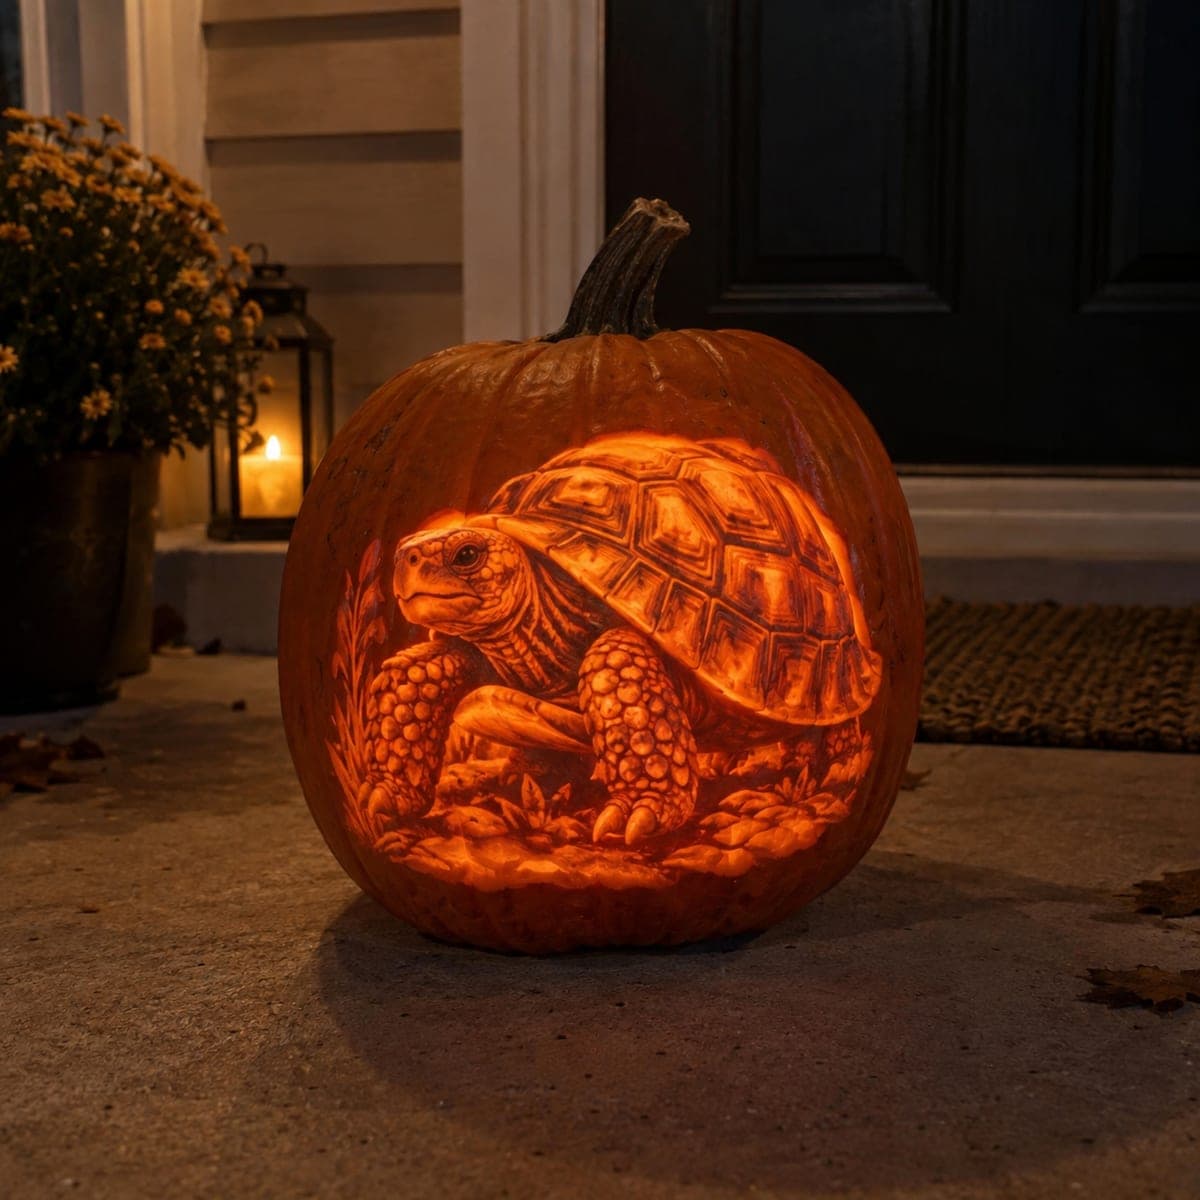
Realistic Tortoise Portrait Shading PumpkinAI
0

Realistic Tortoise Portrait Shading Pumpkin

A detailed shaded tortoise crawls across the face of an illuminated pumpkin, with every scale on its shell and legs rendered in etched relief. The design relies on loop-tool shading and fine-line etching to create depth without any cutout pieces, so the tortoise reads as a warm golden portrait when lit from inside. Transfer the pattern with graphite paper and work the shell hexagons first before detailing the limbs. A striking nature pumpkin carving idea for a front porch display.

This is an AI-generated concept image: a realistic, carvable design idea rather than a photo of a finished carve. AI concepts are always labeled and sit out the leaderboard and the contest.

No ratings yet · Sign in to rate

Comments (0)

  • No comments yet — be the first.

Save without an account. Sign in to like or comment.

Our tips for carving a similar design

This design is built entirely from surface shading, with no pieces cut all the way through, so the tortoise glows as a warm golden relief rather than a bright silhouette. The core trick is varying how deep you scrape the skin: thin scrapes stay dim, deep scrapes near the flesh glow brightest. Plan to shape the shell hexagons first, then work outward to the head, legs, and ground detail so your shadows stay consistent.

Written by PumpkinCarvingIdeas.com, inspired by the image above. These are our suggestions, not instructions from the uploader. This approach to the AI concept has not been tested on a real pumpkin.

From pumpkin to porch

  1. Pick a wall and transfer the pattern

    Choose the flattest, cleanest face of a large pumpkin so the tortoise has room to spread. Since this is an AI concept image, use a real tortoise portrait stencil sized to fit. Tape graphite paper against the skin, lay the pattern on top, and trace every shell segment and leg outline with a stylus. Go back over faint lines by hand so nothing disappears once you start scraping.

  2. Open a back access hole and thin the wall

    Cut a hole in the back of the pumpkin, not the top, so the front stays smooth for shading. An adult should handle all cutting tools. Scoop the seeds and scrape the inside of the carving wall down to about one inch thick with a loop tool. A thinner, even wall lets light pass through your shaded areas evenly.

  3. Shade the shell hexagons

    Start with the shell since it sets the tone for the whole piece. Use a loop tool to scrape each hexagon, leaving the raised ridges between plates darker and hollowing the centers a little deeper for glow. Work plate by plate so the pattern of light and dark stays organized. Keep your deepest scrapes for the plates you want brightest, and leave the outline ridges nearly untouched.

  4. Detail the head, legs, and scales

    Move to the head and front legs, using a smaller loop tool for the pebbled scales. Scrape each scale as a shallow bump surrounded by a slightly deeper groove to create the bumpy skin. For the eye and nostril, leave those spots as untouched skin so they read dark against the lit face. Keep fine etching lines shallow so the wall stays strong and no thin sliver breaks loose.

  5. Add the ground and background plants

    Lightly scrape the rocks and leaves around the tortoise to suggest a setting without stealing focus. Keep these areas dimmer than the shell so the animal stays the star. Soft, shallow strokes are enough here. Step back often and check the balance of light and dark across the whole face.

  6. Light it and photograph

    Drop a battery LED puck inside and set it toward the front wall for the strongest glow. Never use a candle with a thin shaded wall, since the heat can cook and warp your detail. View it in a dark spot and touch up any area that reads flat by scraping a touch deeper. Coat cut edges with petroleum jelly to slow drying, then set it on the porch for photos.

Gather your supplies

Check things off as you get ready.

Work on a stable surface, keep your free hand out of the cutting path, and have an adult handle sharp tools.

Three levels of light

  • Leave intact

    Shell ridge outlines, the eye, and dark shadow gaps between scales stay untouched skin.

  • Peel & shade

    The pebbled leg scales, tortoise head, and background rocks get shallow scrapes for a soft mid glow.

  • Cut through

    No full cutouts here; the deepest loop-tool scrapes on the shell plates read as the brightest golden areas.

Learn the carving basics

Before you start cutting

Do I need to cut any holes through the front?

No, this is a shading-only design, so the front face has no cutouts. All the light comes from scraping the skin to different depths so it glows from within. Your only through cut is the access hole in the back.

How thin should the shaded wall be?

Aim for about one inch across the whole carving area. That is thin enough for light to pass through your deepest scrapes but thick enough to stay strong. Check thickness as you scoop by feeling the wall or poking a T-pin in a hidden spot.

How do I keep the shell plates looking even?

Work one hexagon at a time and match your scraping depth from plate to plate. Leave the ridges between plates raised and darker, and hollow the centers a bit deeper for glow. Stepping back with the light on every few plates helps you catch any spot that got too light or too dark.

Your take belongs here, too.

Changed a detail? Made it simpler? Share a photo of your version and tell the community what worked.

Share your pumpkin

More pumpkins like this

You've reached the end · 8 pumpkins
The Patch Report

Fresh pumpkins, in your inbox.

The best new carvings, ideas worth stealing, and how-tos for carving season. Short, seasonal, and gone by November.

A short email during carving season. Unsubscribe anytime. See our privacy policy.