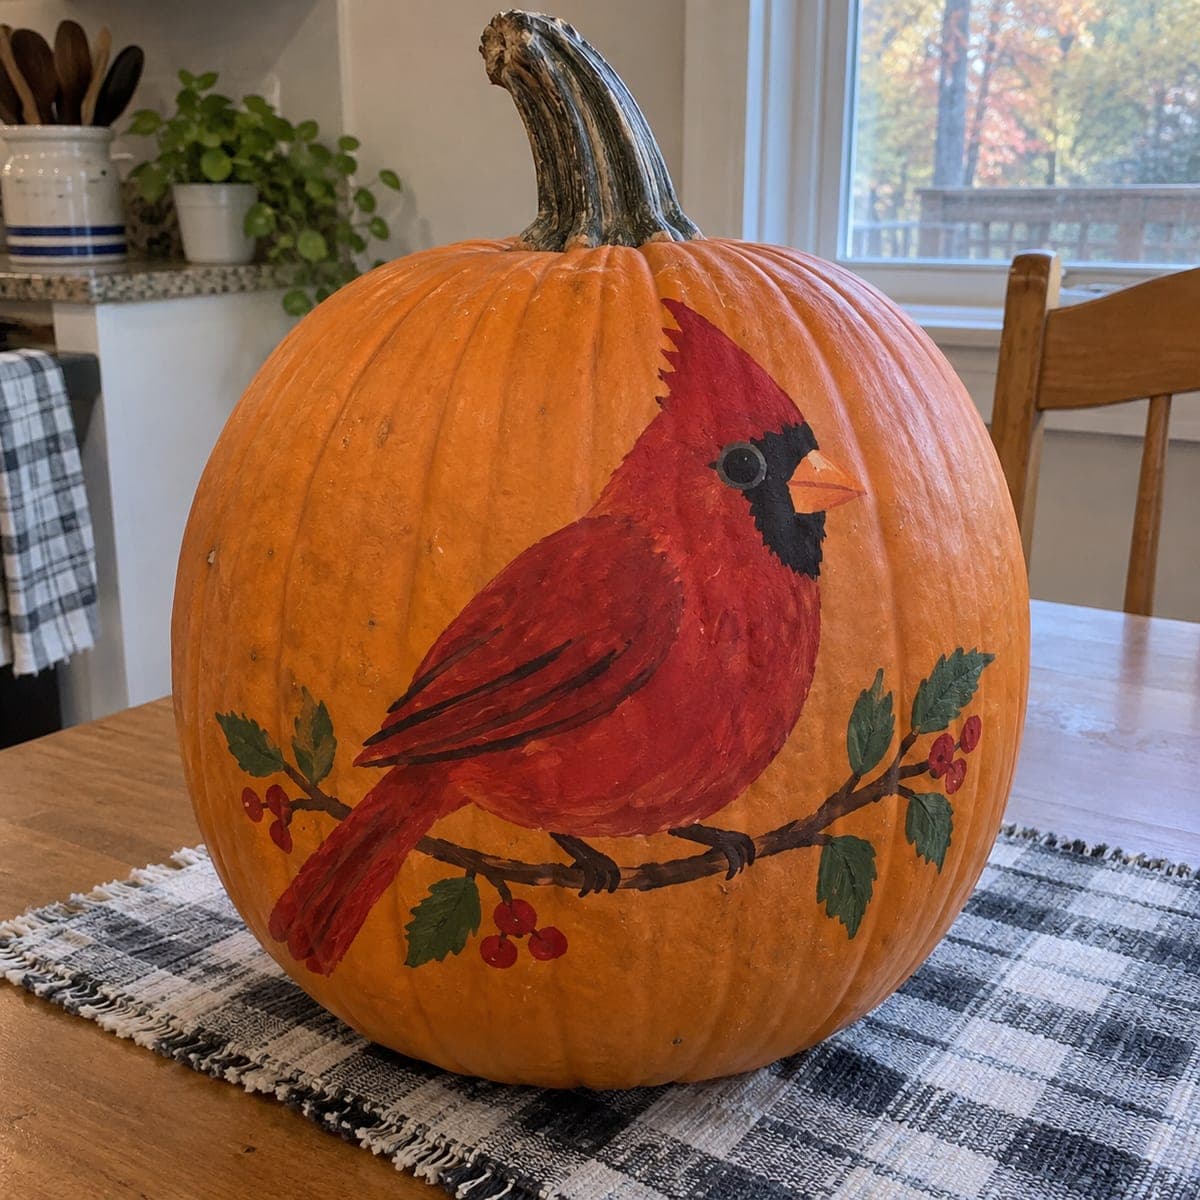
A bright red cardinal perches on a holly-and-berry branch in this no-carve painted pumpkin, a design that carries fall decor straight through the winter holidays. Sketch the bird lightly in chalk, block in the red body and black mask with acrylics, then add the branch, leaves, and berry clusters last. Two coats of red cover best over orange. Because nothing is cut, it will stay fresh indoors for weeks on a kitchen table.
This is an AI-generated concept image: a realistic, carvable design idea rather than a photo of a finished carve. AI concepts are always labeled and sit out the leaderboard and the contest.
The core trick here is painting rather than cutting, so the whole design lives on the surface and the pumpkin stays sealed and fresh for weeks. Build the cardinal in layers, blocking the big red body first, then adding the black mask, beak, and finally the branch, leaves, and berries on top. Working light to dark and background to foreground keeps every edge crisp over the orange skin.
Written by PumpkinCarvingIdeas.com, inspired by the image above. These are our suggestions, not instructions from the uploader. This approach to the AI concept has not been tested on a real pumpkin.
From pumpkin to porch
1
Clean and dry the surface
Wipe the pumpkin down with a damp cloth and let it dry fully so paint grips well. Pick the smoothest, flattest side to face out and set the pumpkin on a towel so it does not roll. If the skin is waxy, a quick pass with a dry paper towel helps. Avoid soap, which can leave a slick film.
2
Sketch the layout in chalk
Use white or light chalk to rough in the cardinal's body, head, and tail, then add the diagonal branch it perches on. Chalk wipes away easily, so redraw until the proportions feel right. Keep the bird large and centered, with the branch running out to both sides for the leaves and berries. Step back often to check the balance before you commit to paint.
3
Block in the red body and black mask
Paint the full body, wing, and tail in bright red acrylic, keeping the outline smooth. Two coats cover best over orange, so let the first dry before adding the second. Once the red is dry, add the black face mask and throat, and pull the crest to a soft peak at the top of the head. Let each color dry fully so the black does not smear into the red.
4
Add the beak, eye, and feather lines
Paint the short triangular beak in orange, then dot a small dark eye inside the black mask. Use a fine brush and a slightly darker red to suggest wing and tail feather lines, working with the shape of the bird. Keep these marks subtle so they read as texture, not clutter. A steady hand and a nearly dry brush give the cleanest strokes.
5
Paint the branch, leaves, and berries
Lay in the brown branch across the pumpkin, then add pointed green holly leaves along it. Cluster small red berries in groups of three near the leaves for a natural look. Because these sit in front, painting them last keeps their edges sharp over the branch and skin. A round brush or the tip of a pencil eraser makes tidy, even berries.
6
Seal, dry, and photograph
Once everything is fully dry, brush on a thin coat of clear acrylic sealer to protect the design and add a soft sheen. Let it cure before handling. Display the pumpkin indoors on a table where the colors stay vivid. Shoot your photo in soft daylight near a window to show off the red without harsh glare.
Gather your supplies
Check things off as you get ready.
Work on a stable surface, keep your free hand out of the cutting path, and have an adult handle sharp tools.
Three levels of light
Leave intact
The orange skin around the design stays untouched as the natural background, since nothing is cut on this painted pumpkin.
Peel & shade
If you want a soft glow, you could lightly peel a thin halo of skin behind the branch, though the classic version leaves the surface smooth.
Cut through
No full cutouts are needed here; keep the pumpkin sealed so it lasts, and skip any interior light.
How do I get the red to look bright over orange skin?
Orange tends to dull a single coat of red, so plan on two thin coats. Let the first dry completely, then add the second for even, vivid coverage. A white base coat under the red makes it pop even more if you want maximum brightness.
What if my chalk sketch shows through the paint?
White chalk usually hides under two coats of acrylic, but you can gently brush away excess chalk lines before painting. If a faint line still shows, a touch-up coat covers it. Avoid heavy pencil, which can bleed through lighter colors.
Can this painted pumpkin last through the holidays?
Yes, since nothing is cut it will not rot as fast as a carved one. Keep it indoors, out of direct heat and sun, and a coat of sealer helps it stay fresh for several weeks. A real gourd will still soften eventually, so a faux craft pumpkin lasts even longer.
Your take belongs here, too.
Changed a detail? Made it simpler? Share a photo of your version and tell the community what worked.
 AI
AI
Comments (0)