Halloween Pumpkin Carving Contest · Starts October 1st · $500 in prizes
← Back to ideas
@ai_concepts
Aug 7, 2026
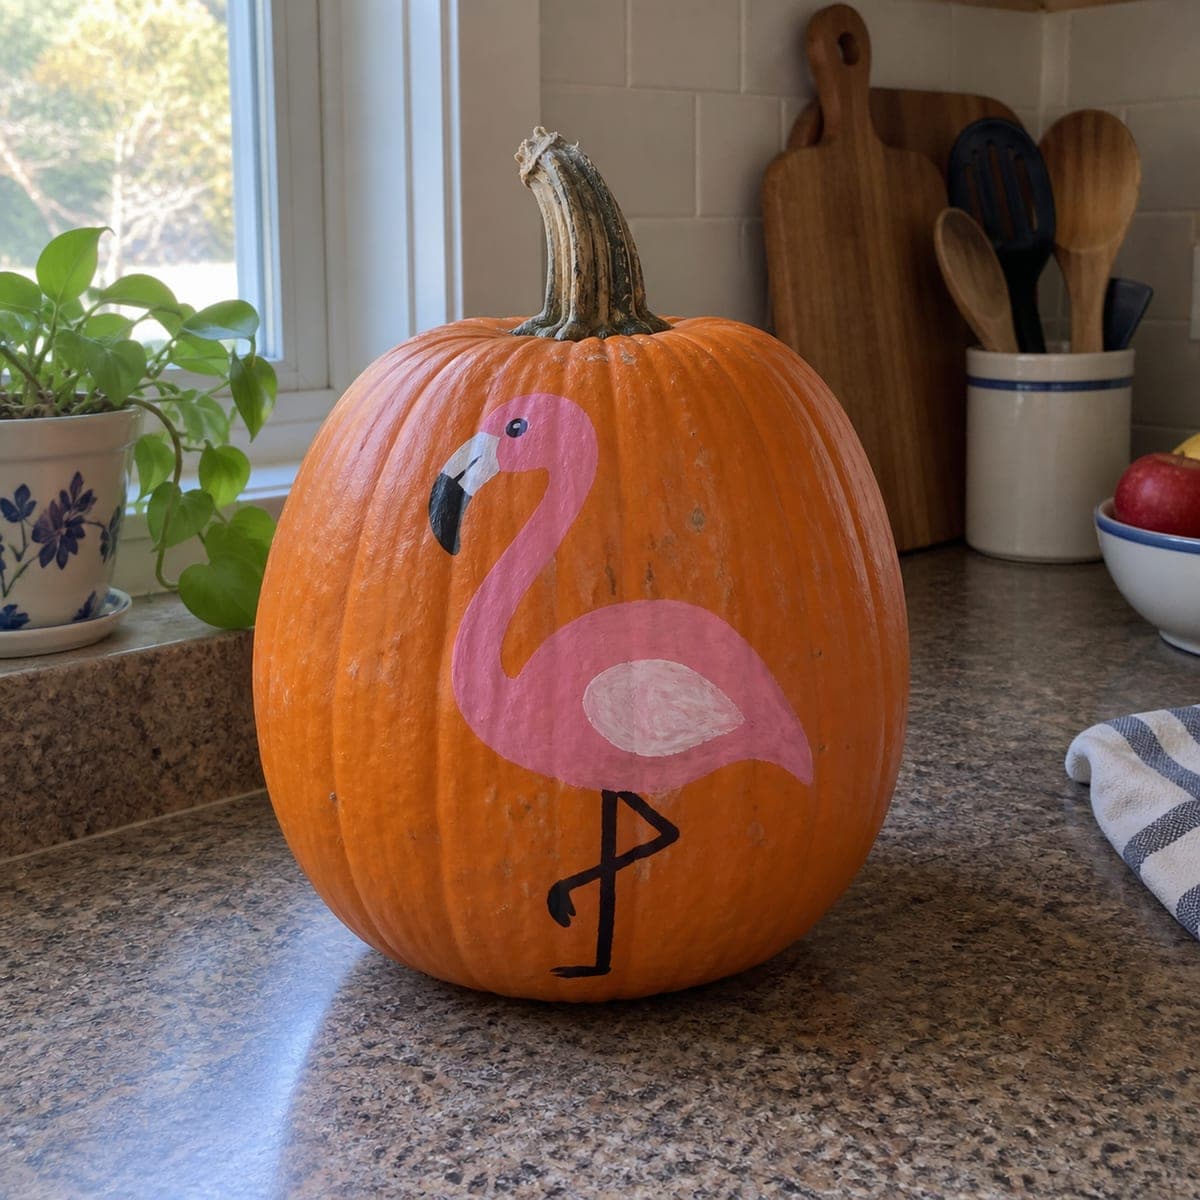
Pink Flamingo Painted No-Carve PumpkinAI
0

Pink Flamingo Painted No-Carve Pumpkin

A bright pink flamingo standing on one skinny black leg turns an ordinary orange pumpkin into a cheerful no-carve pumpkin idea. Sketch the S-curve of the neck in chalk first, then fill with two shades of pink acrylic and add the black beak tip and legs with a fine liner brush. Because nothing is cut, this design lasts for weeks on a kitchen counter or covered porch, and it is an easy afternoon project for kids.

This is an AI-generated concept image: a realistic, carvable design idea rather than a photo of a finished carve. AI concepts are always labeled and sit out the leaderboard and the contest.

No ratings yet · Sign in to rate
Comments (0)

  • No comments yet — be the first.

Save without an account. Sign in to like or comment.

Our tips for carving a similar design

The whole design rests on one simple trick: a smooth S-curve for the flamingo's neck balanced over a single skinny leg. Because this is a painted no-carve pumpkin, you build it up in flat shapes with acrylic, starting light and adding one darker pink for depth. Sketch first in chalk so you can wipe away mistakes before any paint goes down.

Written by PumpkinCarvingIdeas.com, inspired by the image above. These are our suggestions, not instructions from the uploader. This approach to the AI concept has not been tested on a real pumpkin.

From pumpkin to porch

  1. Clean and dry the pumpkin

    Pick a smooth, upright pumpkin so the flat side of the belly gives you a good painting surface. Wipe it down with a damp cloth and a little mild soap to remove dust and field grime, then dry it fully. Paint sticks best to a clean, dry skin. Let it sit for a few minutes so no moisture is trapped in the ridges.

  2. Sketch the S-curve in chalk

    Use white or light chalk to draw the flamingo's body as a rounded oval, then sweep the neck up in a long S shape to the head. Add a small head, the wedge of the beak, and one straight leg with a bent knee below the body. Step back and check the balance before committing. Chalk wipes off easily with a damp finger if you want to adjust the curve.

  3. Base coat the pink body

    Fill the body and neck with a medium pink acrylic using a soft round brush. Keep inside your chalk lines and let this first coat dry, then add a second coat for solid, even color. Two thin coats look better than one thick one and are less likely to drip down the ridges. Rinse your brush before the paint dries.

  4. Add shading and the white wing

    Mix or grab a slightly lighter pink and paint a soft teardrop shape on the belly for the wing, or use white and blend the edge while wet. This second shade gives the bird a rounded, three-dimensional look. Keep the highlight loose and slightly off-center so it reads as a folded wing. Let everything dry before moving to fine details.

  5. Paint the beak and leg with a liner

    Switch to a fine liner brush and black paint for the crisp details. Paint the down-curved beak tip, the tiny eye dot, and the thin single leg with its bent joint. Steady your painting hand with your other hand braced against the pumpkin. Load only a little paint so the lines stay thin and clean, and let it dry completely.

  6. Seal and stage your photo

    Once fully dry, brush on a thin coat of clear acrylic sealer or matte spray to protect the paint from moisture. Set the finished pumpkin on a kitchen counter or covered porch where it can be admired for weeks. For an evening glow you can tuck a battery LED puck nearby, since nothing here is cut. Snap your photo in soft daylight to show off the bright pink against the orange.

Gather your supplies

Check things off as you get ready.

Work on a stable surface, keep your free hand out of the cutting path, and have an adult handle sharp tools.

Three levels of light

  • Leave intact

    The orange pumpkin skin stays bare as the background around the bird, giving a warm contrast to the pink.

  • Peel & shade

    No skin is peeled on this painted design, so the mid-tone comes from the lighter pink wing highlight instead of a glow.

  • Cut through

    Nothing is cut through on a no-carve pumpkin, so full brightness only comes if you set a battery LED nearby for an evening accent.

Learn the carving basics

Before you start cutting

Do I need to cut the pumpkin at all?

No, this is a fully painted no-carve design, so there is no scooping or cutting involved. That keeps it safe for kids to help with and means the pumpkin lasts far longer than a carved one. Just clean, sketch, paint, and seal.

What kind of paint holds up best on a pumpkin?

Acrylic craft paint works well because it dries fast and covers the orange skin in two thin coats. Add a clear acrylic or matte sealer at the end to guard against moisture and smudging. Avoid watercolors, which bead up and run on the waxy skin.

How do I keep the thin black leg from looking wobbly?

Use a fine liner brush loaded with just a little paint and pull one steady stroke rather than short choppy ones. Brace your painting hand against the pumpkin for control. If a line goes crooked, wipe it away with a damp cotton swab before it dries and try again.

Your take belongs here, too.

Changed a detail? Made it simpler? Share a photo of your version and tell the community what worked.

Share your pumpkin

More pumpkins like this

You've reached the end · 8 pumpkins
The Patch Report

Fresh pumpkins, in your inbox.

The best new carvings, ideas worth stealing, and how-tos for carving season. Short, seasonal, and gone by November.

A short email during carving season. Unsubscribe anytime. See our privacy policy.