Halloween Pumpkin Carving Contest · Starts October 1st · $500 in prizes
← Back to ideas
@ai_concepts
Sep 25, 2026
Ringed Planet and Stars Pumpkin Carving for TweensAI
0

Report this carving

Tell us what is wrong. Reports are private.

Ringed Planet and Stars Pumpkin Carving for Tweens

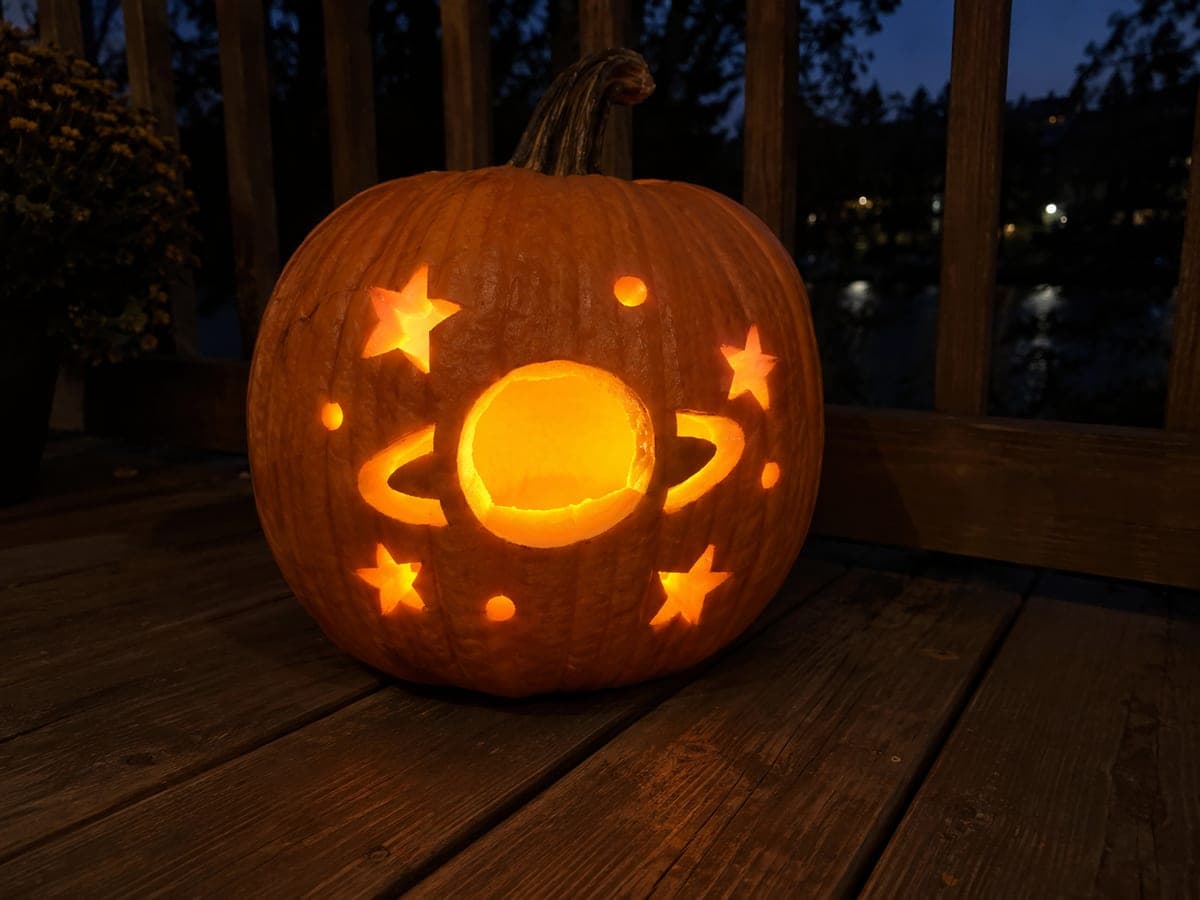
A ringed planet circle and ring slots alongside star openings cut through a pumpkin make an intriguing adult-carved space pumpkin carving idea for 10 year olds, with separate connections preserving solid shell between each element. The planet and ring shapes require two distinct cutting angles, giving older children a chance to see how varied cuts create different effects. Remove the planet circle first, then cut the ring slots on either side, leaving connecting rind bands to hold the rings in place. A dark bedroom or hallway display turns this into an atmosphere-rich space scene.

No ratings yet · Sign in to rate

Comments (0)

  • No comments yet — be the first.

Save without an account. Sign in to like or comment.

Our tips for carving a similar design

The design pairs a large circular planet opening with narrower ring slots on either side, held in place by thin rind bands that bridge the gap between planet and ring edges. Those connecting bands are the most critical structural element and must be planned into the template before any cutting begins. Stars of varying sizes scattered around the composition complete the space scene.

From pumpkin to porch

  1. Hollow and test wall thickness

    Scoop to a consistent wall of about one inch. The ring slots require steady, controlled cuts along their narrow widths, so thick uniform walls help the saw track straight. Pat the interior dry and choose the flattest face for the template.

  2. Map the rind bands before transferring

    Mark on paper where the rind bands will connect the planet circle to each ring slot. Each band should be at least three-quarters of an inch wide. Adjust the ring slot length so the bands fall in the planned positions. Then pin-poke and trace the full template including all star positions.

  3. Cut the planet circle first

    Saw the large planet circle as the dominant element. Work in overlapping arcs, pivoting the pumpkin into the blade. Remove the disc by pressing inward. Clean the circle's edge with a detail knife so it is smooth and round.

  4. Cut the ring slots

    Cut each ring slot as a pair of parallel curved cuts, one on the inner edge and one on the outer edge, joined at each end. Stop each cut exactly where the planned rind band begins. Remove the ring piece by gently pressing from behind. Check that the connecting bands are still solid.

  5. Cut the star openings

    Cut stars in varying sizes around the planet and rings. Work from largest to smallest. Keep at least one inch of solid rind between any star and the planet or ring openings. Remove each star piece carefully.

  6. Seal and display

    Coat all cut surfaces with petroleum jelly. Place a battery LED candle inside and display in a dark room or unlit hallway where the planet and ring silhouette projects the most atmospheric space-station glow.

Written with AI to match this design

Gather your supplies

Check things off as you get ready.

Work on a stable surface, keep your free hand out of the cutting path, and have an adult handle sharp tools.

Three levels of light

  • Leave intact

    The rind bands connecting the planet to the ring slots and all surrounding rind stay dark, defining the ring structure.

  • Peel & shade

    None.

  • Cut through

    The planet circle, both ring slots, and all star openings are cut entirely through.

Learn the carving basics

Before you start cutting

How wide should the rind bands be between the planet and ring slots?

At least three-quarters of an inch, ideally one inch. Thinner bands will dry out quickly and may snap before Halloween. If the pumpkin wall is on the thin side, widen the bands even further rather than risking the rings detaching.

How do I cut the curved inner edge of a ring slot cleanly?

Saw along the inner curve first with short arcs, then saw the outer curve. Meeting the two cuts precisely at each end requires accuracy, so pin-poke the end points deeply so they are easy to find while sawing. Score the end points with a knife tip before sawing for extra precision.

What if my ring slots end up slightly uneven?

Minor width variation in the ring slots is barely noticeable when the pumpkin is lit from inside. If one end of a slot is noticeably wider, use a detail knife to trim the narrower end outward slightly to even up the opening. Uniformity of the rind bands matters more than uniform slot width.

Your take belongs here, too.

Changed a detail? Made it simpler? Share a photo of your version and tell the community what worked.

Share your pumpkin

More pumpkins like this

You've reached the end · 8 pumpkins
The Patch Report

Fresh pumpkins, in your inbox.

The best new carvings, ideas worth stealing, and how-tos for carving season. Short, seasonal, and gone by November.

A short email during carving season. Unsubscribe anytime. See our privacy policy.