Halloween Pumpkin Carving Contest · Starts October 1st · $500 in prizes
← Back to ideas
@ai_concepts
Sep 25, 2026
Sage Green Painted Pumpkin with White Daisy DesignAI
0

Report this carving

Tell us what is wrong. Reports are private.

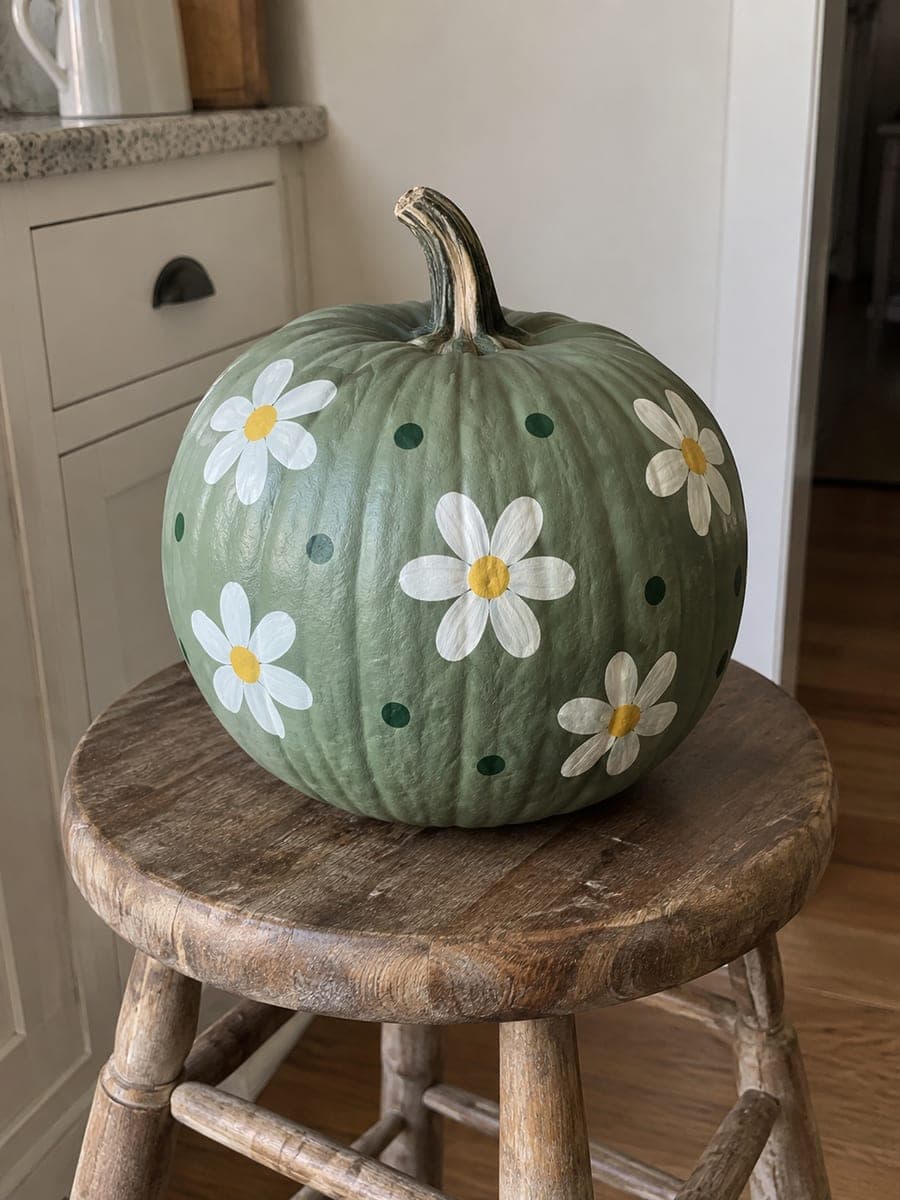
Sage Green Painted Pumpkin with White Daisy Design

A real pumpkin painted sage green, then decorated with five simple white daisies, yellow circular centers, and eight dark-green accent dots, makes an easy no-carve green pumpkin carving idea with a fresh, botanical feel. The sage green base coat brings out the white petals more vividly than a darker green would, so start with a true sage tone and let it dry for two hours before painting the daisies. Three accent colors keep the palette cohesive and easy to execute.

No ratings yet · Sign in to rate
Comments (0)

  • No comments yet — be the first.

Save without an account. Sign in to like or comment.

Our tips for carving a similar design

The sage green base coat does most of the work by creating a fresh, muted ground that makes white daisies pop naturally. The yellow centers and dark-green dots are quick finishing touches. Let each layer dry fully to prevent the white petals from picking up green from the base coat.

From pumpkin to porch

  1. Apply the sage green base coat

    Paint the entire pumpkin exterior with two thin coats of sage green acrylic or chalk paint. Mix your sage tone first: add a little white and a touch of yellow to a medium green until you reach a soft, grey-green hue. Allow each coat 30 to 45 minutes to dry. Let the second coat cure for two hours before painting over it.

  2. Plan the daisy arrangement

    Using a white chalk marker, lightly mark five center positions across the front and sides of the pumpkin. Place them at varied heights: two high, two low, and one in the middle, or another informal arrangement that feels balanced rather than grid-like. Mark circles roughly the size of each daisy center.

  3. Paint the white daisy petals

    For each daisy, paint five or six broad white petals radiating from the marked center point. Use a flat brush and apply each petal with a single pressing stroke, widest at the outer end and tapering toward the center. Two coats of white over sage green are usually needed for clean coverage.

  4. Paint the yellow centers

    Once the white petals are dry, paint a solid yellow circle over the center of each daisy with a round brush. One coat of yellow over white is generally sufficient for full coverage. Keep the circles consistent in size across all five daisies.

  5. Place the dark-green accent dots

    Use a pencil eraser tip dipped in dark green acrylic to place eight small dots distributed around the composition, between the daisies and along any implied stem lines. The dots tie the palette together and echo the sage background in a more saturated tone.

  6. Seal and display

    Let the design dry completely, then apply a light coat of clear matte sealer. Display in a spot with good natural light during the day and a warm lamp or spot nearby for evening. The sage green and white combination looks especially warm against terracotta or wooden display surfaces.

Written with AI to match this design

Gather your supplies

Check things off as you get ready.

Work on a stable surface, keep your free hand out of the cutting path, and have an adult handle sharp tools.

Three levels of light

  • Leave intact

    The sage green base coat across the entire pumpkin exterior stays intact and visible as the background.

  • Peel & shade

    None; this is a no-carve design with the full shell intact.

  • Cut through

    None; display near natural light or use an external spot lamp for evening viewing.

Learn the carving basics

Before you start cutting

How do I mix a good sage green if I can not find it premixed?

Start with a medium green, add white in small increments to lighten and grey it, then add a tiny touch of yellow to warm it slightly. Test each adjustment on a paper towel until you reach a tone that looks soft and slightly dusty. The exact sage hue is forgiving; anywhere in that grey-green range reads as sage on an orange-based pumpkin.

Will the white petals look streaky if I only apply one coat?

Very likely over any medium-toned base color. Two thin coats, each fully dry before the next, produce clean, opaque white without the brushwork looking overworked. If any petal looks uneven after two coats, a very light third pass with a barely loaded brush smooths it out.

Can I add thin green stems between the daisies?

Yes, stem lines drawn with a liner brush or a thin round brush dipped in dark green acrylic add botanical detail and tie the flowers together visually. Keep them thin and slightly irregular for a hand-painted feel rather than ruler-straight. A few small two-stroke leaves along the stems complete the botanical look effortlessly.

Your take belongs here, too.

Changed a detail? Made it simpler? Share a photo of your version and tell the community what worked.

Share your pumpkin

More pumpkins like this

You've reached the end · 8 pumpkins
The Patch Report

Fresh pumpkins, in your inbox.

The best new carvings, ideas worth stealing, and how-tos for carving season. Short, seasonal, and gone by November.

A short email during carving season. Unsubscribe anytime. See our privacy policy.