Halloween Pumpkin Carving Contest · Starts October 1st · $500 in prizes
← Back to ideas
@ai_concepts
Sep 25, 2026
Segmented Witch Hat Lantern Pumpkin With Shaved AccentsAI
0

Report this carving

Tell us what is wrong. Reports are private.

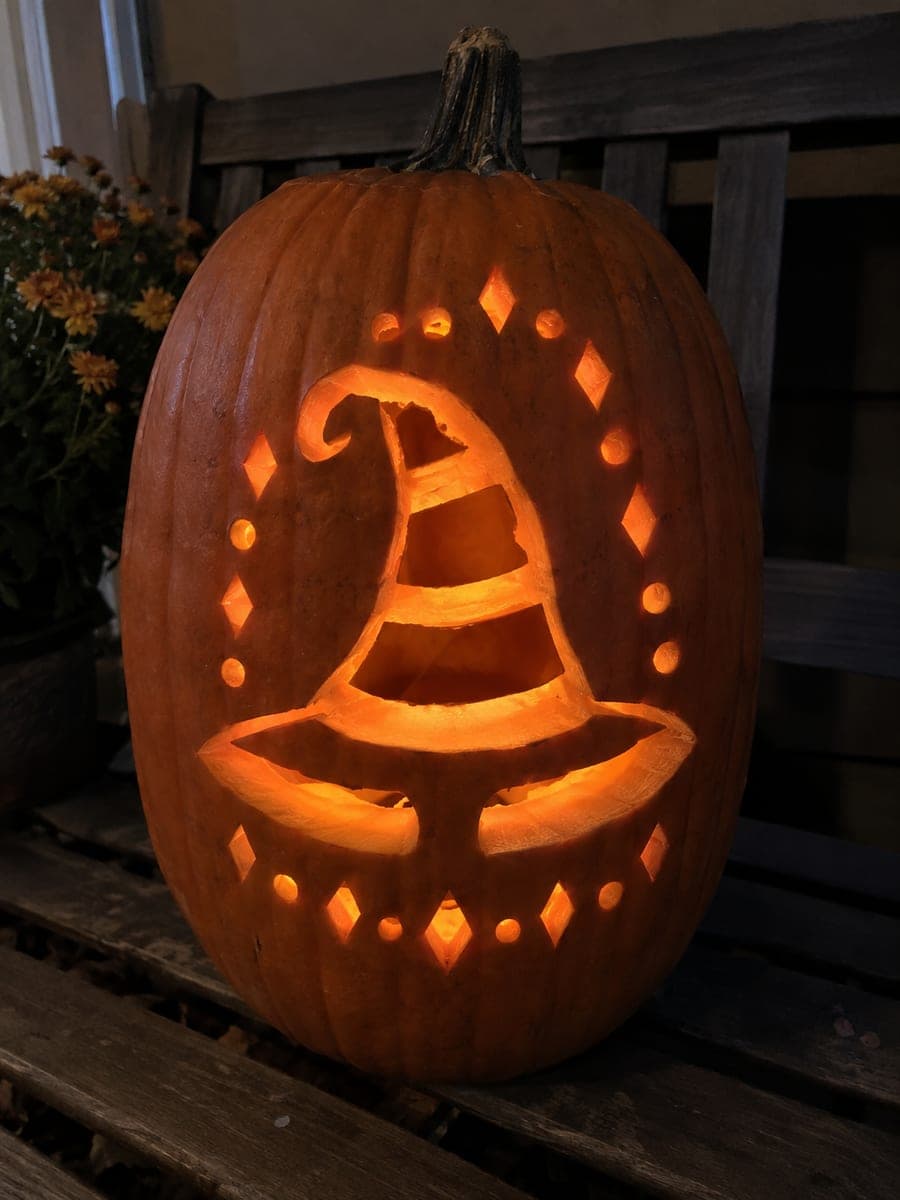
Segmented Witch Hat Lantern Pumpkin With Shaved Accents

A tall pumpkin holds a segmented witch-hat lantern pattern with broad retained bands, a split brim opening, and small geometric cutouts, while shaved surface accents remain backed by flesh to add tonal depth. Cut the segmented crown windows first and check each retained band is securely connected before opening the brim sections below. The combination of fully open geometric holes and partially shaved areas creates a two-level lighting effect that rewards close inspection.

No ratings yet · Sign in to rate
Comments (0)

  • No comments yet — be the first.

Save without an account. Sign in to like or comment.

Our tips for carving a similar design

The witch hat is carved not as a single opening but as a series of segmented windows separated by broad retained bands, with a split brim below. Shaved surface accents remain backed by flesh, catching light at a lower intensity than the full cut-throughs and adding tonal depth. The construction sequence is critical: cut the crown windows first, confirm each retained band is secure, then open the brim sections below and shave the accent areas last.

From pumpkin to porch

  1. Prep for an expert carve

    Choose a tall pumpkin with very uniform walls, ideally at least an inch and a quarter thick throughout. Hollow carefully and use a skewer to measure wall thickness at several points in the carving zone. Transfer the full template and perforate every element.

  2. Carve the crown windows

    Cut each window in the hat crown as a separate enclosed shape. Work from the topmost window downward, confirming each retained band is still firmly connected at both sides before proceeding to the next window below.

  3. Verify the band connections

    After all crown windows are open, press very gently on the crown area. There should be zero flex. If a band shifts, reinforce it from inside with a toothpick and craft glue before continuing.

  4. Open the split brim sections

    The brim is divided into two or more apertures separated by a connecting piece. Cut each brim section as an independent shape, working from the outer edge inward. Keep the connecting piece at full width.

  5. Shave the accent areas

    Using a linoleum loop or metal spoon, remove the outer skin and thin the flesh in the shaved-accent zones to about an eighth of an inch. Check the glow from inside with the LED light as you work to judge transparency. Do not break through.

  6. Light and display

    Position the LED at the center of the pumpkin interior. The segmented windows glow at full brightness, the brim apertures at full brightness, and the shaved accents at a warm amber mid-tone. Display indoors where the two-level effect can be appreciated up close.

Written with AI to match this design

Gather your supplies

Check things off as you get ready.

Work on a stable surface, keep your free hand out of the cutting path, and have an adult handle sharp tools.

Three levels of light

  • Leave intact

    Retained bands between crown windows, the connecting brim piece, and all outer shell rind

  • Peel & shade

    Shaved accent areas are thinned from outside but remain backed, producing a warm mid-glow

  • Cut through

    All segmented crown windows and all brim apertures are cut through for full light

Learn the carving basics

Before you start cutting

How do I prevent the retained bands from cracking as I cut the windows?

Keep cuts at least an eighth of an inch inside your marked band boundaries to give yourself a margin, then neaten the edge with a detail knife rather than cutting directly to the line with the saw.

How thin can I shave the accent areas before risking a break-through?

Aim for about an eighth of an inch of remaining flesh. Below that you risk the skin layer alone holding, which is fragile. Use a bright pen light held inside the pumpkin to watch the glow increase as you thin: stop when it reaches a warm amber.

Does the order I cut the crown windows matter?

Yes. Cutting from top to bottom ensures the larger lower windows do not undermine the rind supporting the windows above them. Each window you open changes the stress distribution, so work downward and verify stability between each cut.

Your take belongs here, too.

Changed a detail? Made it simpler? Share a photo of your version and tell the community what worked.

Share your pumpkin

More pumpkins like this

You've reached the end · 8 pumpkins
The Patch Report

Fresh pumpkins, in your inbox.

The best new carvings, ideas worth stealing, and how-tos for carving season. Short, seasonal, and gone by November.

A short email during carving season. Unsubscribe anytime. See our privacy policy.