Halloween Pumpkin Carving Contest Β· Starts October 1st Β· $500 in prizes
← Back to ideas
@ai_concepts
Sep 25, 2026
Witch Hat With Solid Hatband Cutout Pumpkin CarvingAI
0

Report this carving

Tell us what is wrong. Reports are private.

Witch Hat With Solid Hatband Cutout Pumpkin Carving

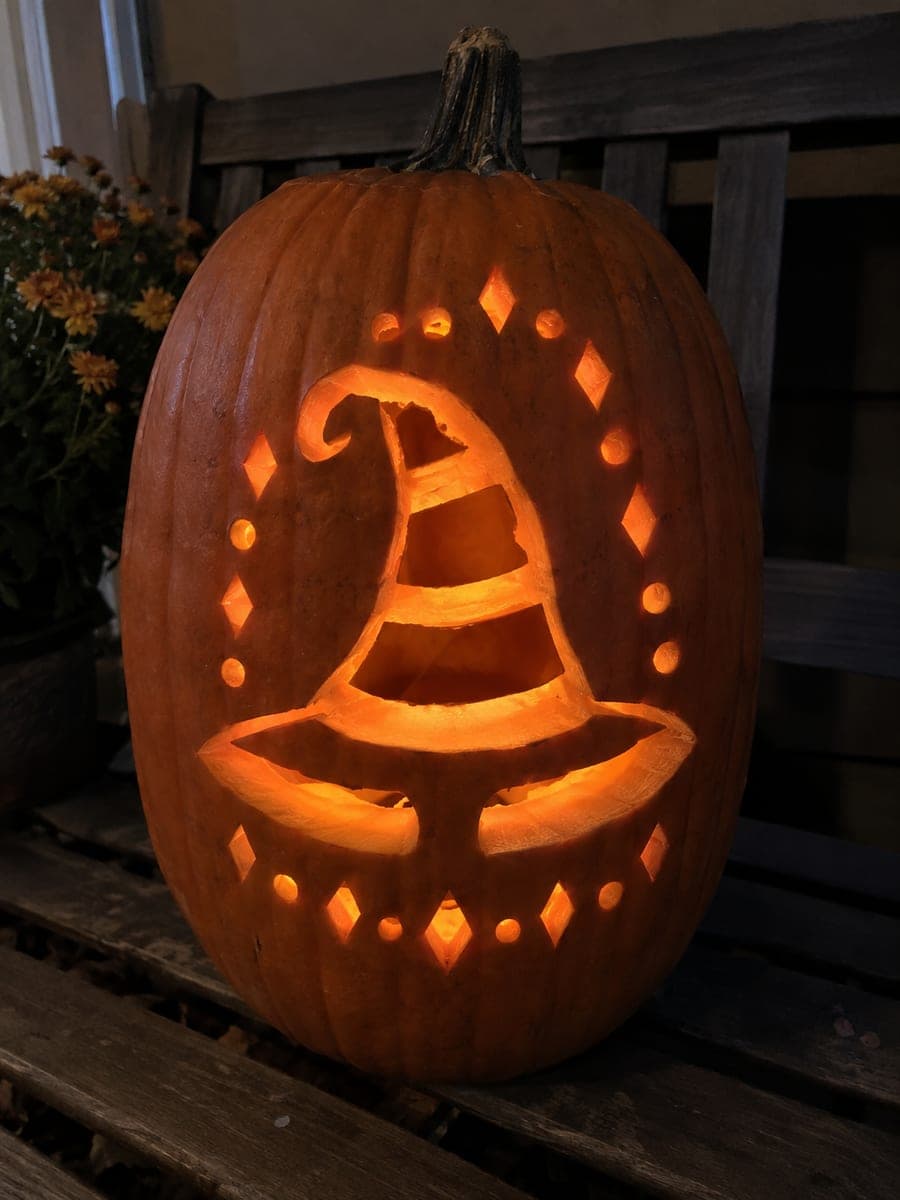
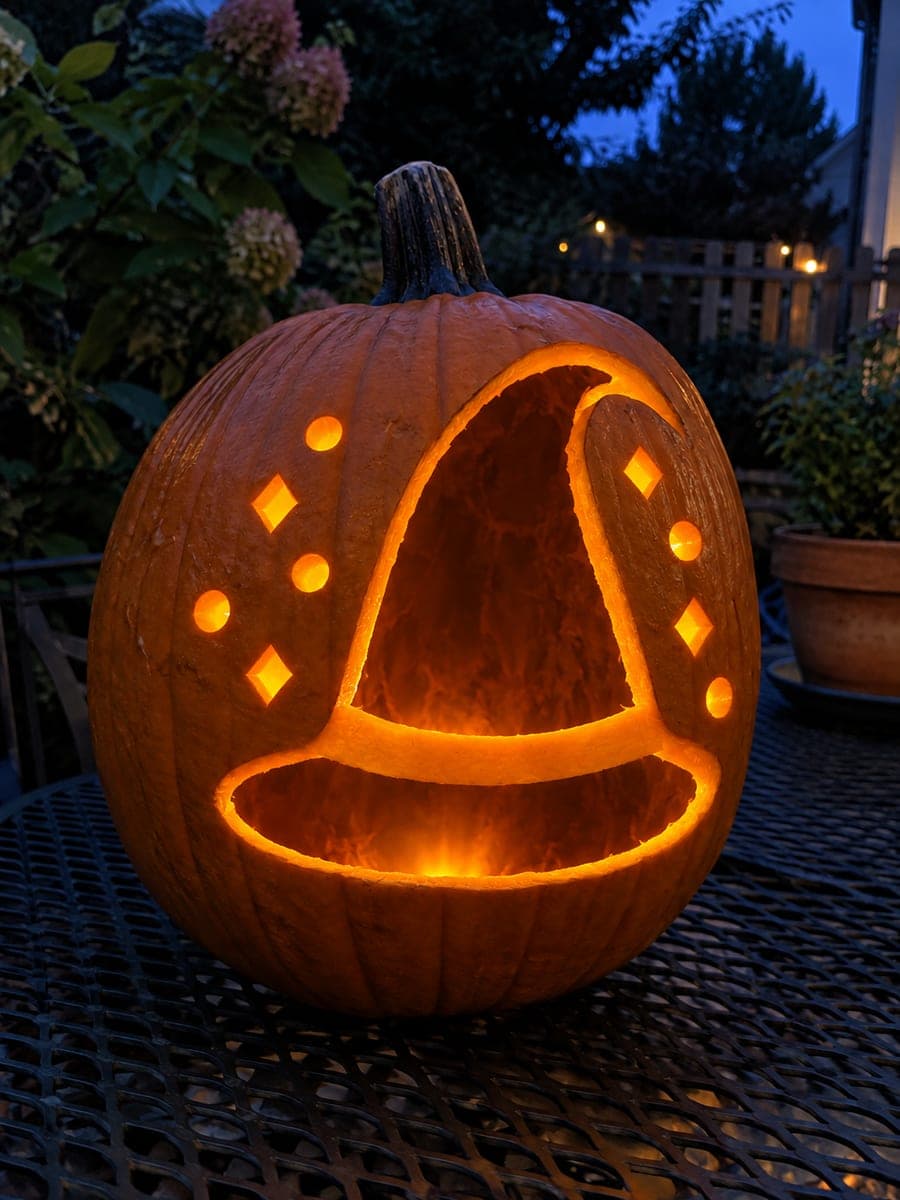
A witch hat cutout is divided by one thick horizontal hatband firmly joined to the pumpkin shell at both sides, with six circle holes and four diamond accents surrounding the main design at dusk. Cut the crown opening and brim opening as two separate shapes rather than one continuous outline, treating the hatband as the structural spine of the whole composition. The small accent holes around the hat reinforce the silhouette without competing with it.

No ratings yet Β· Sign in to rate

Comments (0)

  • No comments yet β€” be the first.

Save without an account. Sign in to like or comment.

Our tips for carving a similar design

Dividing the witch-hat aperture into two openings separated by a solid horizontal band turns a simple silhouette into a structurally interesting design. The band is the spine of the composition: cut the crown window and the brim window as completely independent shapes, never connecting them, and the band stays strong. Six circle holes and four diamond accents scattered around the hat reinforce the composition without competing with the main silhouette.

From pumpkin to porch

  1. Prep and hollow

    Hollow through the lid, leaving walls an inch thick. Transfer the full template, marking hat crown, hat brim, hatband, and all accent-hole positions separately.

  2. Cut the crown window

    Carve the hat crown opening above the hatband as a self-contained shape. The crown is smaller than the brim, so work carefully around the tip of the crooked crown. Keep the blade well clear of the band below.

  3. Cut the brim window

    Move to the wide brim opening below the band and carve it as a second independent shape. The brim arc is broader, so use slow sweeping saw strokes. Once the brim piece is free, verify the band still feels rigid and well-attached at both sides.

  4. Add the circle accent holes

    Drill or saw the six circle holes using a small drill bit or thin awl. Place them at roughly equal spacing around the hat, with at least a half inch of rind between each hole and any adjacent opening.

  5. Add the diamond accents

    Cut the four diamonds with a narrow-bladed saw, keeping each diamond's points just shy of neighboring holes. Diamond shapes require short precise strokes at each corner to get a clean point.

  6. Light and display

    Set the LED light inside and display at dusk. The hatband glows orange between the two lit windows, creating a three-level visual that reads as a more detailed hat than the single-cut version.

Written with AI to match this design

Gather your supplies

Check things off as you get ready.

Work on a stable surface, keep your free hand out of the cutting path, and have an adult handle sharp tools.

Three levels of light

  • Leave intact

    The solid horizontal hatband and all outer shell rind

  • Peel & shade

    None

  • Cut through

    Hat crown window, hat brim window, six circle holes, and four diamond accent holes

Learn the carving basics

Before you start cutting

What happens if I accidentally cut into the hatband?

If the cut is shallow, a small amount of clear craft adhesive worked into the gap and allowed to cure overnight can stabilize the band. If the band is severed, reinforce the back with a flat toothpick or skewer pressed into the interior wall to bridge the cut.

How wide should the hatband be?

At minimum, three-quarters of an inch of solid uncut rind. A wider band, up to an inch and a half, reads better visually and is significantly easier to maintain structurally on a first attempt.

Do the accent holes have to be circles and diamonds, or can I substitute shapes?

Any simple geometric shape works: squares, triangles, or stars. Keep them small relative to the hat windows so they read as background accents rather than primary design elements.

Your take belongs here, too.

Changed a detail? Made it simpler? Share a photo of your version and tell the community what worked.

Share your pumpkin

More pumpkins like this

You've reached the end Β· 8 pumpkins
The Patch Report

Fresh pumpkins, in your inbox.

The best new carvings, ideas worth stealing, and how-tos for carving season. Short, seasonal, and gone by November.

A short email during carving season. Unsubscribe anytime. See our privacy policy.