Halloween Pumpkin Carving Contest · Starts October 1st · $500 in prizes
← Back to ideas
@ai_concepts
Sep 25, 2026
Detailed Witch Face Pumpkin With Hatband and Barred EyesAI
0

Report this carving

Tell us what is wrong. Reports are private.

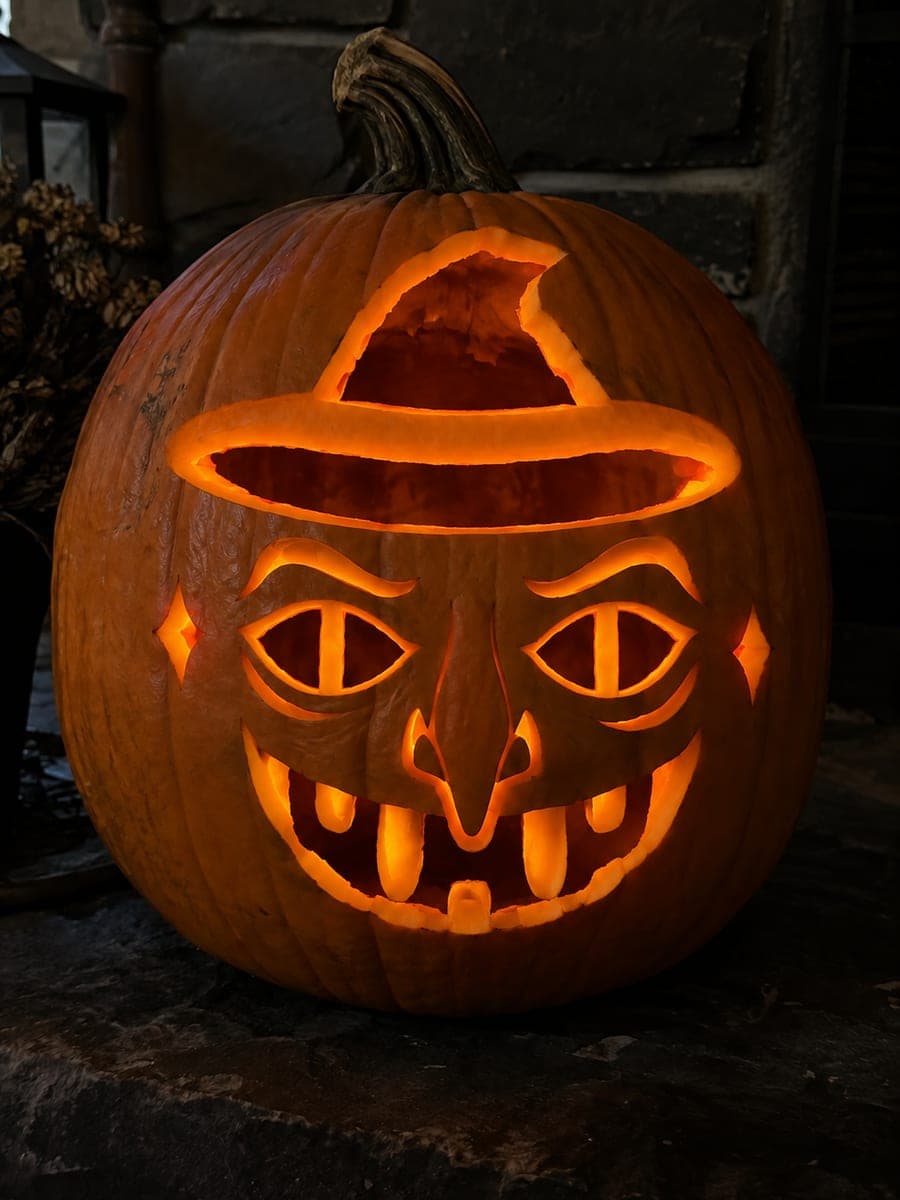
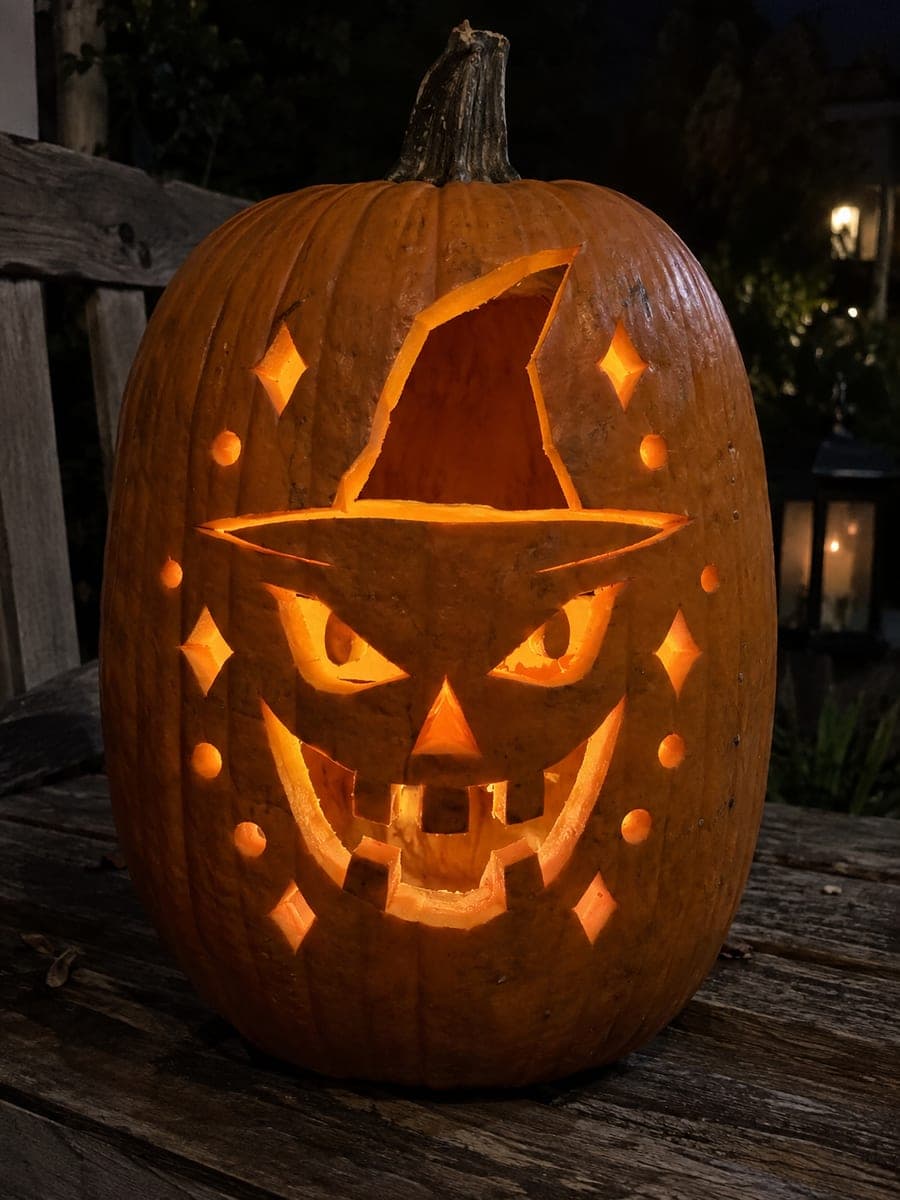
Detailed Witch Face Pumpkin With Hatband and Barred Eyes

This expert witch face pumpkin features broad eye bars connecting top and bottom brows, a full-width hatband joining the outer rind at both ends, a retained hooked nose with a broad root, and chunky teeth, all glowing on a dark hearth. The hatband is the structural anchor: cut it last and confirm both ends are firmly attached to the outer shell before removing any material between the band and the hat crown. The nose detail is left backed by flesh behind it, so it catches light without any risk of snapping off.

No ratings yet · Sign in to rate
Comments (0)

  • No comments yet — be the first.

Save without an account. Sign in to like or comment.

Our tips for carving a similar design

The design's strength comes from three structural anchors: broad eye bars connecting top and bottom brows, a full-width hatband joining the outer rind at both sides, and a hooked nose backed by flesh that never becomes a floating island. The hatband must be cut last, once every other element is confirmed stable, because it is the element most likely to fracture if the shell has already been weakened. Light the finished piece on a dark hearth for maximum drama.

From pumpkin to porch

  1. Prep and wall thickness

    This design demands walls of at least an inch and a quarter because so many elements are retained. Hollow carefully and measure wall thickness with a skewer in several places before starting any cuts. Transfer the full template and perforate every element outline.

  2. Carve the hat crown windows

    Start with the open areas above and below the hatband, treating the hatband as the central spine. Cut the crown window above the band first, confirm the band connection points are firm at both sides, then open the lower hat window. Never cut into the band itself.

  3. Cut the barred eyes

    Each eye has a broad horizontal bar connecting the top and bottom brow. Remove the eye material from both sides of the bar, cutting in small passes and checking frequently that the bar remains at full width. Both bars must stay thick enough to support the weight of the rind above them.

  4. Carve the hooked nose

    The nose detail is shallow-carved rather than fully cut through: remove the surface skin and most of the flesh from the nose area, leaving a thin backed layer so it catches light without becoming a free-standing element. A loop or spoon carving tool works better than a saw here.

  5. Add the chunky teeth

    Cut the mouth opening with the teeth rooted at their tops to the upper gum line. Keep each tooth at least twice as wide as it is tall. Remove the gap material between teeth carefully, using a narrow blade.

  6. Cut the hatband last

    With all other elements confirmed solid, cut the hatband, working one side at a time. Confirm both ends attach firmly to the outer shell before removing any material between the band and the hat crown above or the face below. Light inside and display on the hearth.

Written with AI to match this design

Gather your supplies

Check things off as you get ready.

Work on a stable surface, keep your free hand out of the cutting path, and have an adult handle sharp tools.

Three levels of light

  • Leave intact

    Eye bars, hatband, hooked-nose backed area, all outer shell rind

  • Peel & shade

    None, shading is achieved structurally through backing the nose rather than skin-peeling

  • Cut through

    Hat crown windows above and below the hatband, eye surrounds outside the bars, tooth gaps, and the mouth opening

Learn the carving basics

Before you start cutting

How wide should the hatband be to stay structurally sound?

Aim for at least three-quarters of an inch of uncut rind across the full width of the band, from left shell edge to right shell edge without any interruption. Wider is better. If your template has a narrower band, thicken it before transferring.

The backed nose patch looks flat. How do I get it to glow?

The key is thinning the backed layer to about an eighth of an inch so light transmits through it. Use a metal spoon or linoleum loop tool to thin evenly, checking from inside the pumpkin with the LED light on to see how the glow builds as you thin.

Should I cut this over several sessions or in one go?

If possible, complete the carving in one session so the pumpkin does not begin to dehydrate between cuts, which can cause the rind to become brittle. If you need a break, store the pumpkin in the refrigerator and allow it to return to room temperature before resuming.

Your take belongs here, too.

Changed a detail? Made it simpler? Share a photo of your version and tell the community what worked.

Share your pumpkin

More pumpkins like this

You've reached the end · 8 pumpkins
The Patch Report

Fresh pumpkins, in your inbox.

The best new carvings, ideas worth stealing, and how-tos for carving season. Short, seasonal, and gone by November.

A short email during carving season. Unsubscribe anytime. See our privacy policy.