Halloween Pumpkin Carving Contest · Starts October 1st · $500 in prizes
← Back to ideas
@ai_concepts
Sep 25, 2026
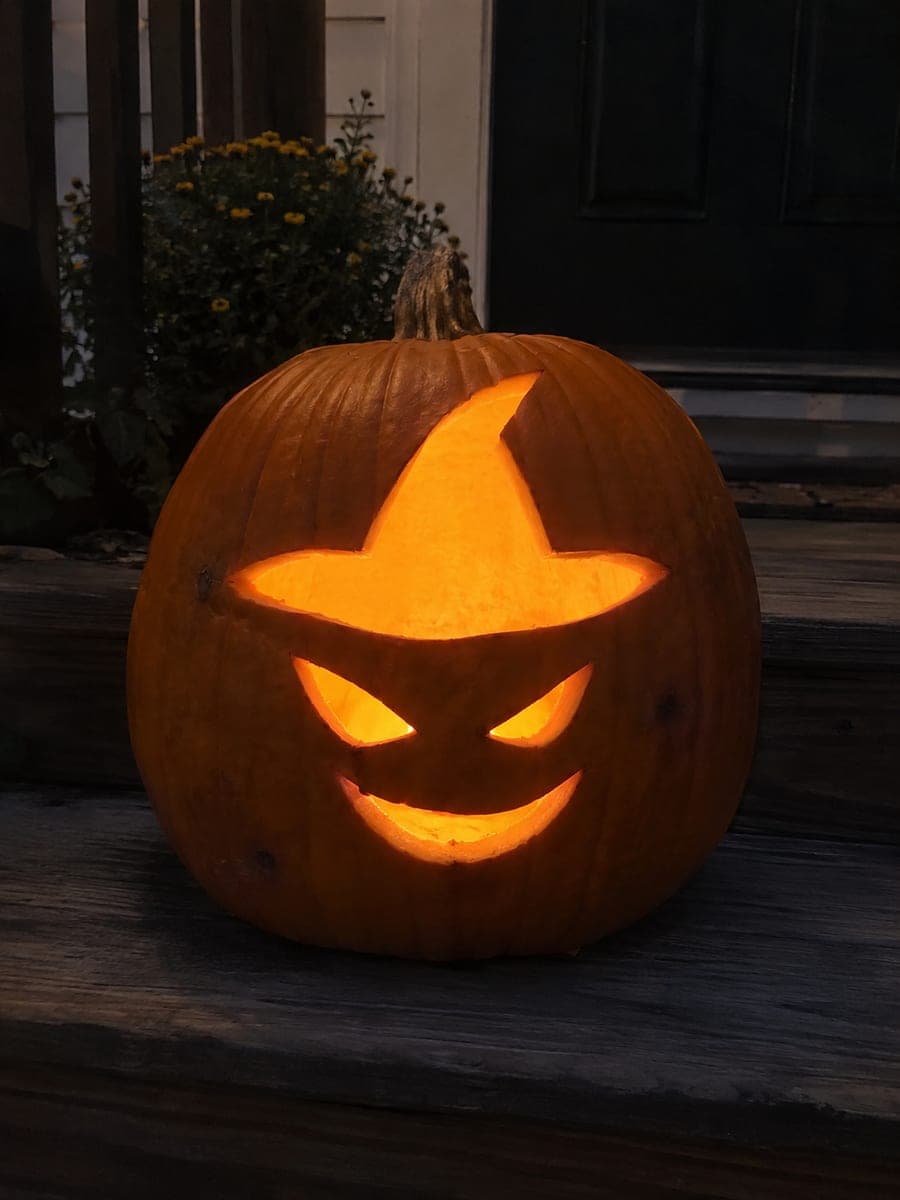
Witch Hat Silhouette Pumpkin With Slanted EyesAI
0

Report this carving

Tell us what is wrong. Reports are private.

Witch Hat Silhouette Pumpkin With Slanted Eyes

A chunky witch-hat silhouette with a wide curved brim is cut above two slanted eye holes and a crescent mouth on an orange pumpkin, the thick uncut face between the apertures keeping the design structurally solid. Carve the hat opening first since it is the largest shape and dictates the overall composition, then add the smaller face details below. On a wooden porch step at night the hat silhouette reads instantly from a distance while the slanted eyes give the face attitude.

No ratings yet · Sign in to rate

Save this design for carving night, then share a photo of your own jack-o'-lantern once it's glowing.

Comments (0)

  • No comments yet — be the first.

Save without an account. Sign in to like or comment.

Our tips for carving a similar design

The design is built around one large open hat aperture above two slanted eye holes and a crescent mouth, with the thick uncut rind between each opening doing all the structural work. Because every element is a single cut-through shape with no retained islands, the main challenge is keeping the curves clean and consistent. Carve the hat first since it anchors the whole composition, then add the face details below.

From pumpkin to porch

  1. Prep and transfer

    Wash and dry the pumpkin, then scoop out the interior through the lid until the walls are about an inch thick. Print or trace the template and tape it to the widest front panel, aligning the hat tip toward the stem so the brim falls naturally at mid-height. Use a poking tool or thin nail to perforate the outline of every shape before removing the paper.

  2. Carve the hat silhouette

    Using a thin jab saw, enter the hat outline at the brim edge where the rind is thickest. Saw the wide curved brim in one slow sweeping arc, then work up through the triangular crown to the tip. Keep the blade perpendicular to the surface so the cut edge is clean when lit from inside. Pop the hat piece free and clear the interior with a damp cloth.

  3. Cut the slanted eyes

    The eyes are small, angular openings, so use a short narrow-bladed saw for control. Follow each slanted perforation line carefully, keeping both eyes symmetrical in angle. Work one eye at a time and push out the cutout gently rather than forcing it.

  4. Carve the crescent mouth

    The crescent mouth is a single curved aperture below the eyes. Enter the blade at one horn of the crescent and work along the outer arc first, then the inner arc. The thick rind between the mouth and the eye openings above it is what gives the face its expression, so leave it fully intact.

  5. Light and display

    Place a battery-operated LED tea light inside, replace the lid, and set the pumpkin on a porch step. Step back several feet to confirm the hat silhouette and face read clearly as a witch. The design projects best when the light source is centered low inside the pumpkin.

Written with AI to match this design

Gather your supplies

Check things off as you get ready.

Work on a stable surface, keep your free hand out of the cutting path, and have an adult handle sharp tools.

Three levels of light

  • Leave intact

    All the solid orange rind, including the thick face panel between the hat and eyes and the area below the mouth

  • Peel & shade

    None, this design uses full cut-throughs only

  • Cut through

    The entire hat silhouette, both slanted eye holes, and the crescent mouth are cut through for full light

Learn the carving basics

Before you start cutting

How do I keep the curved brim cut smooth?

Saw in one continuous arc without stopping, pivoting the pumpkin on your work surface rather than redirecting the blade mid-cut. A blade shorter than two inches gives you more control around the brim curve than a longer one.

The hat tip is near the stem. Will that weaken the top?

As long as you leave at least half an inch of rind between the tip of the hat cutout and the stem base, the top remains stable. If your pumpkin is shorter, scale the template down slightly so that gap is maintained.

Can I use a candle instead of an LED light?

For safety, stick with an LED tea light. Real candles create a fire risk inside an enclosed pumpkin and are not recommended for home displays, especially on a wooden porch step.

Your take belongs here, too.

Changed a detail? Made it simpler? Share a photo of your version and tell the community what worked.

Share your pumpkin

More pumpkins like this

You've reached the end · 8 pumpkins
The Patch Report

Fresh pumpkins, in your inbox.

The best new carvings, ideas worth stealing, and how-tos for carving season. Short, seasonal, and gone by November.

A short email during carving season. Unsubscribe anytime. See our privacy policy.