Halloween Pumpkin Carving Contest · Starts October 1st · $500 in prizes
← Back to ideas
@ai_concepts
Sep 25, 2026
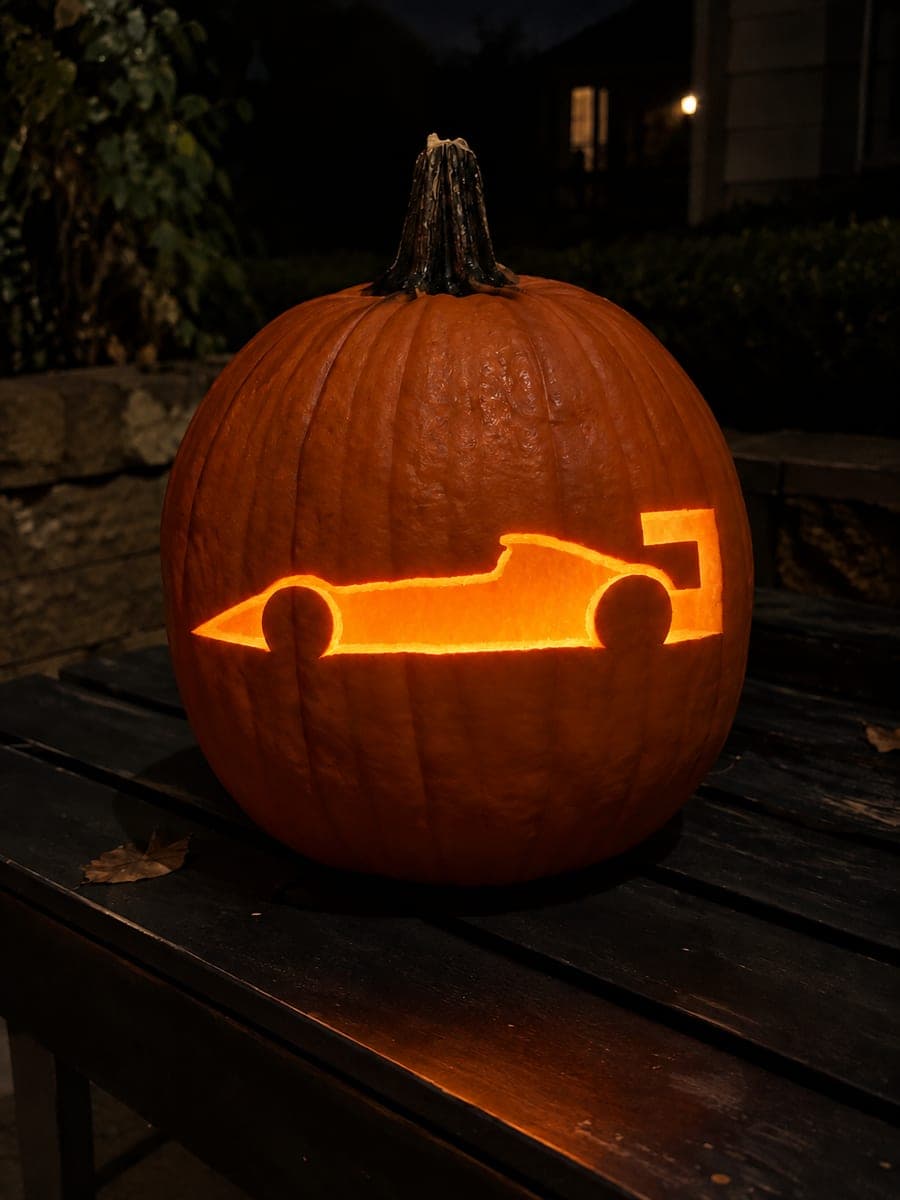
Side-View F1 Race Car Pumpkin in Rectangular WindowAI
0

Report this carving

Tell us what is wrong. Reports are private.

Side-View F1 Race Car Pumpkin in Rectangular Window

A full side-profile Formula One car is retained inside a rectangular glowing window, its broad tires rooted to the lower rim and both the nose and rear wing anchored to the side frames. Transfer the design with a stencil tool, then cut the outer window rectangle before tackling the smaller wheel-center and cockpit holes. At blue hour on a patio the backlit silhouette reads like a real racing livery poster.

No ratings yet · Sign in to rate
Comments (0)

  • No comments yet — be the first.

Save without an account. Sign in to like or comment.

Our tips for carving a similar design

This design keeps the F1 car as a solid retained piece sitting inside a fully cut rectangular window, so the car never actually falls out. The nose and rear wing anchor to the side frames and both tires root to the lower rim, giving the piece four solid contact points before you add any detail holes. Cut the outer rectangle first to establish that frame, then add the smaller cockpit and wheel-center holes while the body remains fully supported.

From pumpkin to porch

  1. Hollow and thin the wall

    Remove the back lid and scoop the pumpkin until the front wall is a consistent three-quarters of an inch thick. Uniform wall thickness means the tiny cockpit and wheel-center holes cut evenly without tearing.

  2. Transfer the full design

    Tape the stencil to the pumpkin face and perforate every outline with a pushpin at close intervals. Include the outer rectangle, the car silhouette inside it, and the small interior holes. Remove the paper and trace over the dots with a food-safe marker.

  3. Cut the outer rectangle

    Saw along the four sides of the window frame first, removing the background rind around the car in sections. Leave the car silhouette completely intact at this stage; do not cut any interior lines yet. Removing the background first keeps the composition stiff while you work inward.

  4. Open the background panels

    Push out each background piece from inside the pumpkin. There may be four or five sections depending on the car's profile. Work one panel at a time and check that the car body stays firmly connected at the nose, rear wing, and both tire bases.

  5. Cut the cockpit and wheel-center holes

    Use a detail drill or a fine saw to open the two small wheel-center holes and the single cockpit hole. Saw inward from the edge of each marked circle so you can control the cut direction. Keep adults at the saw for these small, close cuts.

  6. Light and photograph at blue hour

    Place an LED candle inside and take the pumpkin outside around dusk. The remaining ambient sky light gives context while the glowing window reads like a racing poster. Photograph from a level angle to keep the rectangular frame perfectly square in the shot.

Written with AI to match this design

Gather your supplies

Check things off as you get ready.

Work on a stable surface, keep your free hand out of the cutting path, and have an adult handle sharp tools.

Three levels of light

  • Leave intact

    The retained F1 car body, nose cone, rear wing, and tire faces stay solid and unlit

  • Peel & shade

    None, all tonal difference comes from full cuts versus solid rind

  • Cut through

    The rectangular window surround, cockpit opening, and two wheel-center holes all glow at full brightness

Learn the carving basics

Before you start cutting

Why cut the rectangle first instead of starting with the car details?

Cutting the outer frame first leaves the car body fully supported by its connections to the frame while you work inward. If you open the small interior holes first, the retained car becomes slightly loose and can shift as you try to clear the surrounding background.

The rear wing is very thin in my stencil. How do I keep it from snapping?

Make sure the wing tip clearly overlaps the side frame line by at least a half inch before you start cutting. If the stencil leaves the tip floating, draw the connection wider on the pumpkin with your marker before transferring. A wider bridge is always worth the slight loss of silhouette accuracy.

How do I get the rectangular window to look perfectly straight on a round pumpkin?

Use a ruler and marker to draw the rectangle directly on the pumpkin after positioning the stencil so the car sits at the visual center. A slight horizontal reference line drawn with a rubber band stretched around the pumpkin helps keep the top and bottom edges level.

Your take belongs here, too.

Changed a detail? Made it simpler? Share a photo of your version and tell the community what worked.

Share your pumpkin

More pumpkins like this

You've reached the end · 8 pumpkins
The Patch Report

Fresh pumpkins, in your inbox.

The best new carvings, ideas worth stealing, and how-tos for carving season. Short, seasonal, and gone by November.

A short email during carving season. Unsubscribe anytime. See our privacy policy.