Halloween Pumpkin Carving Contest · Starts October 1st · $500 in prizes
← Back to ideas
@ai_concepts
Sep 11, 2026
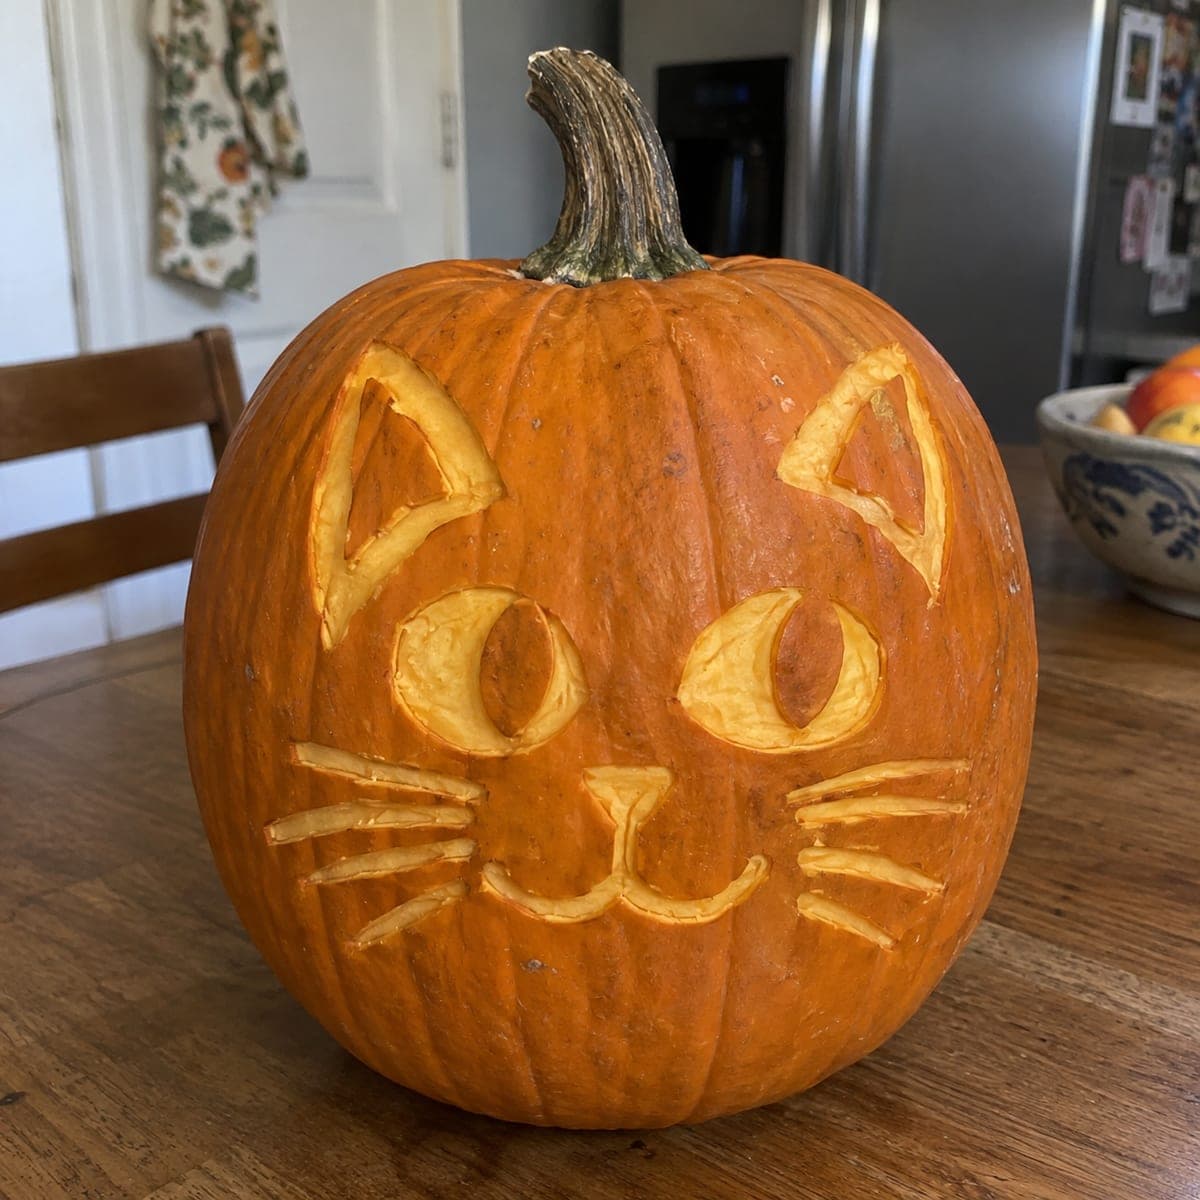
Simple Cat Face Pumpkin With Etched WhiskersAI
0

Simple Cat Face Pumpkin With Etched Whiskers

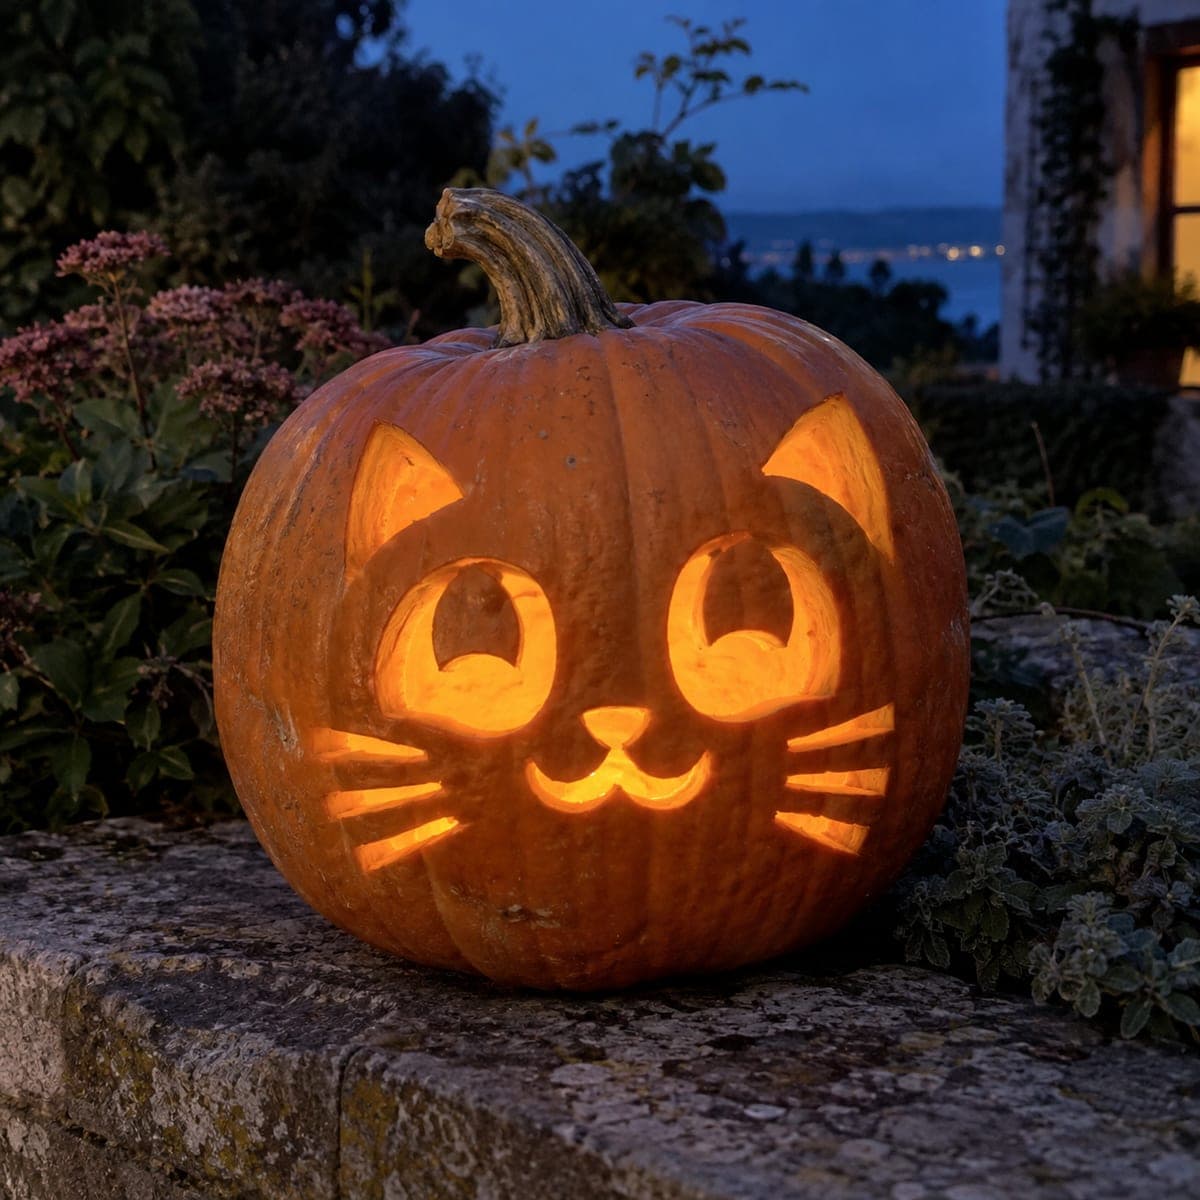
A friendly cat face takes shape from shallow etched lines, with triangle ears, crescent-pupil eyes, and long sweeping whiskers scraped into the rind. Because nothing is cut all the way through, this pumpkin carving idea works even without a candle and lasts longer on a kitchen table. Sketch the face with a dry-erase marker first, then peel the lines with a linoleum cutter or vegetable peeler, starting with the whiskers.

This is an AI-generated concept image: a realistic, carvable design idea rather than a photo of a finished carve. AI concepts are always labeled and sit out the leaderboard and the contest.

No ratings yet · Sign in to rate
Comments (0)

  • No comments yet — be the first.

Save without an account. Sign in to like or comment.

Our tips for carving a similar design

The whole trick here is depth control. Instead of cutting through the wall, you scrape away only the top layer of rind so the pale flesh underneath catches light and reads as a friendly cat. Plan the eyes as the deepest areas, keep the whiskers as long shallow grooves, and leave the rest of the skin dark for contrast.

Written by PumpkinCarvingIdeas.com, inspired by the image above. These are our suggestions, not instructions from the uploader. This approach to the AI concept has not been tested on a real pumpkin.

From pumpkin to porch

  1. Pick a round pumpkin and clean the face

    Choose a pumpkin with a wide, smooth front and few ribs so the whiskers can run straight. Since you are only etching, you can skip gutting entirely, which keeps the wall firm and the pumpkin lasting longer on a table. Wipe the surface clean and dry so your marker lines stay crisp. If you do want an interior LED glow later, cut a small lid from the back instead of the top.

  2. Sketch the cat with a dry-erase marker

    Draw two triangle ears near the top, two crescent-pupil eyes in the middle, and a small nose with a curved smile below. Add three long whiskers sweeping out from each side of the nose. Dry-erase marker wipes off easily, so redraw until the face feels balanced and centered. Step back and check symmetry before any tool touches the rind.

  3. Scrape the whiskers first

    Start with the whiskers using a linoleum cutter or the tip of a vegetable peeler, since they are the easiest lines to control. Drag shallow, even grooves that only remove the orange skin and expose the lighter flesh. Working these first lets you get a feel for pressure before you reach the detailed eyes. Keep your free hand behind the blade and let an adult handle any sharp tool.

  4. Etch the ears, nose, and smile

    Peel the inner triangles of the ears and the curved smile to a similar shallow depth so they glow the same amount. Leave a thin border of untouched skin around each shape to frame it and keep the design readable. For the nose, scrape a small solid patch rather than cutting a hole. Rinse away scrapings now and then so you can see your progress.

  5. Deepen the eyes for contrast

    Scrape the eyes a little deeper than everything else, leaving the crescent pupils as raised, untouched skin. That difference in depth makes the pupils stay dark while the surrounding eye glows, giving the cat its alert look. Go slowly and check both eyes against each other so one does not end up larger. Do not cut all the way through; the goal is a bright thin wall, not an opening.

  6. Light it and photograph

    Set a battery LED tea light behind or inside the pumpkin, or simply place it near a lamp, since etched designs read well even without a flame. Skip real candles, which can scorch the thin scraped areas. Rub a little vegetable oil on the exposed flesh to slow drying and richen the color. Shoot your photo in low room light to show off the soft orange glow of the whiskers and eyes.

Gather your supplies

Check things off as you get ready.

Work on a stable surface, keep your free hand out of the cutting path, and have an adult handle sharp tools.

Three levels of light

  • Leave intact

    The cheeks, forehead, nose bridge, ear borders, and the crescent pupils stay as untouched dark skin.

  • Peel & shade

    The whiskers, inner ears, nose patch, and smile are shallow-scraped for a soft mid glow.

  • Cut through

    Nothing is cut through on this design; the eyes are just scraped a touch deeper for the brightest areas.

Learn the carving basics

Before you start cutting

This is shown as a concept image, so can a real pumpkin look like this?

Yes. Every part of this face is shallow etching, which is very achievable on a real pumpkin. Just keep your scraping depth consistent and leave thin borders around each shape so the design stays crisp.

How deep should I scrape without breaking through the wall?

Remove only the orange skin and a thin layer of flesh, usually about an eighth of an inch. The eyes can go slightly deeper for extra brightness, but stop while you can still feel solid wall under the tool. If you see moisture pooling or the spot feels soft, ease off.

Will it glow if I never cut a hole for a light?

It will glow gently. Etched flesh lets some light pass and also catches ambient room light, so the face reads well on a table. For more brightness, cut a small access hole in the back and tuck an LED inside.

Your take belongs here, too.

Changed a detail? Made it simpler? Share a photo of your version and tell the community what worked.

Share your pumpkin

More pumpkins like this

You've reached the end · 8 pumpkins
The Patch Report

Fresh pumpkins, in your inbox.

The best new carvings, ideas worth stealing, and how-tos for carving season. Short, seasonal, and gone by November.

A short email during carving season. Unsubscribe anytime. See our privacy policy.