Halloween Pumpkin Carving Contest · Starts October 1st · $500 in prizes
← Back to ideas
@ai_concepts
Aug 5, 2026
Cute Cat Face Jack-O-Lantern for KidsAI
0

Cute Cat Face Jack-O-Lantern for Kids

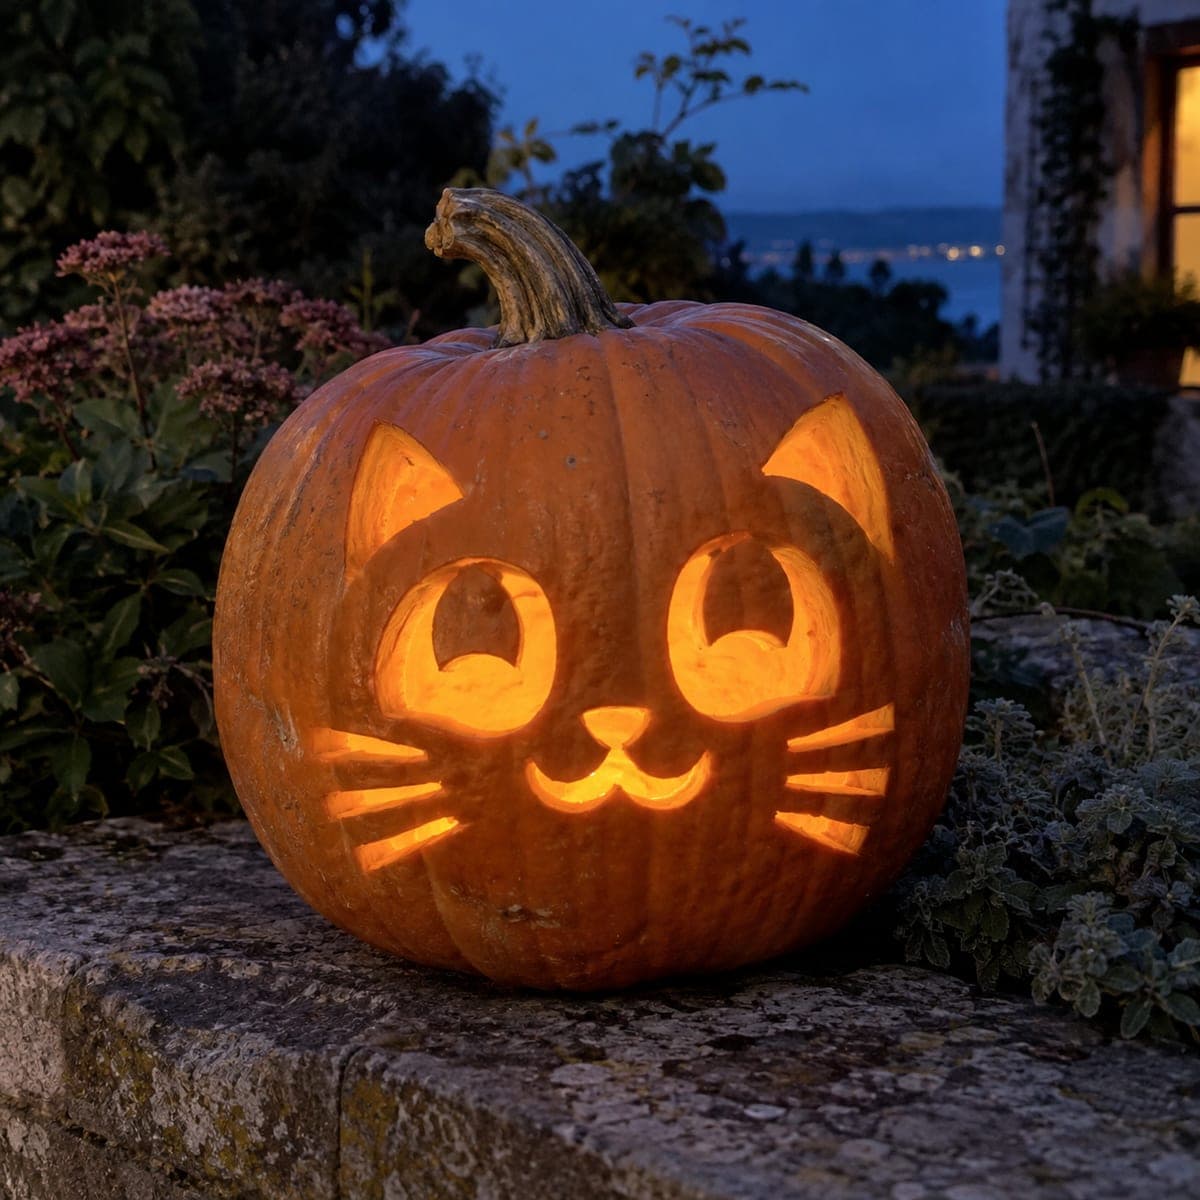
Big rounded eyes, a tiny nose-and-smile combo, and perked triangle ears make this cute cat jack-o-lantern a friendly greeter for young trick-or-treaters. The eyes keep a curved flap at the top to form pupils, so cut them slowly and leave that bridge attached. Etch the inner ears and whiskers shallowly rather than piercing them, which softens the glow and keeps the face sweet instead of spooky.

This is an AI-generated concept image: a realistic, carvable design idea rather than a photo of a finished carve. AI concepts are always labeled and sit out the leaderboard and the contest.

No ratings yet · Sign in to rate

Comments (0)

  • No comments yet — be the first.

Save without an account. Sign in to like or comment.

Our tips for carving a similar design

The charm of this cat comes from two big rounded eyes that each keep a curved flap of skin near the top to read as a pupil, so the eyes glow bright while the pupil stays dark. The nose and smile join into one small cutout, and the whiskers and inner ears are only etched, not pierced, which softens the light and keeps the face cute instead of scary. Cut the small dark details first, save the big eye openings for last, and leave every bridge attached.

Written by PumpkinCarvingIdeas.com, inspired by the image above. These are our suggestions, not instructions from the uploader. This approach to the AI concept has not been tested on a real pumpkin.

From pumpkin to porch

  1. Prep the pumpkin and pick a flat face

    Choose a tall, round pumpkin with a smooth front area big enough for two large eyes and a smile. Cut a lid from the top or, better for stability, a hatch in the back so the front skin stays intact. Scoop the insides and thin the front wall to about one inch so your tools glide through. A thinner wall also lets the peeled areas glow evenly.

  2. Transfer the design

    Tape your stencil flat over the front, snipping the paper edges so it hugs the curve without wrinkling. Use a poking tool to dot along every line, spacing the dots close on the tight curves of the eyes and smile. Peel the paper and connect the dots lightly with a marker so you can see the whole face. Double check that the ears sit up high and the whiskers sweep out symmetrically.

  3. Etch the whiskers and inner ears

    With a small loop or lino tool, scrape away just the outer skin along the whisker lines and inside the ear triangles. Keep these shallow so they glow a soft dim orange rather than punching all the way through. Removing only the skin here is what keeps the face gentle and sweet. Take your time and keep the whisker strokes tapering to a point.

  4. Cut the nose and smile

    Carve the joined nose-and-smile shape as one small opening using a fine saw. Cut slowly on the curves of the smile so the edges stay clean. This is your smallest full cutout, so let an adult handle the blade and keep fingers behind the cutting line. Gently push the piece out from the inside once it is fully cut.

  5. Cut the eyes and keep the pupil bridge

    Save the two large eyes for last since they remove the most material. Carve around each eye slowly, and where the design shows the curved flap at the top, stop your blade and leave that skin attached so it forms the dark pupil. Cut into the eye from below the flap so you never sever the bridge. Ease each eye piece out carefully to avoid cracking the thin edges.

  6. Light it and photograph

    Set a battery LED tea light or a small LED puck inside and place the lid or hatch back on. The eyes and smile should glow bright while the etched whiskers and ears stay dim and the pupils stay dark. Shoot photos at dusk against a simple background so the warm face pops. Rotate the light slightly if one eye looks brighter than the other.

Gather your supplies

Check things off as you get ready.

Work on a stable surface, keep your free hand out of the cutting path, and have an adult handle sharp tools.

Three levels of light

  • Leave intact

    The main face skin and the curved pupil flaps left inside each eye stay dark.

  • Peel & shade

    The whisker strokes and the inner ear triangles are skin-peeled for a soft dim glow.

  • Cut through

    The two big eyes and the joined nose-and-smile are cut through for the brightest light.

Learn the carving basics

Before you start cutting

How do I keep the pupils from falling out of the eyes?

The pupil is just a curved flap of skin left attached at the top of each eye, so treat it as a bridge. Cut into the eye opening from below and around the flap, never through it. If the flap feels loose, leave a little extra skin on the sides where it meets the eye edge.

Should the whiskers be cut all the way through?

No, keep them shallow. Scraping off only the outer skin makes the whiskers glow a soft dim orange and keeps the thin lines from weakening the pumpkin wall. Piercing them would make the light harsh and the face more spooky than cute.

This is a concept image, so can a real pumpkin look like this?

Yes, the design is built to work on a real pumpkin. The eyes and smile are solid cutouts, and the delicate whiskers and ear details are etched rather than pierced, so nothing thin is left to snap. Just thin the front wall and keep every bridge attached and it will hold up fine.

Your take belongs here, too.

Changed a detail? Made it simpler? Share a photo of your version and tell the community what worked.

Share your pumpkin

More pumpkins like this

You've reached the end · 8 pumpkins
The Patch Report

Fresh pumpkins, in your inbox.

The best new carvings, ideas worth stealing, and how-tos for carving season. Short, seasonal, and gone by November.

A short email during carving season. Unsubscribe anytime. See our privacy policy.