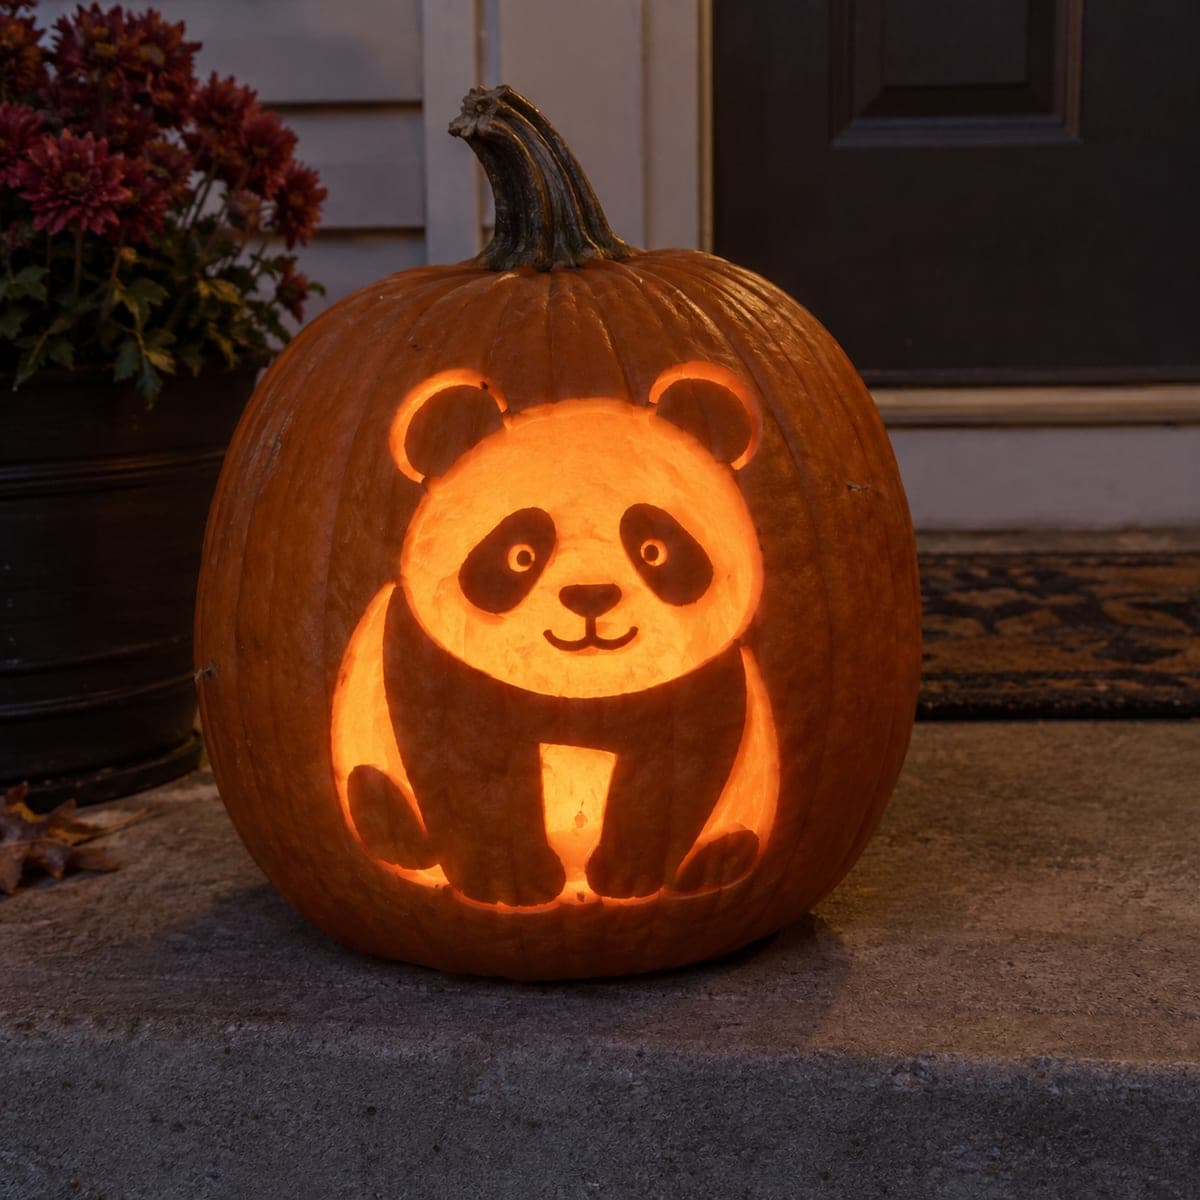
A seated panda glows from this pumpkin, its white face, belly, and paws carved to shine while the ears, eye patches, arms, and legs stay in dark untouched skin. The panda's own black-and-white coloring makes it a natural fit for negative-space carving, since the dark markings simply remain uncut. Keep the eye patches anchored to the ear areas as you cut, and drop in an LED puck for a soft, even glow that kids adore.
This is an AI-generated concept image: a realistic, carvable design idea rather than a photo of a finished carve. AI concepts are always labeled and sit out the leaderboard and the contest.
The trick here is negative-space carving, where the panda's natural black-and-white markings map perfectly onto dark skin and glowing cutouts. You leave the ears, eye patches, arms, and legs as untouched dark skin, then cut through the face, belly, and paws so light pours out. Plan your bridges before any tool touches the pumpkin so the dark eye patches stay firmly connected.
Written by PumpkinCarvingIdeas.com, inspired by the image above. These are our suggestions, not instructions from the uploader. This approach to the AI concept has not been tested on a real pumpkin.
From pumpkin to porch
1
Pick and prep a tall pumpkin
Choose a pumpkin with a broad, fairly flat front face so the seated panda has room to sit centered. Wipe it clean and dry it. Cut a lid from the bottom or the back rather than the top, since a bottom opening lets you set the pumpkin over an LED light easily. Scrape the inside wall behind the design down to about one inch thick so light passes through evenly.
2
Transfer the stencil
Tape a seated panda stencil onto the front, smoothing out wrinkles so the shapes stay true. Poke the outlines with a pin or transfer tool, marking the edges of the face, belly, paws, and the two eye patches. Step back and confirm the whole panda reads clearly before you start cutting. Mark which zones stay dark and which get cut so you never carve the wrong area.
3
Score and protect the dark markings
Before removing anything, lightly trace the ears, eye patches, arms, and legs so you remember they stay as untouched skin. These dark shapes are your negative space, so resist the urge to cut them. Pay special attention to the eye patches, which need to stay anchored to the ear regions by small bridges of skin. Leaving those bridges keeps the classic panda mask from floating loose.
4
Cut the glowing face, belly, and paws
With an adult handling the saw, cut through the white face area, the belly, and the paw shapes so those become full openings for the brightest light. Work with gentle sawing motions and support each piece as it frees so nothing tears. Save the largest opening, the belly, for last so the front stays sturdy while you carve. Keep the little smile and nose as thin bars of dark skin by cutting around them rather than through them.
5
Clean edges and drop in the light
Trim the inside edges of each cutout at a slight bevel so more light escapes and the shapes look crisp. Test-fit an LED puck light inside and check that the glow spreads evenly across the face and belly. If any spot stays dim, thin the inner wall there a little more. Wipe away loose pulp so nothing blocks the light.
6
Stage and photograph
Set the finished panda on a porch step or table where the surrounding dark makes the glow pop. Use a battery LED, never a candle, so the enclosed shape stays cool and safe. Snap your photo in the evening at a slight angle to catch the face and paws. Add a mum or a few leaves nearby for a cozy seasonal frame.
Gather your supplies
Check things off as you get ready.
Work on a stable surface, keep your free hand out of the cutting path, and have an adult handle sharp tools.
Three levels of light
Leave intact
The ears, eye patches, arms, and legs stay as untouched dark skin for the panda's black markings.
Peel & shade
The nose and smile can be skin-peeled to a dim orange so they read as soft features without becoming full holes.
Cut through
The white face, belly, and paws are cut fully through for the brightest glow.
Leave small bridges of skin connecting each eye patch to the nearby ear and face area. Since the patches are meant to stay dark and uncut anyway, this is easy in a negative-space design. Just make sure you never fully surround a dark shape with cuts, or it could loosen.
This is a concept image, so can a real pumpkin look like this?
Yes. No real pumpkin was carved for the picture, but the design is fully carvable because it relies on broad shapes and untouched dark markings rather than fragile thin cuts. Keep the smile and nose as chunky bars of skin so they hold up. The seated pose sits nicely on a tall pumpkin's flat front.
Where should I put the light for an even glow?
Cut the opening from the bottom or back so you can set the pumpkin over an LED puck. A single bright puck usually lights the face and belly evenly. If the top of the face stays dim, thin the inner wall behind it or add a second small LED.
Your take belongs here, too.
Changed a detail? Made it simpler? Share a photo of your version and tell the community what worked.
 AI
AI
Comments (0)