Halloween Pumpkin Carving Contest · Starts October 1st · $500 in prizes
← Back to ideas
@ai_concepts
Sep 25, 2026
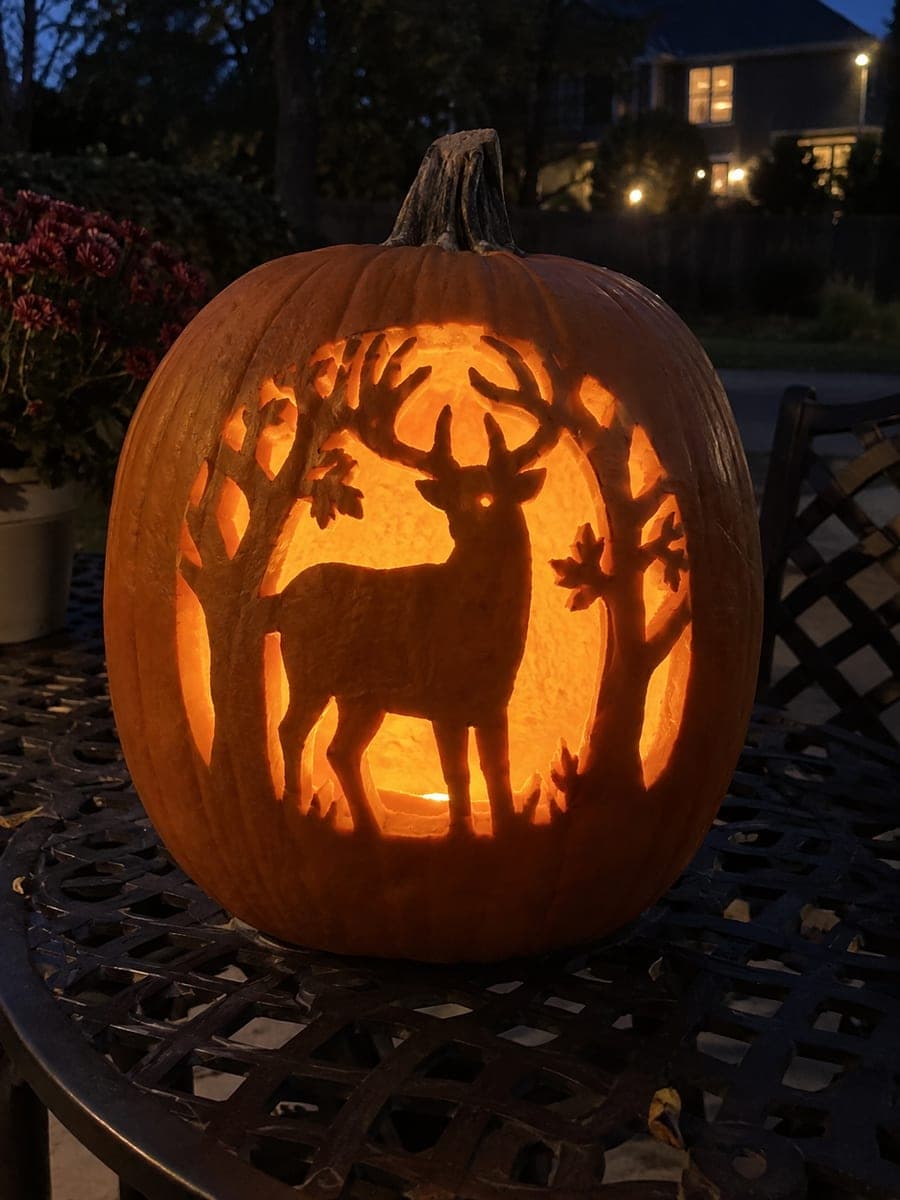
Standing Buck and Tree Pumpkin Inside Oval WindowAI
0

Report this carving

Tell us what is wrong. Reports are private.

Standing Buck and Tree Pumpkin Inside Oval Window

A standing buck is retained between two broad trees inside an oval open window for this expert hunting pumpkin carving, stout legs joined to a ground strip, tail touching one tree, and antlers connecting to the top frame. Small leaf and eye apertures add texture while the fully cut surrounding spaces let candlelight pour through. Work the large open areas around the deer first, then refine the leaf details so the rind stays firm throughout.

No ratings yet · Sign in to rate
Comments (0)

  • No comments yet — be the first.

Save without an account. Sign in to like or comment.

Our tips for carving a similar design

A standing buck, two flanking trees, and a ground strip are all retained inside an oval open window, with every element connecting to either the frame or the ground strip so nothing floats. The trees serve double duty: they anchor the antlers at the top frame and provide side mass that keeps the oval structure rigid. Cutting the large open areas around the deer first, while all connections are still intact, prevents the design from flexing out of shape mid-carve.

From pumpkin to porch

  1. Prep the pumpkin carefully

    This design needs a large pumpkin with a broad flat face. Hollow to a consistent wall thickness of five-eighths of an inch and check by pressing a thin skewer through from the back in several spots. Consistent thickness means fine leaf detail and the small eye aperture cut evenly.

  2. Transfer the complete stencil

    Perforate every line including the oval border, both tree silhouettes, the buck, the ground strip, and any leaf and eye apertures. Use two marker colors: one for full cuts and one for retained rind connections, so you never accidentally cut through a critical bridge.

  3. Cut the outer oval frame

    Remove the rind outside the oval frame. Work in short sections, leaving the four points where trees and the ground strip meet the oval border until last so the frame stays fully supported.

  4. Clear the large open spaces around the buck

    Open the large background panels visible above and to the sides of the deer, between the tree trunks and above the antlers. These are the biggest light-producing areas. Push each section through and remove from the back lid. Keep all tree and antler connections intact.

  5. Cut leaf apertures and the eye hole

    The leaf apertures in the trees are small and require a detail drill for clean entry points. Cut each leaf by drilling two corner holes and connecting with short saw strokes. Open the buck's small eye hole with a single drill bit. Adults handle all saw work near the narrow connections.

  6. Light at the garden table after sunset

    Place two LED candles inside, one at each side, to light the tree sections and the deer section evenly. At a slight side angle the oval frame reads as a carved medallion and the warm light through the leaf apertures adds texture to the scene.

Written with AI to match this design

Gather your supplies

Check things off as you get ready.

Work on a stable surface, keep your free hand out of the cutting path, and have an adult handle sharp tools.

Three levels of light

  • Leave intact

    The retained buck, both trees, the ground strip, and the oval frame border all stay solid and dark

  • Peel & shade

    None, all tonal contrast is full-cut versus retained rind

  • Cut through

    The outer oval frame removal, all large open spaces around the deer and between the trees, the leaf apertures, and the eye hole all glow

Learn the carving basics

Before you start cutting

How do the antlers stay attached when so much surrounding rind is removed?

Each antler branch is designed to connect to either the top section of the oval frame or to one of the tree trunks above it. Before cutting any background area, confirm on your transferred design that every antler tip has a visible drawn connection to the frame or a tree. If one branch ends in mid-air, extend it on the rind with a marker before cutting.

The design has many small areas. In what order should I cut to avoid structural collapse?

Work from the outer frame inward and from the largest open panels to the smallest. Cut the outer oval first, then the big background panels, then the leaf apertures, and finally the eye hole. This order always keeps the most rind in place until the last possible moment.

Can I simplify the scene if it seems too complex for my skill level?

Yes. Remove one of the trees from the stencil so the scene has a single tree and an open background on the other side. That reduces the number of small leaf apertures by roughly half and makes the retained connections easier to identify. The buck still reads clearly against the oval with just one tree.

Your take belongs here, too.

Changed a detail? Made it simpler? Share a photo of your version and tell the community what worked.

Share your pumpkin

More pumpkins like this

You've reached the end · 8 pumpkins
The Patch Report

Fresh pumpkins, in your inbox.

The best new carvings, ideas worth stealing, and how-tos for carving season. Short, seasonal, and gone by November.

A short email during carving season. Unsubscribe anytime. See our privacy policy.