Halloween Pumpkin Carving Contest · Starts October 1st · $500 in prizes
← Back to ideas
@ai_concepts
Jul 29, 2026
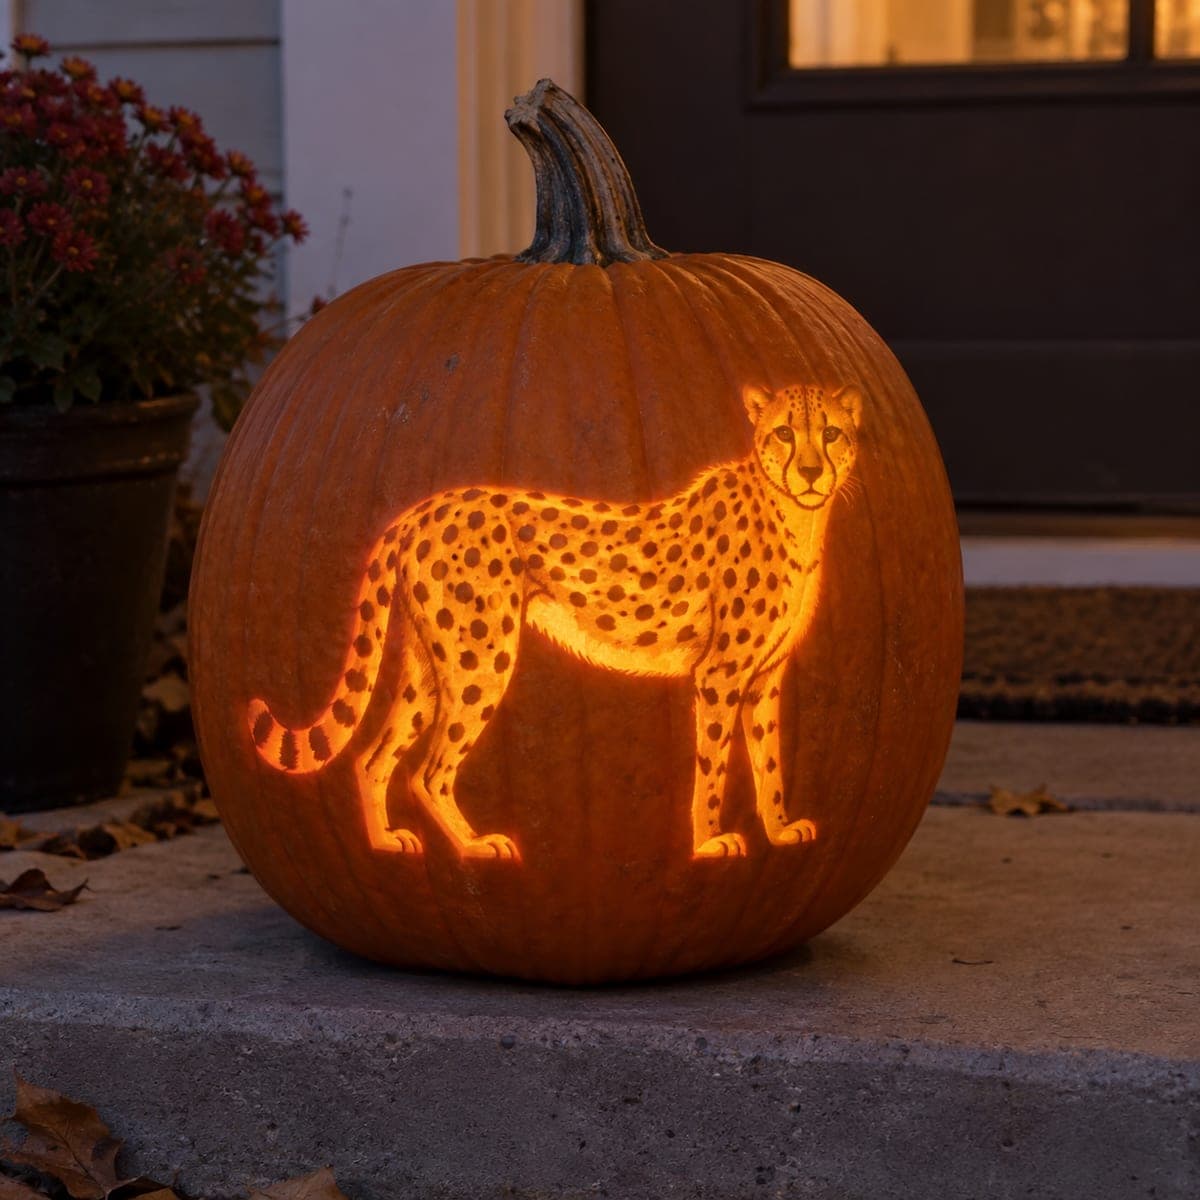
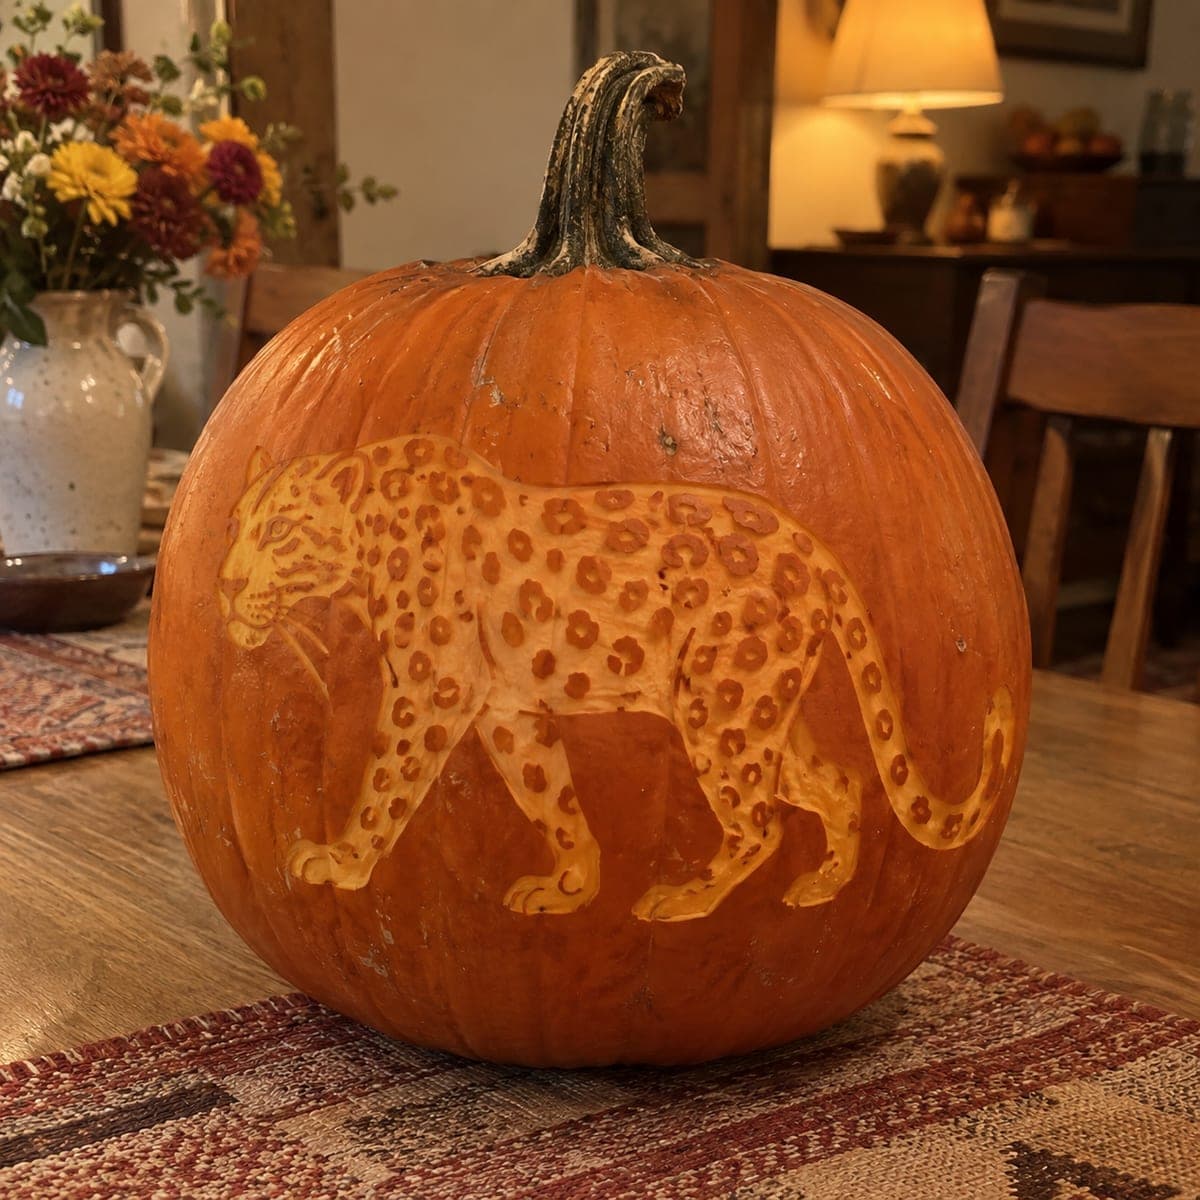
Standing Cheetah Jack-O-Lantern With Spotted CoatAI
0

Standing Cheetah Jack-O-Lantern With Spotted Coat

A full-body cheetah stands watch on this jack-o-lantern, its coat shaved to a glowing gold and dotted with dozens of dark spots left in untouched rind. The long curved tail and alert face show how much personality a thin-shell etching can carry when the depths are consistent. Shave the whole body first, then cut the spots as shallow skin islands you leave behind. Backlight it with two tea lights so the legs glow evenly.

This is an AI-generated concept image: a realistic, carvable design idea rather than a photo of a finished carve. AI concepts are always labeled and sit out the leaderboard and the contest.

No ratings yet · Sign in to rate
Comments (0)

  • No comments yet — be the first.

Save without an account. Sign in to like or comment.

Our tips for carving a similar design

The core trick here is a shaved body that glows gold, with the spots left as small islands of untouched rind so they read dark against the light. You map the whole cheetah first, shave the coat down to a thin shell for an even glow, then protect each spot as you go. The face and tail carry the personality, so save your steadiest hand for those.

Written by PumpkinCarvingIdeas.com, inspired by the image above. These are our suggestions, not instructions from the uploader. This approach to the AI concept has not been tested on a real pumpkin.

From pumpkin to porch

  1. Pick and prep the pumpkin

    Choose a tall, wide pumpkin with one broad, smooth face so the standing cheetah has room from nose to tail. Cut a wide access lid from the bottom rather than the top, which keeps the stem intact and makes it easy to set over the lights later. Scrape the inside wall behind the design down to about one inch thick so the shaved areas will glow evenly. A flat interior wall gives you consistent depth when you etch.

  2. Transfer the full stencil

    Print the cheetah at a size that fits your smooth face and tape it firmly in place so it cannot shift. Poke the outline, the leg gaps, the spots, and the tail bands with a pushpin or transfer wheel, spacing dots closely on tight curves like the face and paws. Peel the paper and connect the dots lightly with a marker if it helps you see the map. Take your time here, since the spot placement is what sells the coat.

  3. Shave the coat to a glow

    Using a fine ribbon or shaving tool, remove only the outer skin across the whole body to reveal the pale flesh beneath, working in smooth passes for a consistent gold tone. Keep the depth uniform so the legs and belly light up as brightly as the back. Do not cut all the way through anywhere in the body at this stage. Stop shaving right at the outline so the cheetah keeps a crisp edge against the dark rind around it.

  4. Leave the spots and tail bands

    As you shave, carve around each spot and each dark tail band so those small patches keep their untouched skin and stay dark. Work spot by spot rather than clearing a whole area first, which protects the little islands from being shaved off by accident. Keep the spots rounded and varied in size like a real coat. For the face, leave thin lines of skin for the tear marks and nose so the features stay readable.

  5. Deepen the brightest accents

    Once the body is shaved and the spots are set, decide where you want full brightness, such as thin gaps between the legs or a slim line under the belly. Cut those all the way through last, after all the delicate etching is done, so the shell stays strong while you work. Keep any full cutouts small and leave rind bridges between the legs so the standing pose does not weaken. Clean up ragged edges with a detail knife.

  6. Light it and photograph

    Set two battery LED tea lights inside, spaced apart so the tall body glows evenly from paws to shoulders instead of pooling in one spot. Avoid open flames, since the thin shaved shell scorches easily and dries out fast. Rub a little petroleum jelly on cut edges to slow browning, and shoot your photo at dusk when the gold coat reads best against the dark. If the belly looks dim, nudge one light forward.

Gather your supplies

Check things off as you get ready.

Work on a stable surface, keep your free hand out of the cutting path, and have an adult handle sharp tools.

Three levels of light

  • Leave intact

    The dozens of coat spots, the dark tail bands, the face markings, and all the rind surrounding the cheetah stay untouched and dark.

  • Peel & shade

    The entire cheetah body, legs, head, and tail get skin-peeled to a soft gold glow.

  • Cut through

    Small full cutouts only, such as thin gaps between the legs or a slim line under the belly for the brightest accents.

Learn the carving basics

Before you start cutting

How do I keep the spots from disappearing while I shave?

Carve around each spot as you reach it instead of shaving a large zone and adding spots after. Treat every spot as a tiny protected island of skin so your shaving tool never crosses it. Working in small sections keeps the pattern intact and evenly spaced.

Will the standing pose hold up with four thin legs?

Yes, because the legs are shaved rather than cut through, so the shell stays continuous and strong. Only make small full cutouts, and leave rind bridges between the legs rather than opening large gaps. Save any cut-throughs for the very last step to keep the pumpkin sturdy.

This is an expert design, how can a beginner get a similar look?

Start with just the cheetah silhouette and a handful of large spots rather than the full detailed coat. You can skip the shaved gradient and simply cut a bold outline with a few round spot holes. Search an easier big-cat stencil to build confidence before attempting the full shaded version.

Your take belongs here, too.

Changed a detail? Made it simpler? Share a photo of your version and tell the community what worked.

Share your pumpkin

More pumpkins like this

You've reached the end · 8 pumpkins
The Patch Report

Fresh pumpkins, in your inbox.

The best new carvings, ideas worth stealing, and how-tos for carving season. Short, seasonal, and gone by November.

A short email during carving season. Unsubscribe anytime. See our privacy policy.