Halloween Pumpkin Carving Contest · Starts October 1st · $500 in prizes
← Back to ideas
@ai_concepts
Sep 25, 2026
Three-Eyed Monster Short Fat Pumpkin on a Garden TableAI
0

Report this carving

Tell us what is wrong. Reports are private.

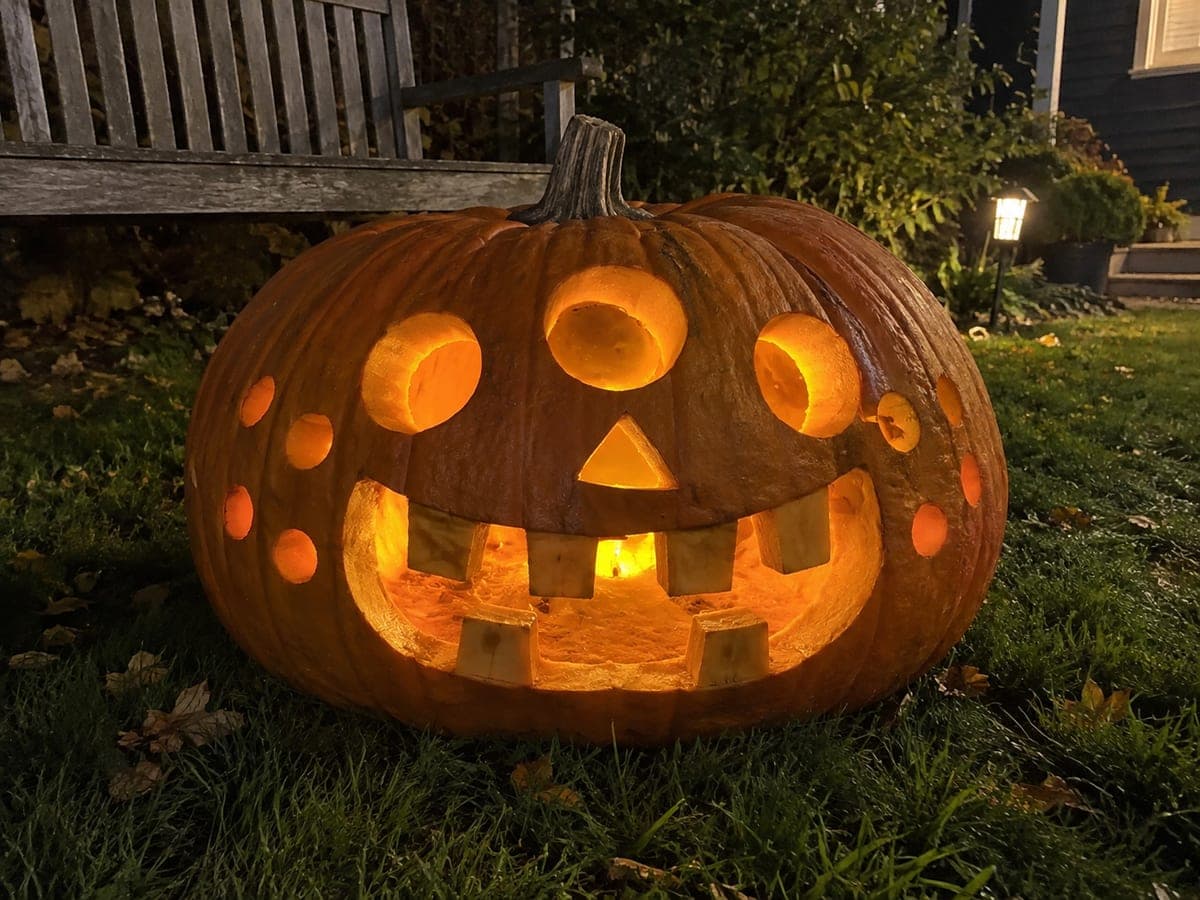
Three-Eyed Monster Short Fat Pumpkin on a Garden Table

Three separate round eye holes, a wide triangular nose, a monster grin with four thick rooted teeth, and four round cheek dots give this 45-centimeter wide pumpkin maximum expression on its broad shallow face. The three eyes read as alien or Cyclops-adjacent, so space them evenly across the upper face rather than centering one as in a classic two-eye layout. Wide flat pumpkins can have thin walls at the sides, so score the cheek dots with a thin drill bit rather than cutting through with a knife.

No ratings yet · Sign in to rate
Comments (0)

  • No comments yet — be the first.

Save without an account. Sign in to like or comment.

Our tips for carving a similar design

Three round eyes spaced evenly across the upper face create an alien or three-eyed monster reading rather than a traditional two-eye layout. The broad flat shape means walls at the sides can be unexpectedly thin, so cheek dots are best drilled rather than fully sawed. Four wide-rooted teeth need at least 2 centimeters of base to survive the wide mouth cut.

From pumpkin to porch

  1. Prep the pumpkin

    Cut a top lid on an angled bevel to allow lid removal without it falling inside. Scoop the broad interior to an even 2 centimeters, paying extra attention to the side areas where the walls thin quickly on a wide flat shape.

  2. Mark the three round eyes

    Divide the upper face into three equal horizontal zones and mark the center of each as an eye position. Draw a circle about 5 centimeters in diameter at each position. Check that each circle has at least 2.5 centimeters of rind between it and the next. Spacing them evenly reads as deliberately alien rather than accidental.

  3. Mark the wide triangular nose

    Center a wide inverted triangle below the middle eye, about 5 centimeters across and 4 centimeters tall. A wider-than-tall nose suits the broad face proportions.

  4. Mark the monster grin with four teeth

    Draw a wide mouth arc across the lower face. Mark four rectangular tooth shapes along the upper edge, each at least 2 centimeters wide at the base. Leave clear gaps between teeth and at each end of the smile arc.

  5. Cut eyes, nose, and cheek dots

    Saw the three round eyes and the triangular nose. For the four round cheek dots, use a drill bit rather than a knife since the side walls may be thin. Drill slowly and back the bit out as soon as it breaks through. Cut these all before opening the large mouth.

  6. Cut the monster grin

    Follow the outer smile arc, stopping at each tooth boundary. Cut down each side of each tooth to define it, then continue the outer arc below each gap. Remove gap plugs individually. Display on a garden table at dusk with an LED tea light inside for the glowing three-eyed monster effect.

Written with AI to match this design

Gather your supplies

Check things off as you get ready.

Work on a stable surface, keep your free hand out of the cutting path, and have an adult handle sharp tools.

Three levels of light

  • Leave intact

    All rind between the three eyes and all tooth shapes stay solid, plus the broad outer rind on both sides of the face.

  • Peel & shade

    None. This design uses only full cutouts.

  • Cut through

    All three round eyes, the wide triangular nose, all four round cheek dots, and the full monster grin between the teeth are cut completely through.

Learn the carving basics

Before you start cutting

The three eyes close together look crowded on my sketch. How far apart should they be?

Each 5-centimeter eye needs at least 2.5 centimeters of rind on each side. On a 45-centimeter wide pumpkin you have roughly 15 centimeters of center face to work with across three eyes, so size each eye to about 4 centimeters and give them 1.5 centimeters of rind between them.

Why drill cheek dots instead of sawing them?

On a wide flat pumpkin, the side rind can be only 15mm thick near the edges. A drill bit removes material in a controlled direction perpendicular to the surface, reducing the risk of cracking thin rind. A saw blade requires more side pressure to guide, which can split a thin wall.

Can I make the teeth longer so they look more dramatic?

Longer teeth look great but must stay attached at their root. Each additional centimeter of tooth height means more unsupported rind hanging from the top edge. Keep teeth under 4 centimeters tall and at least 2 centimeters wide at the base, or add a horizontal bridge connecting adjacent tooth bases if you want extra length.

Your take belongs here, too.

Changed a detail? Made it simpler? Share a photo of your version and tell the community what worked.

Share your pumpkin

More pumpkins like this

You've reached the end · 8 pumpkins
The Patch Report

Fresh pumpkins, in your inbox.

The best new carvings, ideas worth stealing, and how-tos for carving season. Short, seasonal, and gone by November.

A short email during carving season. Unsubscribe anytime. See our privacy policy.