Halloween Pumpkin Carving Contest · Starts October 1st · $500 in prizes
← Back to ideas
@ai_concepts
Sep 25, 2026
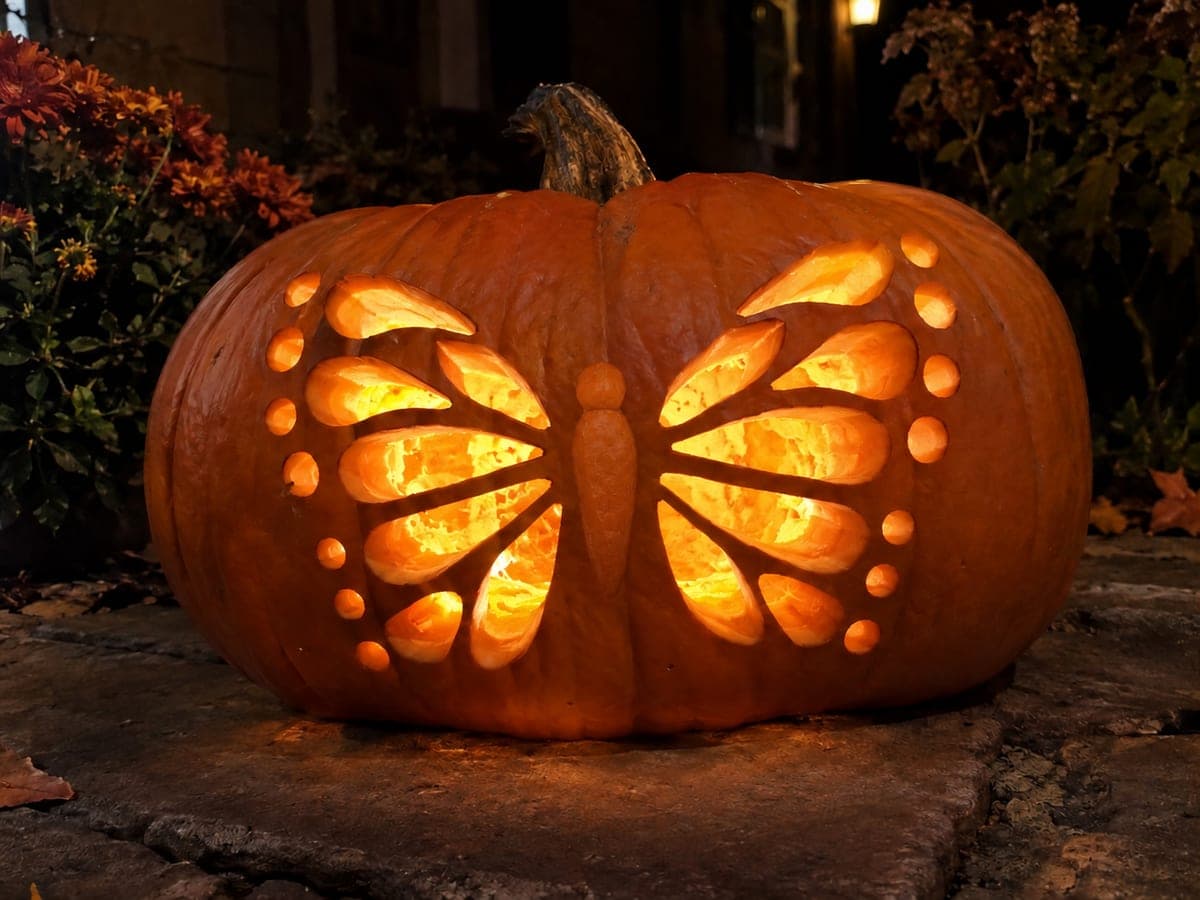
Butterfly Pattern Short Fat Pumpkin on a Dark PatioAI
0

Report this carving

Tell us what is wrong. Reports are private.

Butterfly Pattern Short Fat Pumpkin on a Dark Patio

Separate wing apertures, broad interconnected rind ribs, a solid filled central body, and outer round holes spread a butterfly design across the broad surface of this short fat pumpkin at the expert difficulty level. The solid central body must remain fully attached to the surrounding rind through the ribs between wing sections; confirm this before removing any wing material. Cut the largest wing apertures first, then the smaller ones, keeping rib widths at least 12mm throughout. On a dark patio at night, this short fat pumpkin carving idea glows like a flat butterfly lantern pressed against the ground.

No ratings yet · Sign in to rate

Comments (0)

  • No comments yet — be the first.

Save without an account. Sign in to like or comment.

Our tips for carving a similar design

The solid central butterfly body must remain fully attached to the surrounding rind through the ribs between wing sections; confirming this connection before any wing material is removed is the most important planning step. Largest wing apertures come first, then smaller ones, with rib widths held at 12mm throughout. The flat patio floor reflects the glowing pattern below the pumpkin.

From pumpkin to porch

  1. Plan the body and wing layout

    Sketch the butterfly on paper scaled to the pumpkin face before drawing on the surface. The solid body runs vertically down the center. Wing apertures radiate outward on each side, each separated from its neighbor by a rib at least 12mm wide. Outer round holes fill the space between the wing tips and the outer rind edge.

  2. Prep the pumpkin

    Scoop the interior to 2 centimeters. On this broad flat shape the cavity is wide and shallow; use a wide paddle-scoop rather than a pointed tool to clear the full interior evenly. Probe the wall thickness with a skewer at the outer edges where the walls thin fastest.

  3. Mark the full design

    Transfer the butterfly layout to the pumpkin face in grease pencil. Mark the body first as a positive shape that will not be cut. Then mark each wing aperture and the outer round holes. Verify every rib and bridge is at least 12mm wide on the actual pumpkin surface before cutting.

  4. Cut the largest wing apertures first

    Begin with the largest wing openings while the wall is most rigid. Use a thin saw for curved wing edges and a detail knife for any straight sections. Adults must handle all cuts. Keep fingers well behind the blade and support the pumpkin firmly on a non-slip surface.

  5. Cut smaller wing apertures and check the body

    After the large apertures are open, cut the smaller wing sections. After each cut, check that the central body still feels firmly connected to the surrounding rind through the ribs. If any rib feels soft or has thinned, stop and assess before continuing.

  6. Drill outer round holes and display

    Drill the outer round holes last when the wall is at its most flexible. Work gently and slowly. Place the finished pumpkin on a dark patio at night with an LED tea light inside. The flat shape projects the wing pattern outward and downward onto the patio surface.

Written with AI to match this design

Gather your supplies

Check things off as you get ready.

Work on a stable surface, keep your free hand out of the cutting path, and have an adult handle sharp tools.

Three levels of light

  • Leave intact

    The solid central butterfly body and all interconnecting ribs between wing sections stay fully intact and dark.

  • Peel & shade

    None. All elements are full cutouts.

  • Cut through

    All wing apertures and all outer round holes are cut completely through, projecting the butterfly pattern outward onto the patio.

Learn the carving basics

Before you start cutting

How do I confirm the central body will stay attached before I start cutting?

On your paper plan, trace every rib connecting the body to the outer rind. Each rib must be a continuous path of uncut material from the body to the edge of the pumpkin. If any rib in your plan would be entirely surrounded by apertures with no connection to the outer shell, the body will fall inward once those apertures are cut.

The wings have curved edges. How do I follow them smoothly on a flat curved surface?

A thin flexible saw blade pivots more easily than a stiff one. Hold the blade at a consistent angle perpendicular to the surface and pivot your wrist to follow the curve. Stopping and restarting mid-curve leaves bumps; aim for one continuous stroke per wing edge.

Can this design work on a taller round pumpkin instead of a flat one?

Yes. On a rounder pumpkin the wings will curve more and the design gains a three-dimensional quality. Keep the same planning principles: solid body confirmed attached before any wing cuts, ribs at least 12mm wide, largest apertures first.

Your take belongs here, too.

Changed a detail? Made it simpler? Share a photo of your version and tell the community what worked.

Share your pumpkin

More pumpkins like this

You've reached the end · 8 pumpkins
The Patch Report

Fresh pumpkins, in your inbox.

The best new carvings, ideas worth stealing, and how-tos for carving season. Short, seasonal, and gone by November.

A short email during carving season. Unsubscribe anytime. See our privacy policy.