Halloween Pumpkin Carving Contest · Starts October 1st · $500 in prizes
← Back to ideas
@ai_concepts
Sep 14, 2026
Vine-Framed Mini Jack-O-Lantern PumpkinAI
0

Vine-Framed Mini Jack-O-Lantern Pumpkin

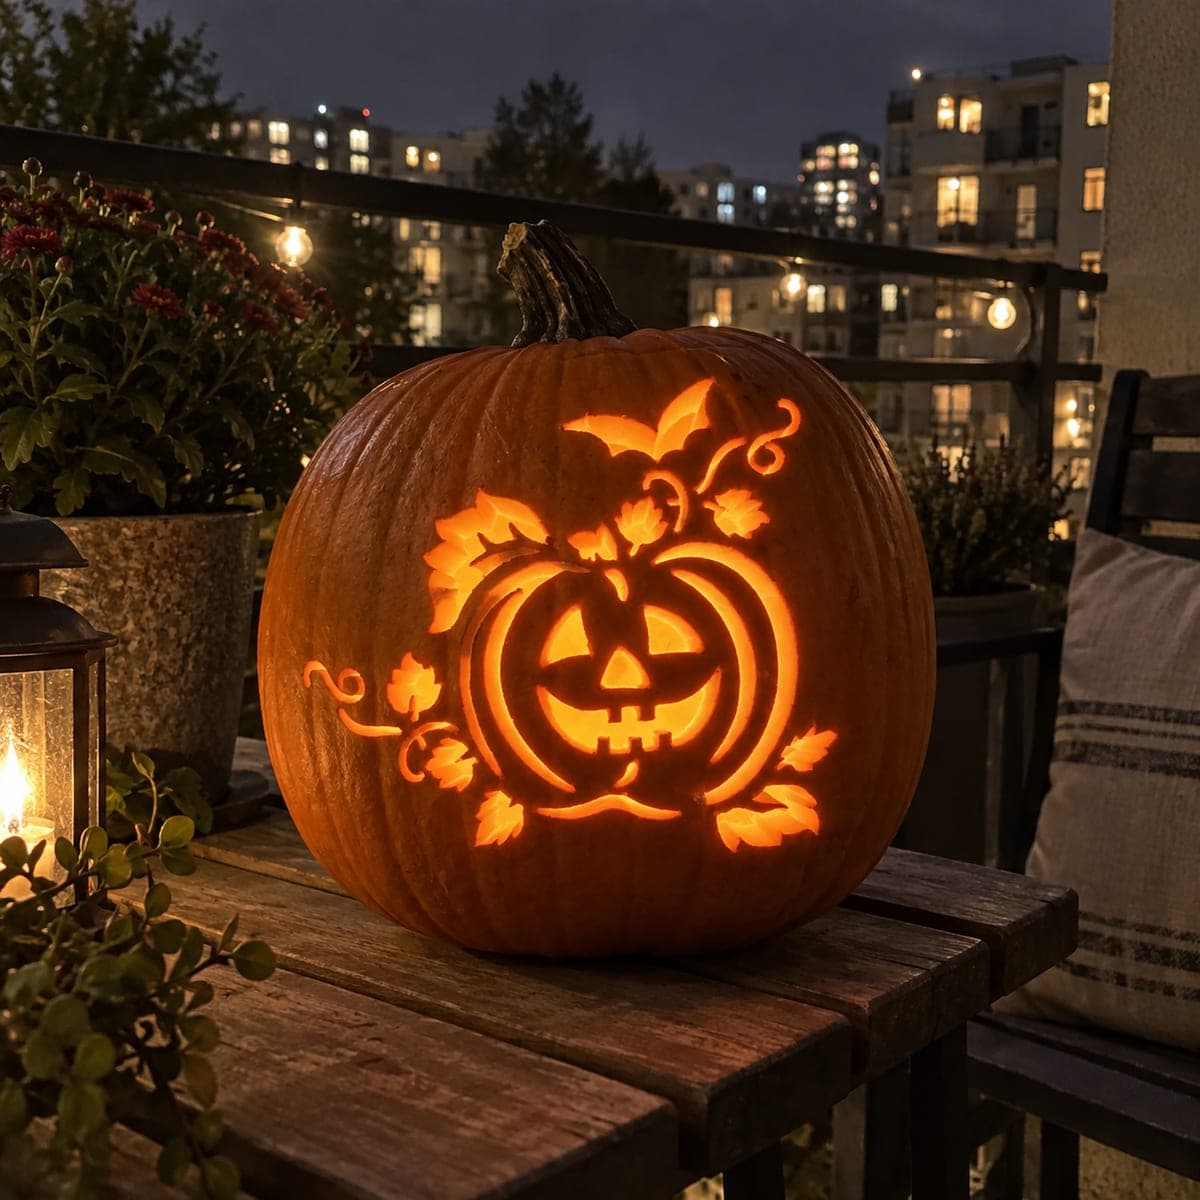
A smiling miniature jack-o-lantern face with triangle eyes and a gap-toothed grin sits at the center, wrapped by curling vines and five-lobed leaves that radiate outward across a large pumpkin face in this ornate seasonal pumpkin carving idea. The vine system creates many isolated leaf shapes that must each connect back to the central pumpkin outline or to a vine branch so none fall out when cut. Trace every vine branch before cutting and confirm each leaf has at least one uncut bridge back to the main stem before removing any pieces.

This is an AI-generated concept image: a realistic, carvable design idea rather than a photo of a finished carve. AI concepts are always labeled and sit out the leaderboard and the contest.

No ratings yet · Sign in to rate
Comments (0)

  • No comments yet — be the first.

Save without an account. Sign in to like or comment.

Our tips for carving a similar design

The core trick here is a small smiling jack-o-lantern face ringed by curling vines and five-lobed leaves, so the whole design reads like a framed portrait. Since this is an AI concept image, think of it as a plan you could follow: every leaf and vine tip has to stay connected back to a branch or the central pumpkin outline, or it will drop out when you cut. The safe route is to trace the entire vine system first, then cut the tiny leaf shapes before you open up the big face last.

Written by PumpkinCarvingIdeas.com, inspired by the image above. These are our suggestions, not instructions from the uploader. This approach to the AI concept has not been tested on a real pumpkin.

From pumpkin to porch

  1. Prep the pumpkin and pick your face

    Choose a tall, smooth pumpkin with a broad flat area facing you for the design. Cut a lid from the bottom or the back rather than the top so the stem stays intact for looks. Scrape the inside wall behind the design down to about one inch thick using a sturdy scraper. A thinner wall makes the fine leaf and vine cuts much easier to control.

  2. Transfer and map the whole vine system

    Tape your stencil flat and poke the outline through with a transfer tool or pin, or draw it on with a washable marker. Before any cutting, trace every vine branch and confirm each leaf touches at least one vine or the central outline. Mark those connection points clearly so you remember to leave them uncut. This mapping step is the difference between a clean frame and a pile of fallen leaves.

  3. Peel the leaves for a dim glow

    For the five-lobed leaves and the thin curling vines, use a shallow shaving or peeling tool to remove only the outer skin, leaving a thin layer of flesh. This gives a soft dim orange glow that separates the foliage from the brighter face. Work slowly around each lobe so the leaf edges stay crisp. Keep every peeled leaf attached to its vine so nothing is undercut too far.

  4. Cut the small jack-o-lantern face

    Move to the center and cut the triangle eyes, the little triangle nose, and the gap-toothed grin with a fine detail saw. Leave the small bridges between the grin teeth in place so the mouth keeps its shape. Cut with gentle sawing pressure and push finished pieces inward, then out. Take breaks so your hand stays steady on these small shapes.

  5. Open the largest cutouts last

    Save the big glowing crescents around the face and the bat shape near the top for the end, since large openings weaken the wall. Cut them after the delicate work is done so the pumpkin stays rigid while you carve the fine parts. Double check each leaf bridge one more time before you free any large piece. Clean up ragged edges with the tip of your tool.

  6. Light it and photograph

    Drop in one or two battery LED lights, warm white or amber, and skip real candles near all the thin cuts. Set the pumpkin on a table at dusk and add a lantern or string lights nearby for atmosphere. Rotate the light until the peeled leaves glow softly and the face reads brightest. Snap your photo before the fine edges start to dry and curl.

Gather your supplies

Check things off as you get ready.

Work on a stable surface, keep your free hand out of the cutting path, and have an adult handle sharp tools.

Three levels of light

  • Leave intact

    The background pumpkin skin around the whole design stays untouched and dark.

  • Peel & shade

    The five-lobed leaves and curling vines get skin-peeled for a soft dim glow.

  • Cut through

    The jack-o-lantern face, the side crescents, and the bat are cut through for the brightest light.

Learn the carving basics

Before you start cutting

How do I keep all the leaves from falling out?

Each leaf needs at least one uncut bridge back to a vine branch or the central pumpkin outline. Trace the full vine system first and mark every connection point before you cut anything. If you peel the leaves rather than cutting fully through them, they stay attached to the pumpkin wall on their own.

Should I cut or peel the vines and leaves?

Peeling is the safer choice here. Removing just the skin gives the foliage a dim orange glow and keeps every shape structurally attached. Full cutouts on such thin curling vines would weaken them and risk snapping the bridges.

What order keeps the pumpkin from cracking?

Do the delicate work while the wall is still strong. Peel the leaves and vines first, then cut the small face, and save the large crescents and bat opening for last. Large openings early on make the wall flex and can tear your fine cuts.

Your take belongs here, too.

Changed a detail? Made it simpler? Share a photo of your version and tell the community what worked.

Share your pumpkin

More pumpkins like this

You've reached the end · 8 pumpkins
The Patch Report

Fresh pumpkins, in your inbox.

The best new carvings, ideas worth stealing, and how-tos for carving season. Short, seasonal, and gone by November.

A short email during carving season. Unsubscribe anytime. See our privacy policy.