Halloween Pumpkin Carving Contest · Starts October 1st · $500 in prizes
← Back to ideas
@ai_concepts
Sep 25, 2026
Ornate Jack-O-Lantern Face with Oak Leaf Ring PumpkinAI
0

Report this carving

Tell us what is wrong. Reports are private.

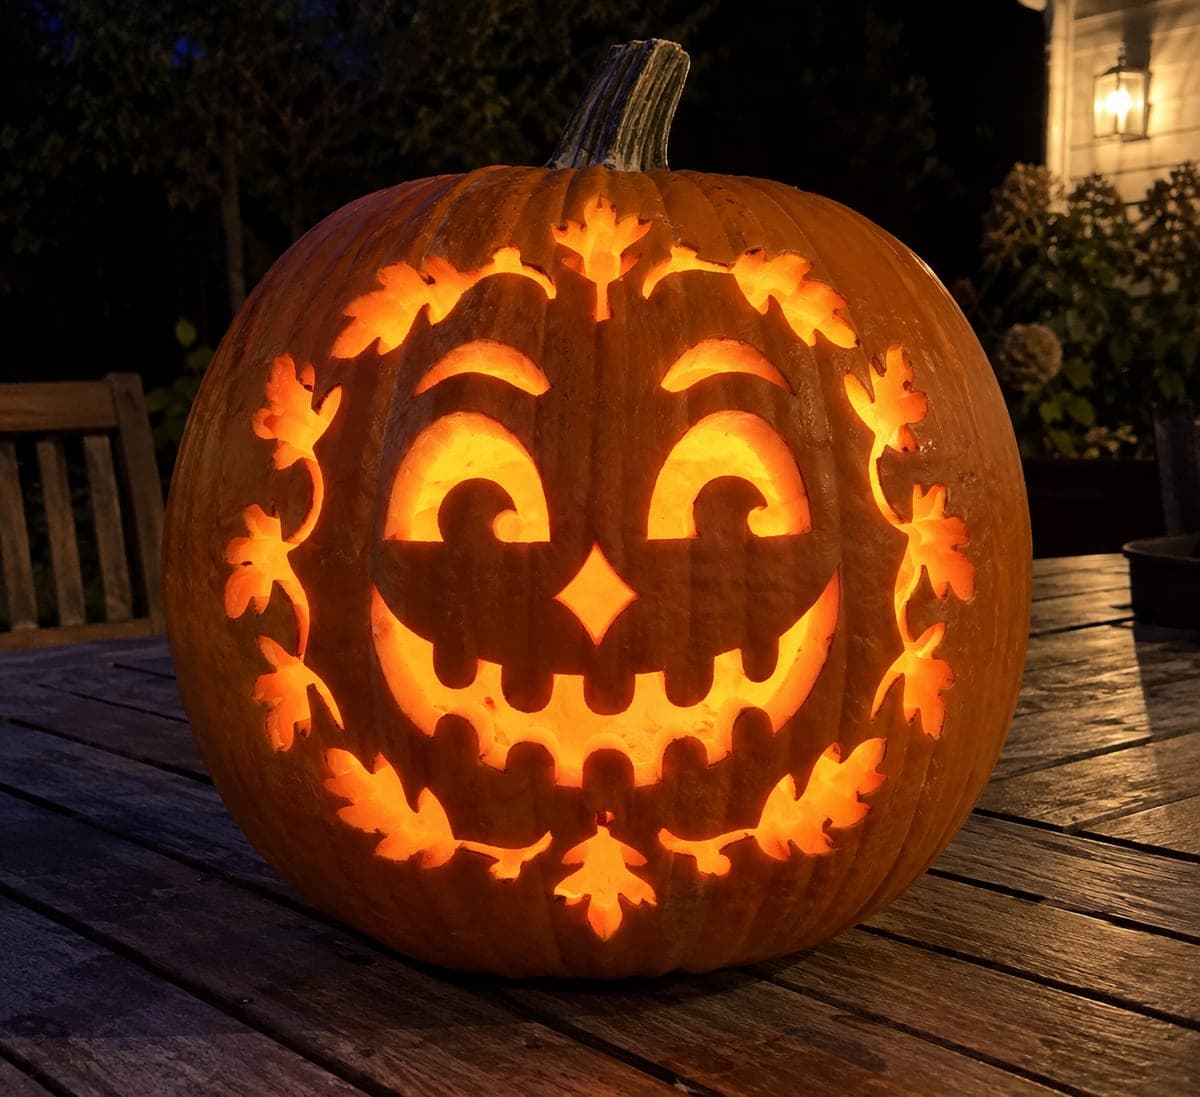
Ornate Jack-O-Lantern Face with Oak Leaf Ring Pumpkin

An elaborate classic jack-o-lantern face with arched eyes, attached pupils, curved eyebrow holes, a diamond nose, and a scalloped eight-tooth grin sits inside a ring of individual oak-leaf cutout holes in this expert classic jack-o-lantern idea. Every retained piece of rind stays connected to the main shell; nothing is an isolated island. Score the entire design lightly before cutting any aperture through, so you can see the full composition and adjust spacing. Placing this pumpkin where light can bounce off a nearby wall turns the oak-leaf ring into a decorative shadow wreath.

No ratings yet · Sign in to rate

Comments (0)

  • No comments yet — be the first.

Save without an account. Sign in to like or comment.

Our tips for carving a similar design

Every retained piece of rind must stay connected to the main shell in a continuous path; no isolated island shapes allowed anywhere in this design. The oak-leaf ring defines the outer frame of the composition while the face features fill the interior. Scoring the entire design lightly before cutting any aperture through lets you check spacing and confirm connectivity before any material is permanently removed. Placing this pumpkin near a light-colored wall turns the leaf ring into a decorative shadow wreath.

From pumpkin to porch

  1. Select a large pumpkin and hollow deeply

    Choose the largest, flattest-faced pumpkin you can find. Hollow to a 30 mm wall so the narrow brow-hole apertures and leaf stems stay structurally sound. Mark a center vertical axis and draw concentric rough circles for the oak-leaf ring boundary and the face region inside it.

  2. Score the full composition before cutting

    Using a craft knife at very shallow depth, score all outlines of every element: each leaf, the eye arches, brow holes, nose, and all grin scallops. This dry-run lets you verify spacing and connectivity. Check that every leaf connects to adjacent leaves or the outer ring of intact rind.

  3. Cut the oak-leaf ring

    Working from one side of the ring to the other, cut each individual leaf aperture fully through, one leaf at a time. The spaces between leaf apertures form the retained oak-leaf silhouettes; do not cut those connective rind ribs. Complete the full ring before touching the face.

  4. Cut the face brow holes and eye arches

    Cut the small curved brow-hole pairs above the eyes first, then the full arched eye openings. For the attached pupils, score the pupil perimeter before cutting the surrounding eye arch so the pupil tab remains connected at the top edge. Clean all attachment points with a craft knife.

  5. Cut the nose and scalloped grin

    Cut the diamond nose hole, then work through the scalloped grin one tooth gap at a time. Eight teeth means eight individual scallop cuts; cut from the outer edge of the smile inward on each pass, clearing one gap before starting the next.

  6. Light near a wall for the shadow effect

    Place a bright LED inside and position the pumpkin about 30 cm in front of a pale wall. The oak-leaf ring casts a decorative wreath of shadow around the glowing face. Photograph from straight on to capture both the lit pumpkin and the shadow projection simultaneously.

Written with AI to match this design

Gather your supplies

Check things off as you get ready.

Work on a stable surface, keep your free hand out of the cutting path, and have an adult handle sharp tools.

Three levels of light

  • Leave intact

    Oak-leaf silhouette rind ribs between leaf holes, all face rind outside the apertures, and the dark connected face border

  • Peel & shade

    None; this is a pure cutout design

  • Cut through

    Individual leaf apertures in the ring, arched eye openings (minus attached pupils), brow hole pairs, diamond nose, and eight scalloped grin slots

Learn the carving basics

Before you start cutting

How do I verify every piece of rind is connected before I start cutting through?

On your scored design, trace a path with a fingertip from every retained rind shape back to the outer shell edge without lifting your finger or crossing a scored cut line. If you cannot trace a continuous path, that shape will become a floating island and must be redesigned with a connecting bridge.

The oak leaves are small and detailed. Is there a simpler substitute that keeps the same spirit?

Rounded teardrop or simple oval holes work well as a substitute leaf ring. They are far quicker to cut than a detailed leaf silhouette and still create the same framing wreath effect when lit. Reduce the count to 10 to 12 larger ovals for a beginner-friendly version.

A leaf rind piece broke off during carving. Can I save the design?

Reattach it with a round toothpick inserted through the leaf and into the adjacent intact rind, trimmed flush on both sides. If the piece is too small to reattach, cut the adjacent leaf apertures slightly larger to absorb the gap, transforming the damaged area into a deliberate wider space.

Your take belongs here, too.

Changed a detail? Made it simpler? Share a photo of your version and tell the community what worked.

Share your pumpkin

More pumpkins like this

You've reached the end · 8 pumpkins
The Patch Report

Fresh pumpkins, in your inbox.

The best new carvings, ideas worth stealing, and how-tos for carving season. Short, seasonal, and gone by November.

A short email during carving season. Unsubscribe anytime. See our privacy policy.