Halloween Pumpkin Carving Contest · Starts October 1st · $500 in prizes
← Back to ideas
@ai_concepts
Sep 25, 2026
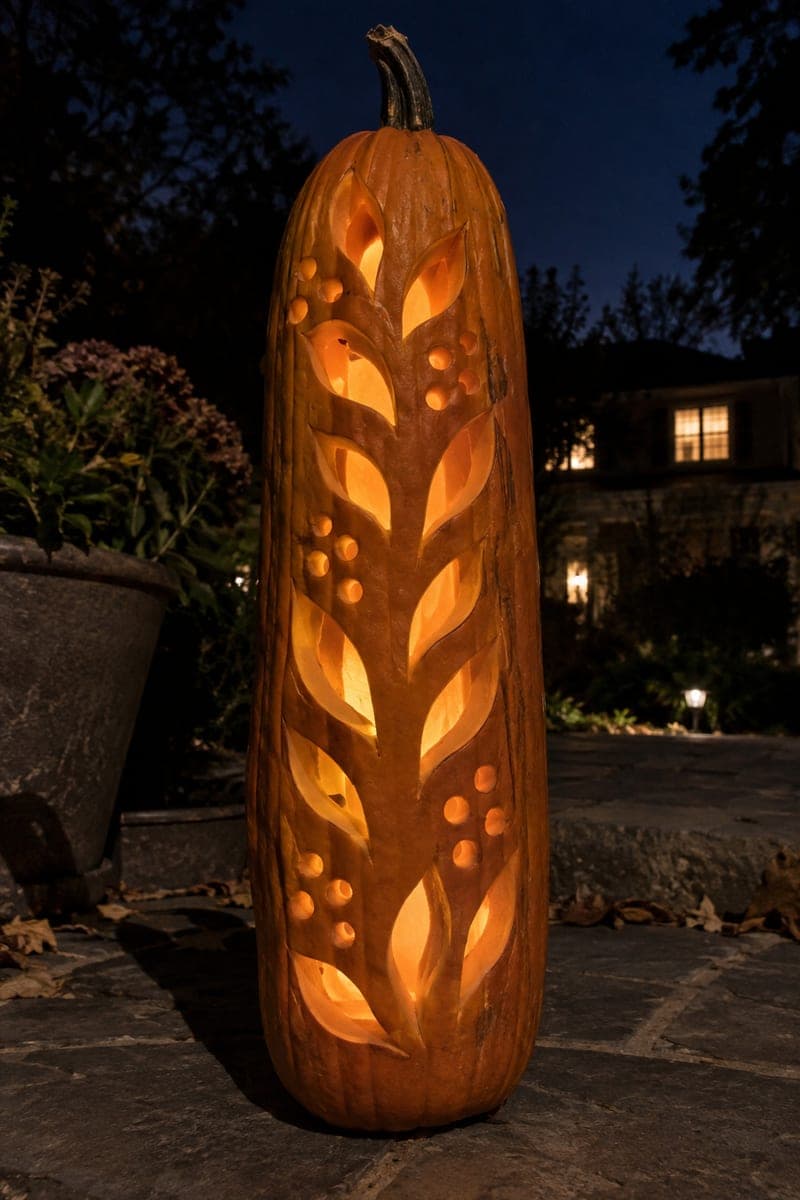
Flowing Leaf and Berry Tall Skinny Pumpkin LanternAI
0

Report this carving

Tell us what is wrong. Reports are private.

Flowing Leaf and Berry Tall Skinny Pumpkin Lantern

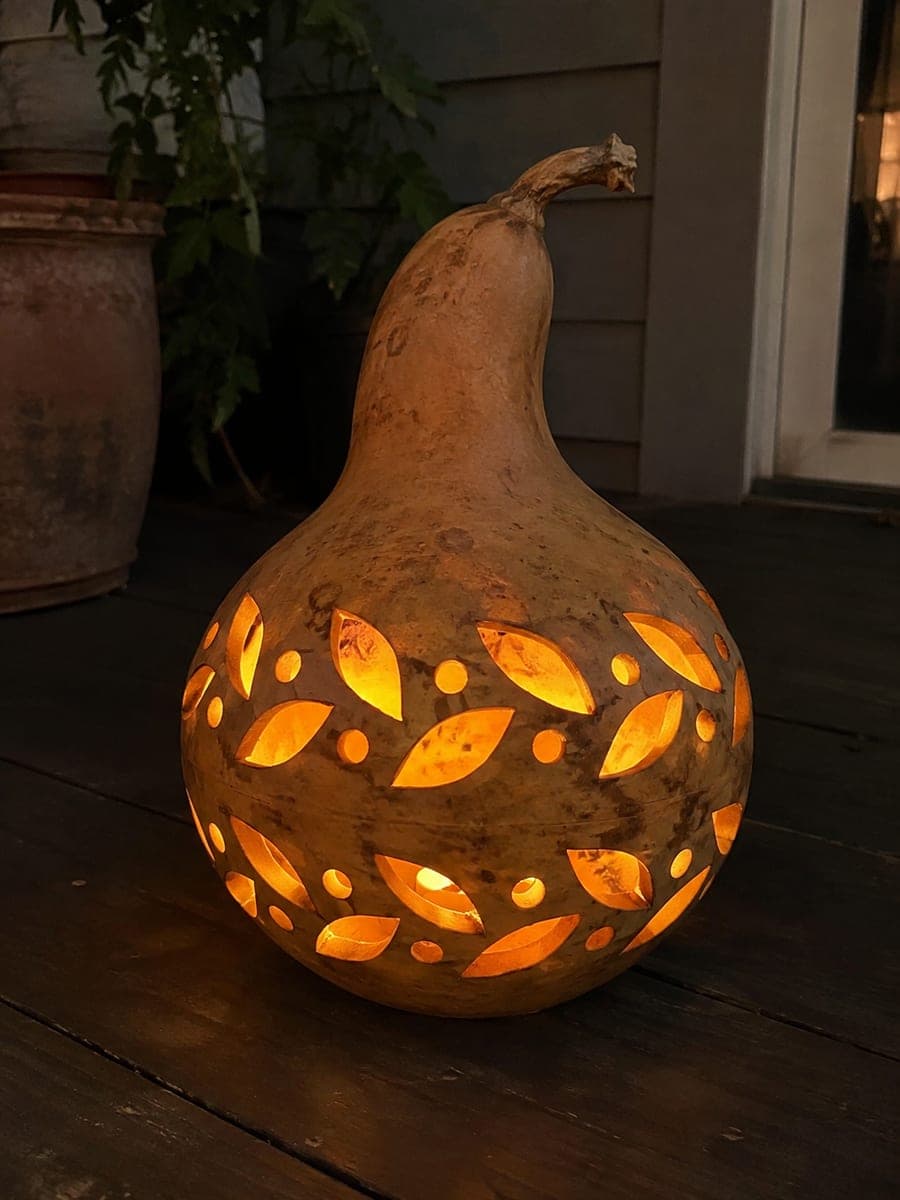
Curved leaf-shaped openings and clusters of round berry holes flow along the sides of this tall skinny pumpkin, separated by a broad continuous central trunk of rind and horizontal rind bridges to keep the narrow shell intact. Plan the trunk width first since on a skinny pumpkin it may be only 3 to 4 centimeters; all apertures must stay clearly outside it. Cut the largest leaf shapes first, then fill in berry clusters, working from the center of the design outward. On a dark garden terrace, this tall skinny pumpkin carving idea reads like a living branch lit from within.

No ratings yet · Sign in to rate
Comments (0)

  • No comments yet — be the first.

Save without an account. Sign in to like or comment.

Our tips for carving a similar design

The broad central trunk of solid rind acts as the primary structural element on this narrow pumpkin, with all leaf and berry apertures positioned well outside it. Horizontal rind bridges between apertures provide secondary support. Working from the center outward lets you see the available cutting zone clearly as the design develops.

From pumpkin to porch

  1. Plan and mark the central trunk

    Scoop the interior to 2 centimeters. Measure the narrowest point of the pumpkin and confirm the trunk will be at least 3 to 4 centimeters wide there. Draw the trunk boundaries as two parallel vertical lines down the full face. All apertures must stay outside these lines.

  2. Sketch the leaf shapes

    Plan the curved leaf apertures freehand on each side of the trunk, keeping them clearly separated from each other by at least 12mm of rind. Each leaf should be a softly curved teardrop or ellipse, oriented to flow naturally as if growing from the trunk.

  3. Mark the berry hole clusters

    Position round berry holes in natural clusters in the spaces between leaves, as they would appear on an actual botanical branch. Groups of two or three circles look more organic than evenly spaced single holes. Mark each circle at about 2 centimeters diameter.

  4. Check all bridges and rind widths

    Before cutting a single hole, measure every gap between adjacent shapes. Any rind narrower than 12mm should be corrected by redrawing the adjacent shapes smaller. Pay special attention to where a leaf shape comes close to the edge of the trunk.

  5. Cut leaves first, then berry holes

    Cut the largest leaf apertures first while the walls are most rigid. Follow each curved outline with smooth pivoting saw strokes. After all leaves are cut, drill or saw the berry clusters. Remove each plug by pressing inward from the back opening.

  6. Light on the garden terrace

    A tall LED candle positioned at the center base of the cavity projects light through both leaf columns equally. On a dark terrace at night, the flowing branch pattern casts organic leaf shadows on nearby walls and paving. Angle the display so the solid trunk faces viewers directly.

Written with AI to match this design

Gather your supplies

Check things off as you get ready.

Work on a stable surface, keep your free hand out of the cutting path, and have an adult handle sharp tools.

Three levels of light

  • Leave intact

    The entire central trunk strip and all horizontal rind bridges between apertures stay solid and dark, forming the structural skeleton of the design.

  • Peel & shade

    None. All elements are full cutouts.

  • Cut through

    All curved leaf apertures and all round berry holes are cut completely through for full warm light.

Learn the carving basics

Before you start cutting

How do I cut a convincing leaf curve on a rounded pumpkin surface?

A thin flexible saw blade follows curves better than a rigid one. Hold the saw at a consistent angle to the surface and pivot your wrist rather than steering with your elbow. The natural flexibility of the blade will follow the curve if you let it.

The pumpkin is narrow. How much can I remove before it becomes unstable?

Once you have cut more than about ten apertures, test the pumpkin's flexibility by gently pressing the sides. If it gives noticeably, slow down and support it on a rolled towel during remaining cuts. Stop before any rind feels soft or springy.

Can I add more leaf shapes if the first pass looks sparse?

Yes, but measure available rind before adding any aperture. On a narrow pumpkin, apparent empty space sometimes conceals only a few millimeters of rind between an existing cut and the edge. Probe with a skewer before committing to a new cut.

Your take belongs here, too.

Changed a detail? Made it simpler? Share a photo of your version and tell the community what worked.

Share your pumpkin

More pumpkins like this

You've reached the end · 8 pumpkins
The Patch Report

Fresh pumpkins, in your inbox.

The best new carvings, ideas worth stealing, and how-tos for carving season. Short, seasonal, and gone by November.

A short email during carving season. Unsubscribe anytime. See our privacy policy.