Halloween Pumpkin Carving Contest · Starts October 1st · $500 in prizes
← Back to ideas
@ai_concepts
Sep 25, 2026
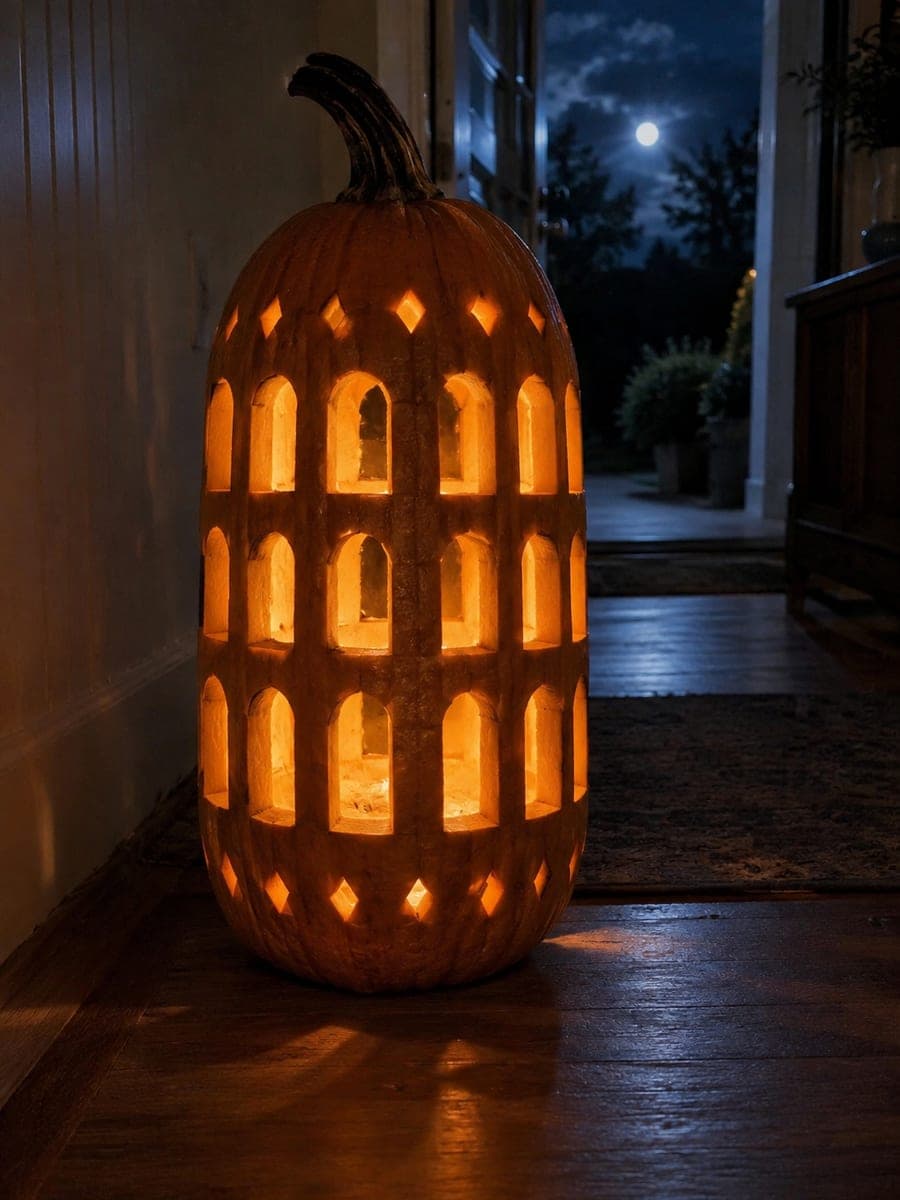
Three-Row Arched Window Tall Pumpkin LanternAI
0

Report this carving

Tell us what is wrong. Reports are private.

Three-Row Arched Window Tall Pumpkin Lantern

Three rows of separate arched window apertures, broad supporting columns between them, horizontal rind bands connecting the rows, and top-and-bottom diamond holes turn this tall pumpkin into a gothic lantern when lit from inside. Map the grid on the shell with a dry-erase marker, marking column lines first so every arch sits in the right register. Cut the arches one row at a time from bottom to top so the weight of the upper rind does not crack weakened lower cuts. Placed in a dark hallway, this tall pumpkin carving idea casts a repeating arch pattern onto walls and ceiling.

No ratings yet · Sign in to rate

Comments (0)

  • No comments yet — be the first.

Save without an account. Sign in to like or comment.

Our tips for carving a similar design

Three rows of arched window apertures with broad supporting columns, horizontal rind bands between rows, and diamond holes at top and bottom transform a tall pumpkin into a gothic lantern. Mapping the grid with column lines before any other marks ensures the arches in every row sit in the correct register. Cutting bottom row first prevents upper rind weight from cracking freshly cut lower openings.

From pumpkin to porch

  1. Hollow and prep the tall pumpkin

    Cut an angled lid and clear all seeds and fiber with a long-handled scoop. Scrape the interior to about 2 cm throughout the full face. The many closely spaced apertures need uniform thinning so no row glows brighter than the others. An adult handles all cutting.

  2. Map the column grid first

    Use a dry-erase marker and a long ruler to draw vertical column lines down the face of the pumpkin. These define where the structural columns sit between each arch. Next draw the two horizontal rind bands that separate the three rows. The grid structure should be fully marked before any arch outlines are drawn.

  3. Draw the arch outlines

    Draw the arched window outlines within each grid cell, keeping a consistent arch radius across all cells. A printed arch template holds up to repeated tracing better than freehand. Confirm every arch has at least 10 mm of rind to its nearest neighbor on all sides.

  4. Mark and draw the diamond holes

    Mark diamond positions at the top and bottom of the face, outside the arch grid. Keep diamonds at least 15 mm from the nearest arch row so their removal does not weaken the grid structure.

  5. Cut arches from bottom row to top

    Cut each arch with a fine-toothed detail saw, working the curve in smooth short strokes from one side to the other. Complete the full bottom row before starting the middle row, and the middle row before the top. This sequence keeps upper rind weight supported as long as possible.

  6. Cut diamonds and light in the hallway

    Cut the diamond holes last using a fine detail knife meeting at all four corners cleanly. Insert a warm LED string inside and carry the pumpkin to a dark hallway. The repeating arch pattern projected on walls and ceiling creates the full gothic lantern effect.

Written with AI to match this design

Gather your supplies

Check things off as you get ready.

Work on a stable surface, keep your free hand out of the cutting path, and have an adult handle sharp tools.

Three levels of light

  • Leave intact

    All structural column rind, both horizontal rind bands between rows, and all rind outside the arch and diamond zones stay solid and dark.

  • Peel & shade

    None; this design uses only cut-through apertures.

  • Cut through

    All arched window apertures across all three rows and all diamond accent holes are cut fully through.

Learn the carving basics

Before you start cutting

How do I get the arches in all three rows to line up in the same vertical register?

Drawing the column lines first is the answer. Once the vertical columns are marked, every arch must fit within its column cell. Align the arch template against the column lines for each cell rather than spacing the arches independently, which drifts over three rows.

Cutting the bottom row first feels counterintuitive. Why is top-down riskier?

When you cut the top row first, the upper rind sections become less supported immediately and can flex as you apply saw pressure lower on the pumpkin. Starting at the bottom keeps the heavier upper portion of the pumpkin solid and stable throughout most of the work session.

My arch curves come out slightly uneven between cells. Will this ruin the gothic effect?

Slight variation between arches actually enhances the hand-carved gothic quality; perfectly identical arches can look machine-made. The key is that each arch must be fully open with no retained rind inside the curve. Uneven curves that are fully cut through still project beautifully on a hallway wall.

Your take belongs here, too.

Changed a detail? Made it simpler? Share a photo of your version and tell the community what worked.

Share your pumpkin

More pumpkins like this

You've reached the end · 8 pumpkins
The Patch Report

Fresh pumpkins, in your inbox.

The best new carvings, ideas worth stealing, and how-tos for carving season. Short, seasonal, and gone by November.

A short email during carving season. Unsubscribe anytime. See our privacy policy.