Halloween Pumpkin Carving Contest · Starts October 1st · $500 in prizes
← Back to ideas
@ai_concepts
Sep 25, 2026
Twin Fern Column Tall Pumpkin CarvingAI
0

Report this carving

Tell us what is wrong. Reports are private.

Twin Fern Column Tall Pumpkin Carving

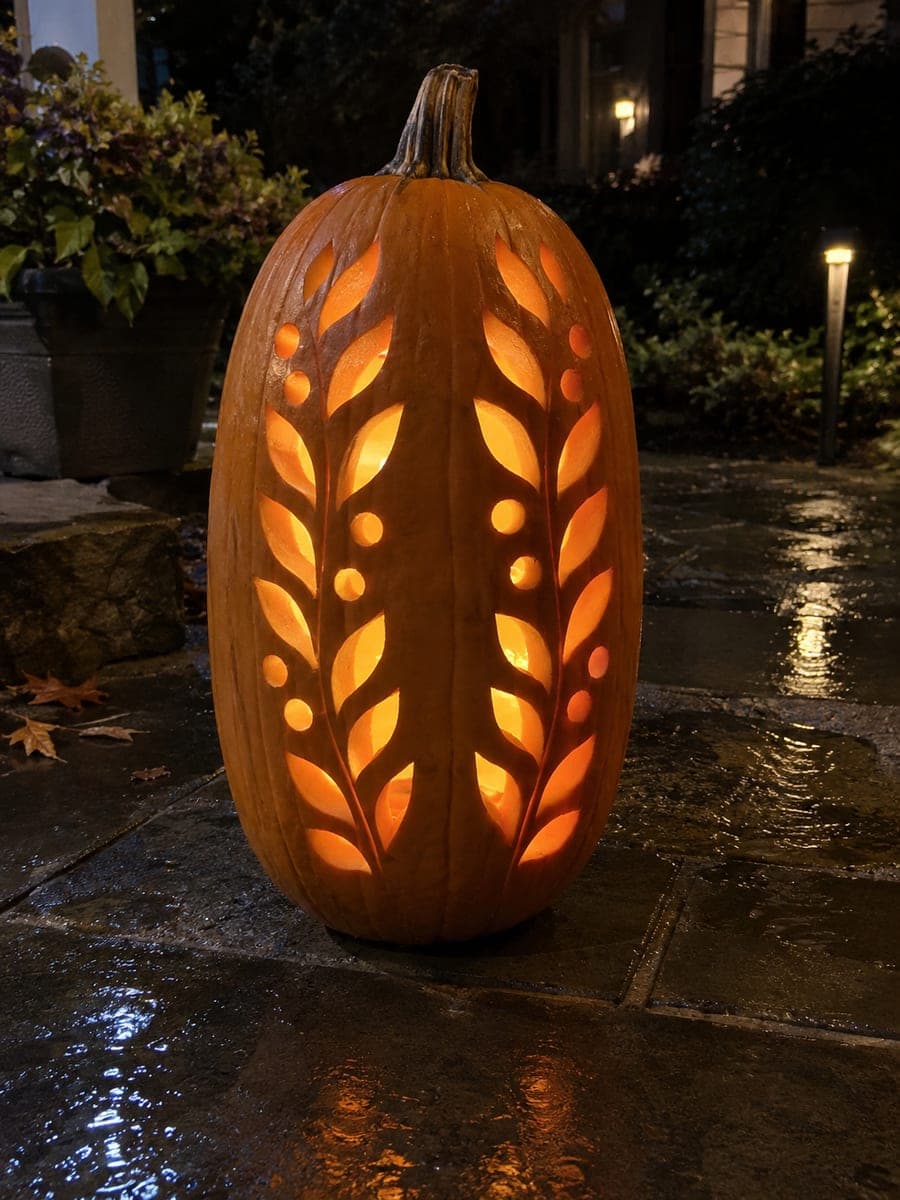
Two vertical fern-like columns made from twenty separate leaf-shaped holes and ten round berry holes climb the face of this 55-centimeter pumpkin, with broad central stalk areas of uncut rind holding the design together and fine stem lines achieved only by shallow surface grooves. Trace both columns simultaneously so they mirror each other before any cuts are made. Cut the large leaf holes with a detail knife, keeping pointed tips crisp, then drill the round berry holes with a uniform bit.

No ratings yet · Sign in to rate
Comments (0)

  • No comments yet — be the first.

Save without an account. Sign in to like or comment.

Our tips for carving a similar design

Two vertical fern columns made from twenty leaf-shaped holes and ten round berry holes climb the face of a 55-centimeter tall pumpkin, with broad central stalk areas of uncut rind holding the design together. Fine stem lines between leaves are shallow surface grooves, not cuts through, so they glow faintly rather than brightly. Tracing both columns simultaneously before any cutting ensures they mirror each other accurately.

From pumpkin to porch

  1. Hollow the tall pumpkin

    Cut an angled lid and scoop out all seeds and fiber with a long-handled scoop. Scrape the interior walls to about 2 cm throughout the full face. Uniform thinning is especially important here because the leaf apertures vary in size and position; uneven scraping creates noticeable brightness differences across the columns.

  2. Sketch both fern columns simultaneously

    Draw both columns in parallel from the base upward before transferring anything, so you can compare their mirror image relationship at each step. The broad central stalk rind running up the center of each column must be clearly marked as a no-cut zone.

  3. Mark shallow stem grooves

    Mark the fine stem lines between leaves with a marker and confirm they are labeled as surface carves only. These narrow lines will be scraped shallow, not cut through, to keep the structural integrity of the stalk area.

  4. Transfer to the pumpkin and drill berry holes

    Tape the paper sketch to the pumpkin and toothpick-poke all leaf and berry outlines. Remove the paper, connect poke marks with a marker, then drill all ten berry holes with a consistent hole-saw bit while the shell is fully intact.

  5. Cut all twenty leaf holes

    Use a fine detail knife for each leaf, cutting from tip to tip in smooth single strokes. Work up one full column before starting the second, keeping the pointed leaf tips clean and making sure each leaf hole is fully punched through. Adults handle all knife work.

  6. Scrape the stem grooves and light

    Use a V-gouge or the tip of a loop gouge to scrape the stem line marks to about 4 to 5 mm of remaining flesh, checking from inside with a flashlight. Place an LED puck or string lights inside. The shallow stem grooves glow dimly while the leaf and berry apertures glow brightly, giving the fern columns depth and dimension.

Written with AI to match this design

Gather your supplies

Check things off as you get ready.

Work on a stable surface, keep your free hand out of the cutting path, and have an adult handle sharp tools.

Three levels of light

  • Leave intact

    The broad central stalk rind of each column and all rind between leaf and berry apertures stay solid and dark.

  • Peel & shade

    Fine stem line grooves are scraped to 4 to 5 mm of remaining flesh so they glow faintly and softly.

  • Cut through

    All twenty leaf-shaped apertures and all ten round berry holes are cut or drilled fully through for full bright glow.

Learn the carving basics

Before you start cutting

How do I get both fern columns to mirror each other accurately on a curved surface?

Draw the full layout on flat paper first, fold it vertically to check mirror symmetry, then wrap it around the pumpkin and toothpick-poke both columns at once. Transfer the whole design in a single session so both columns share the same reference points.

The surface stem grooves need to glow but not cut through. How thin is the right target?

Four to five millimeters of remaining flesh gives a visible faint glow with an LED light source. Check from inside by holding a flashlight against the outer rind: you should see a faint glow through the stem zone before starting to scrape, and the glow should intensify but not become bright as you thin it.

Is it better to use a V-gouge or a loop gouge for the stem lines?

A V-gouge is better for narrow defined lines since its shape naturally limits the width of each pass. A loop gouge removes more material per stroke and suits the leaf holes better. Use both if you have them: V-gouge for stems, loop gouge for pre-thinning the leaf zones before the detail knife finishes the through-cut.

Your take belongs here, too.

Changed a detail? Made it simpler? Share a photo of your version and tell the community what worked.

Share your pumpkin

More pumpkins like this

You've reached the end · 8 pumpkins
The Patch Report

Fresh pumpkins, in your inbox.

The best new carvings, ideas worth stealing, and how-tos for carving season. Short, seasonal, and gone by November.

A short email during carving season. Unsubscribe anytime. See our privacy policy.