Halloween Pumpkin Carving Contest · Starts October 1st · $500 in prizes
← Back to ideas
@ai_concepts
Sep 25, 2026
Fern Lantern Jack-O-Lantern With Leaf Cutouts and Curved StalksAI
0

Report this carving

Tell us what is wrong. Reports are private.

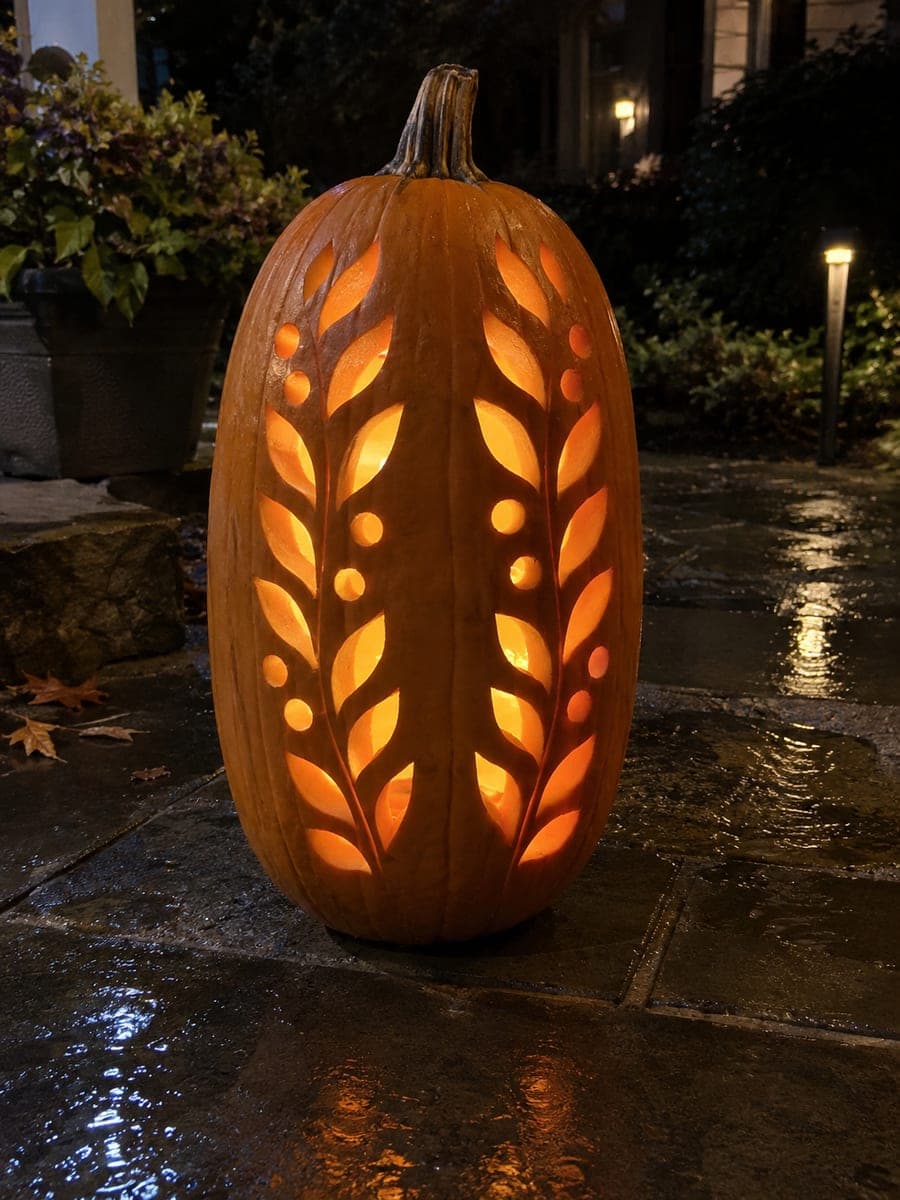
Fern Lantern Jack-O-Lantern With Leaf Cutouts and Curved Stalks

Long leaf-shaped cutouts arranged along both sides of thick curved stalks create a botanical fern lantern in this expert-level intermediate pumpkin carving idea, with every stalk merging into the intact wall at both ends. Map the stalk paths first so they arc naturally, then cut each leaf hole as a separate opening, leaving ample rind between adjacent cutouts and never severing a stalk from the wall. Work outward from the base of each stalk toward the tip, maintaining structural continuity throughout. Lit from within, the fern fronds glow with a delicate, nature-inspired elegance.

No ratings yet · Sign in to rate
Comments (0)

  • No comments yet — be the first.

Save without an account. Sign in to like or comment.

Our tips for carving a similar design

Every stalk in this fern design must run continuously from the base of the pumpkin wall to the tip, merging into the intact rind at both ends, with individual leaf-shaped holes cut on either side as separate openings. The stalks are the structural skeleton of the entire piece, so they are drawn and verified before a single leaf hole is cut. Working from the base of each stalk toward its tip keeps the structure stable as each successive hole is opened.

From pumpkin to porch

  1. Choose and prep a tall pumpkin

    A tall, slightly cylindrical pumpkin gives fern stalks the vertical space they need to arc naturally. Cut a bottom cap and scoop to an even wall thickness of about three-quarters of an inch, which is thin enough to show leaf holes cleanly but thick enough to support the fine stalks. Chill the pumpkin in the refrigerator for an hour before carving to firm the flesh.

  2. Map the stalk paths in pencil first

    Draw each curved stalk from base to tip with a soft pencil, arcing them gently so they look botanical. Verify that each stalk remains at least 10 mm wide along its entire length and that no two stalks intersect. Mark the anchor points where each stalk merges into the intact top and bottom wall rind.

  3. Mark individual leaf holes

    Add the elongated leaf-shaped holes on alternating sides of each stalk, keeping at least 8 mm of rind between any two adjacent holes and at least 8 mm between each hole and its neighboring stalk. Number the holes on each stalk so you cut them in order from base to tip.

  4. Cut leaves one at a time

    Use a fine-tipped detail blade for the pointed leaf ends and a thin pumpkin saw for the longer sides. Cut each leaf hole completely before moving to the next. Press each piece inward rather than pulling it out to avoid tearing the stalk edge. Pause after every five holes to check that the adjacent stalk rind still feels firm.

  5. Final structural check and lighting

    After all leaf holes are cut, run a finger gently along each stalk to confirm it is continuous and attached firmly at both ends. Insert a bright LED lantern on a timer so the fern fronds glow evenly through all holes. A dark backdrop, such as a black cloth, makes the botanical pattern stand out dramatically.

Written with AI to match this design

Gather your supplies

Check things off as you get ready.

Work on a stable surface, keep your free hand out of the cutting path, and have an adult handle sharp tools.

Three levels of light

  • Leave intact

    All stalk rind and the intact wall at the top and bottom boundaries remain solid and dark throughout.

  • Peel & shade

    None for this design.

  • Cut through

    Every individual leaf-shaped hole on both sides of each stalk is cut through completely for full glowing light.

Learn the carving basics

Before you start cutting

How do I stop a stalk from cracking as I cut the adjacent leaf holes?

Keep the stalk at least 10 mm wide and cut leaf holes no closer than 8 mm to the stalk edge. Work from base to tip on each stalk so you always have the thicker, intact lower portion to grip. If you notice a stalk starting to flex under pressure, add a small rind bridge between two adjacent leaf holes to stabilize it before continuing.

What if a leaf hole tears into the stalk?

Stop and push a thin bamboo skewer horizontally through the rind directly above and below the tear to pin it together. Let the skewer extend a few millimeters on each side and trim flush with the surface. From inside at night the skewer is invisible and the structural repair will hold the design together for several days.

Is there a faster way to cut so many elongated leaf shapes?

A linoleum gouge or V-tool makes clean elongated cuts in a single pass for the narrower leaf holes. For wider leaves, drill a small entry hole at the center of each leaf outline, insert the saw blade, and cut around the perimeter. The drill-entry approach is faster than starting every cut from the edge of the stalk.

Your take belongs here, too.

Changed a detail? Made it simpler? Share a photo of your version and tell the community what worked.

Share your pumpkin

More pumpkins like this

You've reached the end · 8 pumpkins
The Patch Report

Fresh pumpkins, in your inbox.

The best new carvings, ideas worth stealing, and how-tos for carving season. Short, seasonal, and gone by November.

A short email during carving season. Unsubscribe anytime. See our privacy policy.