Halloween Pumpkin Carving Contest · Starts October 1st · $500 in prizes
← Back to ideas
@ai_concepts
Sep 25, 2026
Leaf and Diamond Column Long Pumpkin CarvingAI
0

Report this carving

Tell us what is wrong. Reports are private.

Leaf and Diamond Column Long Pumpkin Carving

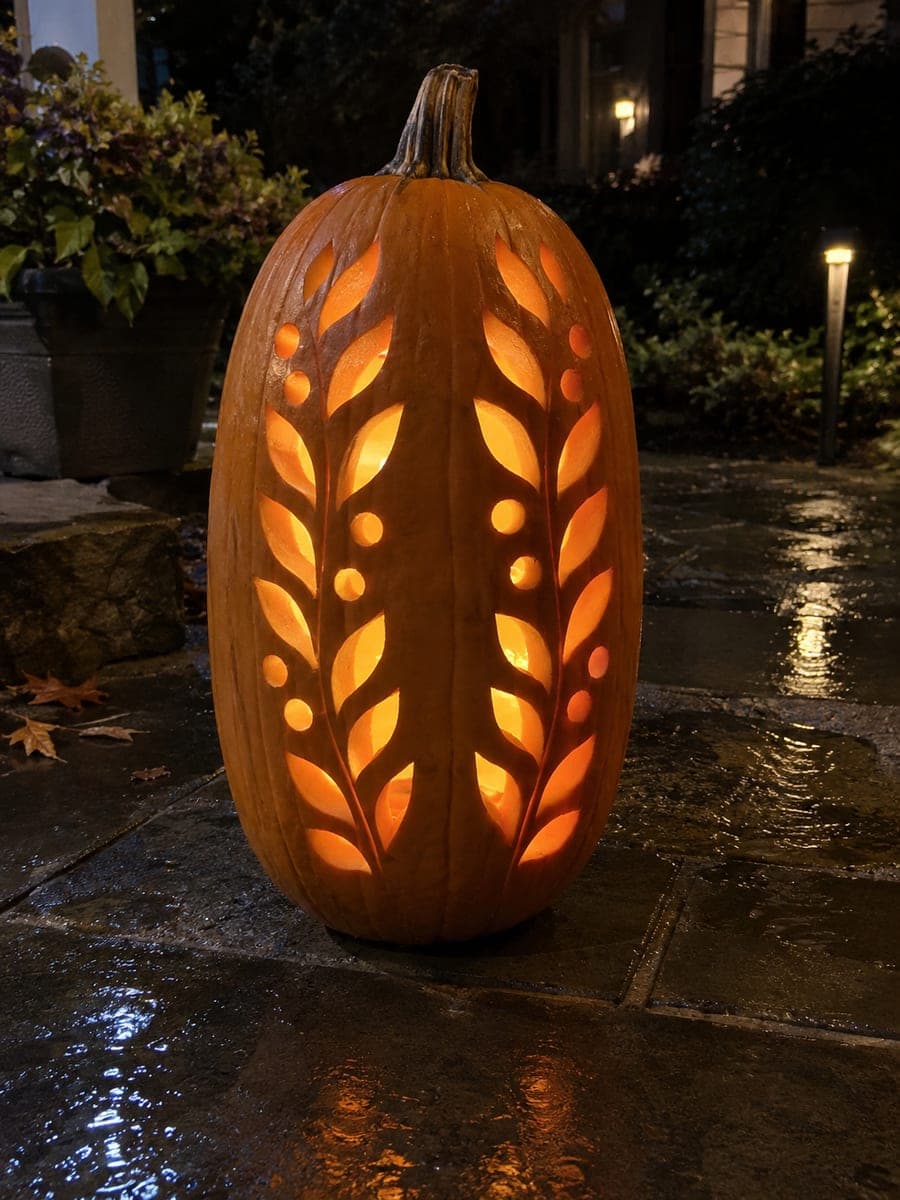
Two columns of leaf and diamond apertures flank a broad solid central strip on this long pumpkin, with substantial rind separating every opening and no thin connecting cuts anywhere in the design. Measure the central strip width against the narrowest point of the pumpkin before beginning, since the strip must never be less than 4 centimeters to carry the vertical weight. Alternate leaf and diamond shapes as you cut down each column so the pattern is visually consistent from all angles.

No ratings yet · Sign in to rate

Comments (0)

  • No comments yet — be the first.

Save without an account. Sign in to like or comment.

Our tips for carving a similar design

Two flanking columns of alternating leaf and diamond apertures require a central solid strip that is never less than 4 centimeters wide to carry the vertical weight of the tall shell. No thin connecting cuts exist anywhere, so every element is structurally independent. The hallway setting concentrates the projected glow on nearby walls and ceiling for a dramatic indoor effect.

From pumpkin to porch

  1. Measure and protect the central strip

    Scoop to 2 centimeters. Mark the central strip with two parallel vertical lines at the narrowest point, confirming at least 4 centimeters between them. Draw these lines in a permanent marker rather than pencil so they remain visible throughout the cutting process.

  2. Plan column intervals

    Divide the working face height into intervals, alternating leaf and diamond positions in each column. Mark each interval's center point. Stagger the left and right columns so a leaf on the left lines up with a diamond on the right and vice versa, creating a more dynamic visual rhythm.

  3. Draw all shapes and verify bridges

    Sketch each leaf as a pointed oval about 6 centimeters long and each diamond at about 4 centimeters top to bottom. Verify that every shape has substantial rind on all four sides, at least 12mm. Confirm that no shape extends over the central strip lines.

  4. Cut one column at alternating rows

    Cut every other shape in the left column first, skipping alternate rows. This keeps maximum rind intact while early cuts are made. Then cut the skipped shapes. Repeat for the right column. The staggered approach prevents stress concentrating in one zone.

  5. Finish remaining shapes

    Complete any remaining leaf or diamond cuts, working gently once more than half the apertures are open. Support the pumpkin on a rolled towel. Check the central strip after every few cuts to confirm it has not bowed or cracked.

  6. Light in a dim hallway

    Place the pumpkin in a dim hallway with a tall LED candle inside. The two columns of alternating shapes project a patterned wash of light on the walls and ceiling. Viewing from the end of the hallway shows the full glowing column effect.

Written with AI to match this design

Gather your supplies

Check things off as you get ready.

Work on a stable surface, keep your free hand out of the cutting path, and have an adult handle sharp tools.

Three levels of light

  • Leave intact

    The solid central strip and all rind between every aperture stay fully intact and dark, carrying the structural load of the design.

  • Peel & shade

    None. All cuts are full cutouts.

  • Cut through

    All leaf-shaped and diamond-shaped apertures in both flanking columns are cut completely through for full bright glow.

Learn the carving basics

Before you start cutting

How do I cut a clean leaf shape with a sharp pointed tip on both ends?

Score both pointed ends with a detail knife before running the oval cuts between them. Cut from one end to the middle, then from the other end to the middle, meeting in the center. This avoids the overrun that happens when you carry the cut past a tip.

The central strip is 3.5 centimeters at the narrowest. Is that acceptable?

It will work but is at the minimum acceptable width. Reduce the leaf and diamond shapes in the zone near that narrow point and increase rind between shapes to 15mm there. The extra caution at the most stressed section protects the whole design.

Is there a risk of the pumpkin splitting lengthwise along a rib?

Long pumpkins can split along a deep rib if too many apertures are cut in a single vertical line. Stagger the two columns so shapes on each side are offset from each other, distributing stress horizontally rather than concentrating it on one rib.

Your take belongs here, too.

Changed a detail? Made it simpler? Share a photo of your version and tell the community what worked.

Share your pumpkin

More pumpkins like this

You've reached the end · 8 pumpkins
The Patch Report

Fresh pumpkins, in your inbox.

The best new carvings, ideas worth stealing, and how-tos for carving season. Short, seasonal, and gone by November.

A short email during carving season. Unsubscribe anytime. See our privacy policy.