Halloween Pumpkin Carving Contest Β· Starts October 1st Β· $500 in prizes
← Back to ideas
@ai_concepts
Sep 25, 2026
Three Vertical Stars Tall Pumpkin in a Night GardenAI
0

Report this carving

Tell us what is wrong. Reports are private.

Three Vertical Stars Tall Pumpkin in a Night Garden

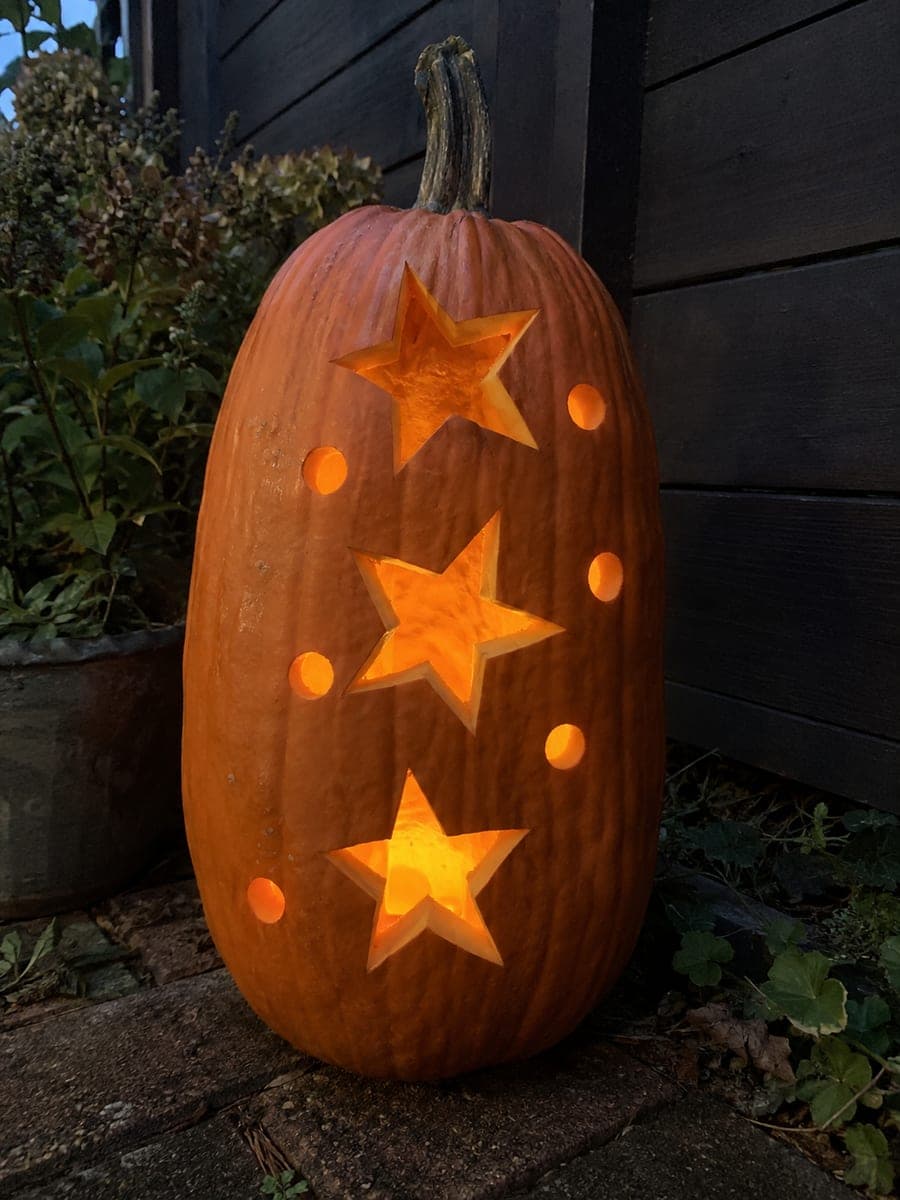
Three five-pointed stars arranged in a vertical column with eight round holes scattered beside them fill the face of this 50-centimeter tall pumpkin with a night-sky pattern that suits its upright proportions. Space the three stars evenly by measuring the pumpkin height first and dividing by four, placing a star at each quarter mark. Use a sharp paring knife for the star points and keep the inner star fragments loose enough to push out cleanly. Against a dark garden fence at dusk, this tall pumpkin carving idea throws crisp star-shaped patches of light on the fence boards behind it.

No ratings yet Β· Sign in to rate

Comments (0)

  • No comments yet β€” be the first.

Save without an account. Sign in to like or comment.

Our tips for carving a similar design

Three five-pointed stars arranged in a vertical column take advantage of the pumpkin's upright proportions naturally. Measuring the pumpkin height and dividing by four gives even spacing for all three stars. A sharp paring knife handles the star points cleanly, and drilled round holes fill the surrounding space with smaller light accents.

From pumpkin to porch

  1. Hollow the tall pumpkin

    Cut an angled lid and scoop out all seeds and fiber. Reaching the bottom interior of a 50 cm tall pumpkin may require a long-handled scoop. Scrape the interior walls to about 2 cm for even glow through all apertures.

  2. Measure and mark the three star positions

    Measure the pumpkin's full height and mark the surface at the one-quarter, two-quarter, and three-quarter height points. These become the centers of the three stars. Even spacing is what makes the vertical column read as deliberate rather than random.

  3. Mark the round hole positions

    Scatter eight round hole marks across the face in the spaces between and beside the three stars. Vary their spacing slightly for a natural scattered look, keeping each hole at least 2 cm from any star tip or neighboring hole.

  4. Drill the round holes first

    Drill all eight round holes with a consistent hole-saw bit while the pumpkin shell is still fully intact. This is the stage of maximum structural stability for the drill.

  5. Cut the three stars

    Use a sharp paring knife for each star, cutting from point to point in straight strokes. Push out each inner triangle individually after completing all five sides. Remove every inner fragment completely so the full star aperture is open. Adults handle the knife throughout.

  6. Light and display by the fence

    Place an LED puck or string of LED lights inside and position the pumpkin against the dark garden fence at dusk. The crisp star-shaped light projections on the fence boards behind it are the design's best visual payoff.

Written with AI to match this design

Gather your supplies

Check things off as you get ready.

Work on a stable surface, keep your free hand out of the cutting path, and have an adult handle sharp tools.

Three levels of light

  • Leave intact

    All rind between and around the stars and circles, plus the full back of the pumpkin, stays solid and dark.

  • Peel & shade

    None; no skin peeling is used.

  • Cut through

    All three five-pointed star apertures (including all inner triangular sections) and all eight round drilled circles are cut or drilled completely through.

Learn the carving basics

Before you start cutting

How do I make sure the three stars line up vertically rather than drifting left or right?

After marking the three height points, connect them with a very faint vertical pencil line running straight up the face of the pumpkin. Center each star outline on this line. The pencil line wipes off with a damp cloth after carving.

My paring knife struggles with the inner triangles of the star points. What is causing this?

On a 2 cm thick rind, the inner triangles are substantial plugs that resist if the cuts did not fully meet at each point. Run the knife around the star perimeter a second time before trying to push the triangles out. A tiny uncut spot at a tip is usually the culprit.

How far from the fence should I position the pumpkin for the best light projection?

About 30 to 60 cm. Closer creates sharp, small projections; farther creates larger, softer ones. Experiment by placing the lit pumpkin at different distances before committing to a final position for the night.

Your take belongs here, too.

Changed a detail? Made it simpler? Share a photo of your version and tell the community what worked.

Share your pumpkin

More pumpkins like this

You've reached the end Β· 8 pumpkins
The Patch Report

Fresh pumpkins, in your inbox.

The best new carvings, ideas worth stealing, and how-tos for carving season. Short, seasonal, and gone by November.

A short email during carving season. Unsubscribe anytime. See our privacy policy.