Halloween Pumpkin Carving Contest Β· Starts October 1st Β· $500 in prizes
← Back to ideas
@ai_concepts
Sep 25, 2026
Owl on Branch Classic Jack-O-Lantern Pumpkin CarvingAI
0

Report this carving

Tell us what is wrong. Reports are private.

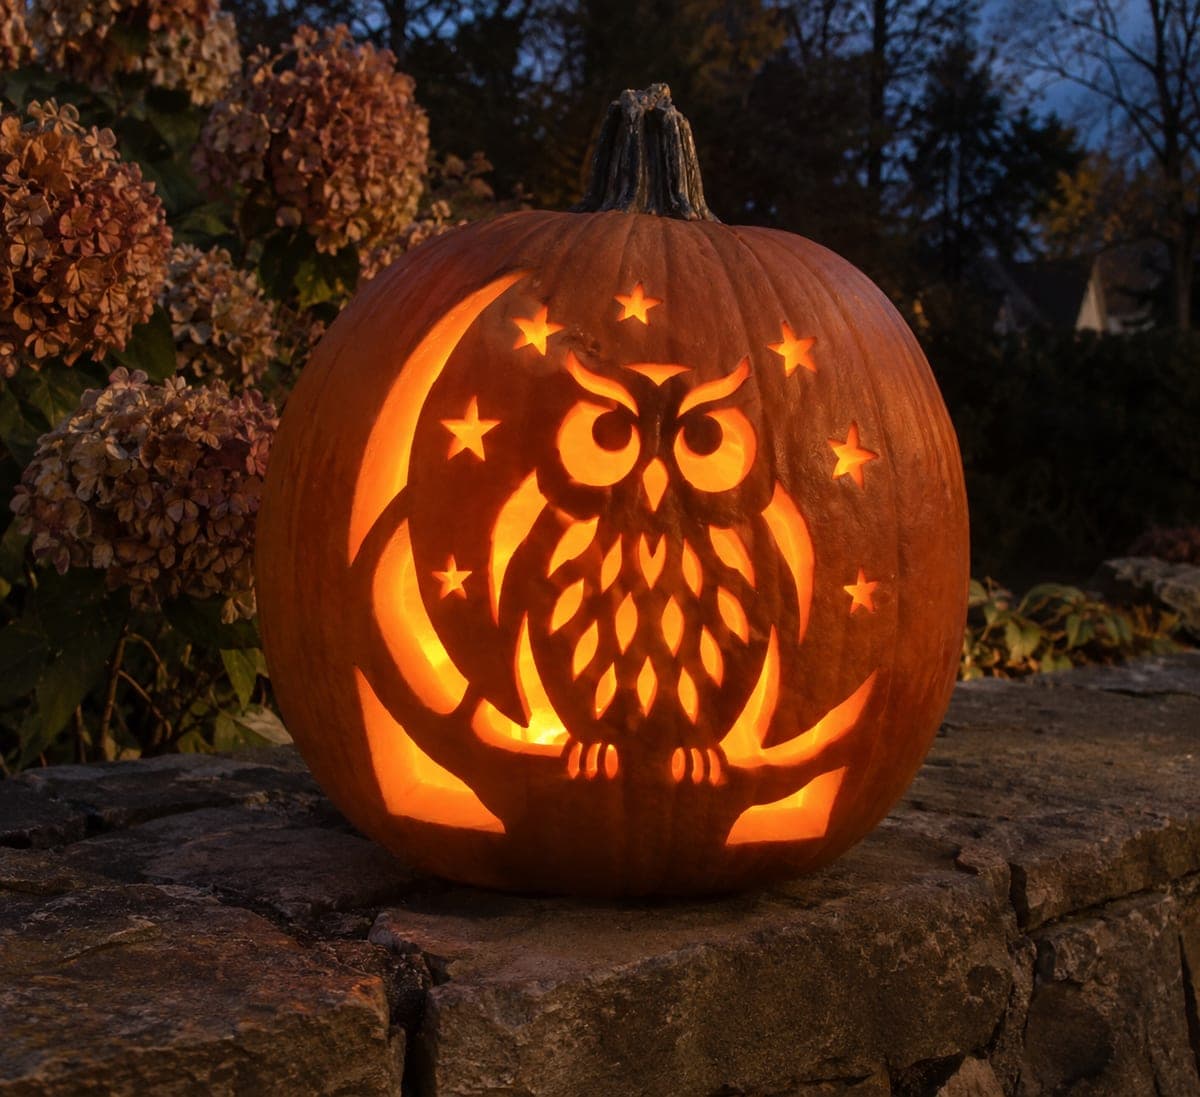
Owl on Branch Classic Jack-O-Lantern Pumpkin Carving

A classic owl perched on a crescent branch sits inside a ring of 18 feather holes and six star holes in the upper rind, with both wings merging into the side walls through broad supports so nothing floats. Eye pupils connect to their upper brows throughout, keeping that signature owl intensity when lit. Cut the branch base first since it anchors the entire composition, then work upward through the owl body and finally the surrounding decorative holes. A tall pillar candle rather than a tealight fills this design's vertical space more evenly.

No ratings yet Β· Sign in to rate

Comments (0)

  • No comments yet β€” be the first.

Save without an account. Sign in to like or comment.

Our tips for carving a similar design

The branch base is the structural anchor for the entire composition: it connects directly to the outer shell on both sides and supports the owl body rising above it. Both wings are kept connected to the intact side walls through broad rind bridges so no wing floats freely. The 18 feather holes and 6 star holes in the upper rind are the decorative field that frames the central owl silhouette; cutting these last prevents you from weakening the upper rind before the structural work below is done.

From pumpkin to porch

  1. Hollow and transfer the pattern

    Scoop the pumpkin to a 25 mm wall. Print the full composition to fit the pumpkin face, ensuring the branch base spans the full width with ends meeting the side walls. Poke-transfer the full pattern including all feather and star hole positions.

  2. Cut the branch base first

    Cut the crescent branch opening along the bottom of the composition. This is the widest opening and establishes the horizontal baseline for everything above. Both ends of the crescent should connect to, or come close to, the intact side walls for maximum support.

  3. Cut the owl body and feet

    Working upward from the branch, cut the owl's body outline and feet openings. The dark owl body silhouette stays as intact rind; you are cutting the light spaces around it. Make sure the feet attachment to the branch top is at least 15 mm wide.

  4. Cut the wings with side-wall connections

    Cut the negative space of each wing, leaving the wing edge connected to the side wall through a broad rind bridge. Do not cut continuously around any wing tip; stop the cut before the tip and restart from the other direction, leaving a bridge of at least 20 mm connecting each wing to the intact side wall.

  5. Cut the owl eye pupils

    Score the pupil shape inside each eye first, then cut the open eye ring around each pupil, leaving the pupil attached to the upper edge of the eye ring. Use a craft knife for the fine detail around the pupil attachment.

  6. Cut the feather and star holes last

    Cut the 18 feather holes working from the bottom of the field upward, then the 6 star holes in the upper rind. Use a narrow gouge or small drill bit for the smallest holes to avoid wobbling the blade and cracking the rind between holes. Place a tall LED pillar candle inside for even vertical light coverage.

Written with AI to match this design

Gather your supplies

Check things off as you get ready.

Work on a stable surface, keep your free hand out of the cutting path, and have an adult handle sharp tools.

Three levels of light

  • Leave intact

    The full dark owl silhouette, branch rind, and all rind between feather holes

  • Peel & shade

    None needed

  • Cut through

    Space around the owl body, wing negative spaces, eye rings (minus pupil tabs), feet slots, 18 feather holes, and 6 star holes

Learn the carving basics

Before you start cutting

How do I keep the feather holes from cracking into each other?

Space them so there is at least 8 mm of solid rind between every two adjacent holes. If your printed pattern places holes closer than that, increase the spacing slightly. A mini drill bit makes cleaner feather holes than a saw in tight spaces.

The owl's eye pupils are very small. Is there an easier alternative?

Simple open circular eye holes without pupils are structurally safer and much easier to cut. The owl still reads clearly without the pupil detail. If you want some darkness in the eye, use a melon baller to shallow-scrape a disc of skin inside each eye hole circle before cutting through.

My branch crescent ended up too thick and does not look like a natural branch. Can I thin it?

Once the crescent is cut, you can use a linoleum cutter to lightly score horizontal texture lines across the intact branch rind to suggest bark, which visually narrows the perceived thickness. Avoid actually thinning the branch by cutting more off the top or bottom, as that weakens the anchor point for the owl above.

Your take belongs here, too.

Changed a detail? Made it simpler? Share a photo of your version and tell the community what worked.

Share your pumpkin

More pumpkins like this

You've reached the end Β· 8 pumpkins
The Patch Report

Fresh pumpkins, in your inbox.

The best new carvings, ideas worth stealing, and how-tos for carving season. Short, seasonal, and gone by November.

A short email during carving season. Unsubscribe anytime. See our privacy policy.