Halloween Pumpkin Carving Contest · Starts October 1st · $500 in prizes
← Back to ideas
@ai_concepts
Jul 28, 2026
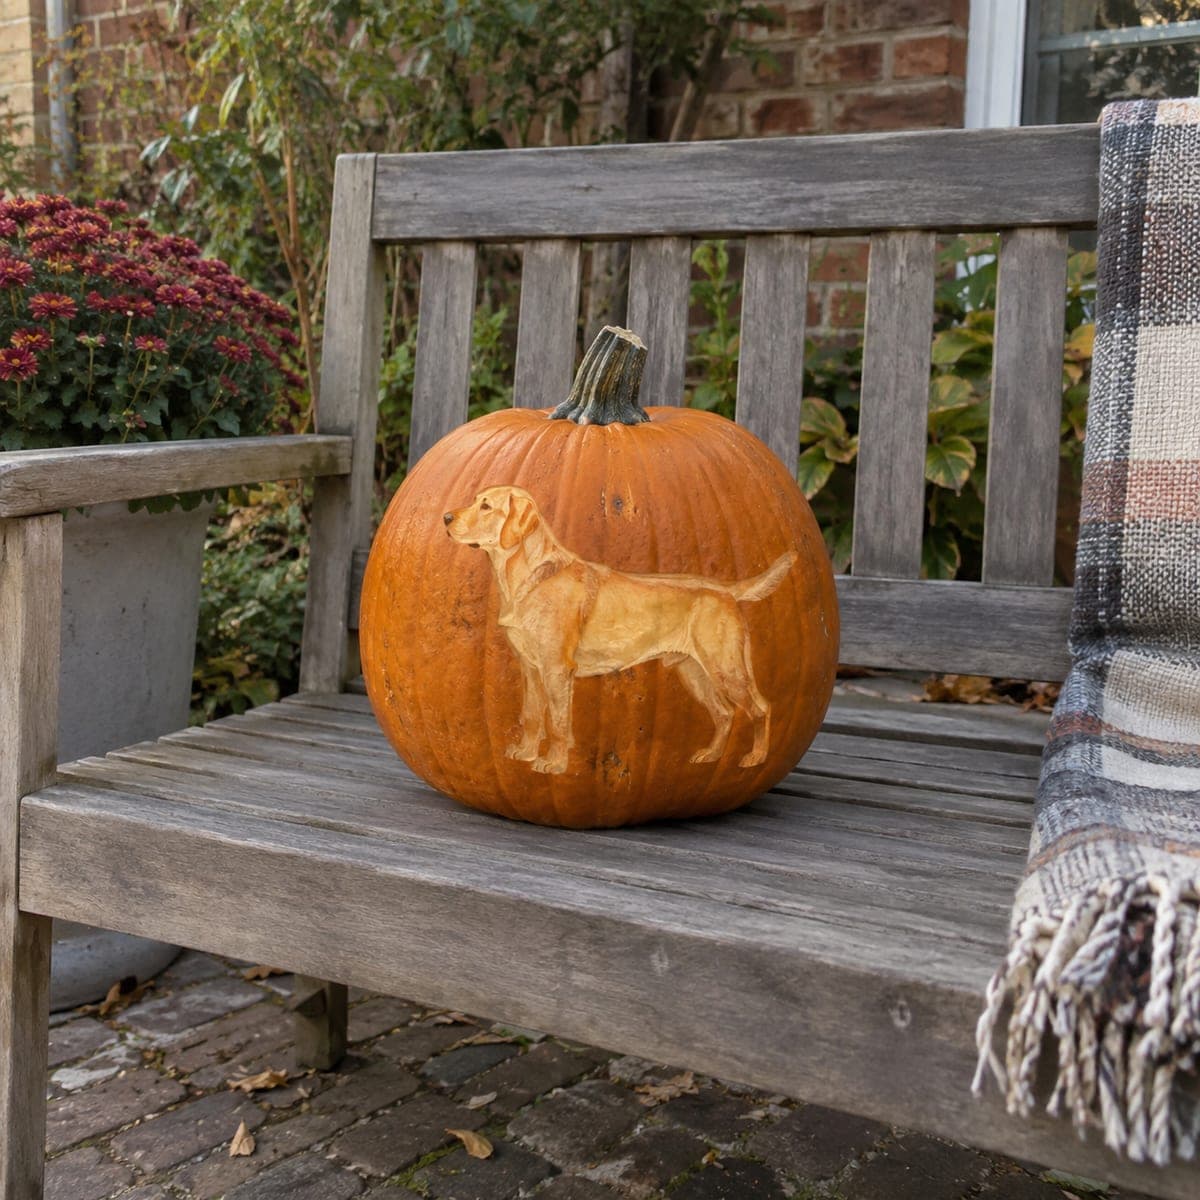
Yellow Lab Full Body Shaded Relief PumpkinAI
0

Yellow Lab Full Body Shaded Relief Pumpkin

A standing yellow Labrador Retriever is carved in shallow relief on a pumpkin's surface, the skin removed around the dog's outline to create contrast while the coat details are etched with fine lines. The design is visible best in natural or low indoor light where the tonal difference between peeled and unpeeled skin shows. Photograph and print a good side-profile reference image, then scale it to fit your pumpkin before tracing. A warm, breed-specific pumpkin carving idea for Lab owners looking for a personal fall decoration.

This is an AI-generated concept image: a realistic, carvable design idea rather than a photo of a finished carve. AI concepts are always labeled and sit out the leaderboard and the contest.

No ratings yet · Sign in to rate

Comments (0)

  • No comments yet — be the first.

Save without an account. Sign in to like or comment.

Our tips for carving a similar design

The whole effect here comes from skin depth rather than open cuts, so the pumpkin never needs a light inside to read the design. You peel the outer orange skin away from around the dog to make a lighter background, then scrape the coat itself in soft layers so the raised body catches natural light. Think of it as sculpting tone, not cutting holes.

Written by PumpkinCarvingIdeas.com, inspired by the image above. These are our suggestions, not instructions from the uploader. This approach to the AI concept has not been tested on a real pumpkin.

From pumpkin to porch

  1. Pick a smooth pumpkin and clean the surface

    Choose a pumpkin with a broad, even face and few bumps so your relief has a flat canvas to sit on. Wipe the skin down with a damp cloth to remove dirt and any waxy film. You do not need to gut this pumpkin, since nothing gets cut through, but a firm fresh one will hold fine detail longer. Set it on a towel so it does not roll while you work.

  2. Size and transfer your reference

    Print a clear side profile of a standing Lab and scale it to fill the middle of the pumpkin face. Tape the paper in place, then trace the outline and the major muscle lines with a poking tool or a transfer wheel so dotted marks press into the skin. Peel the paper and connect the dots with a washable marker. Double check that the legs and tail sit inside the flattest area before you cut anything.

  3. Outline and lower the background

    With a small detail knife or a lino-style U gouge, carefully score along the full outline of the dog, keeping the blade shallow. Then peel just the outer skin off the background area around the dog, taking off a thin layer to expose the lighter flesh underneath. Work in small strokes away from your holding hand and keep the depth even so the background glows one consistent tone. Leave the dog itself standing proud at full skin height for now.

  4. Shade the coat with layered scraping

    Switch to a ribbon or loop tool and start shaping the body, scraping shallow on the shoulders and deeper on the chest and belly to suggest roundness. Follow the direction of the fur so your etched lines read as a coat rather than random scratches. Leave the darkest areas, like the eye, muzzle line, and leg creases, as untouched skin for contrast. Step back often and check the tones in daylight, since relief carving is easy to overwork.

  5. Refine edges and fine fur detail

    Tidy the outline so the dog reads crisply against the peeled background, softening any ragged spots with the tip of your knife. Add fine fur flicks along the back, tail, and ears using light etched lines. Keep the ears and tail as connected relief, not cut-through shapes, so nothing thin can snap off. Brush away crumbs with a dry pastry brush to see the true finish.

  6. Preserve and photograph

    Rub a thin coat of petroleum jelly or a light spray of lemon water over the carved areas to slow browning and drying. Set the pumpkin where soft natural light rakes across it, which makes the tonal difference pop best. For evening display, aim a small LED spotlight from the side rather than placing a light inside. Snap your photo within the first day or two while the contrast is freshest.

Gather your supplies

Check things off as you get ready.

Work on a stable surface, keep your free hand out of the cutting path, and have an adult handle sharp tools.

Three levels of light

  • Leave intact

    The eye, muzzle outline, and deep leg and belly creases stay as untouched dark skin for the sharpest detail.

  • Peel & shade

    The full body of the Lab is scraped in soft layers so the raised coat glows a warm mid orange.

  • Cut through

    Nothing is cut all the way through on this design, since the contrast comes entirely from the peeled background and shaded relief.

Learn the carving basics

Before you start cutting

Do I need to put a light inside the pumpkin?

No, this is a surface relief design that reads by daylight or a side light, not by glowing through cutouts. If you want it visible at night, aim a small LED spotlight across the face from the side. An internal light would actually wash out the subtle tonal contrast you worked to create.

How do I keep the shaded coat from turning brown too fast?

Any peeled pumpkin flesh starts oxidizing within hours, so seal the carved areas with a thin layer of petroleum jelly or a spritz of lemon water. Keep the pumpkin cool and out of direct sun when not on display. Even so, plan to photograph a shaded relief within the first day or two for the best contrast.

What if I have never done relief shading before?

Start by practicing depth control on the back of the pumpkin or a spare one, since the goal is thin, even layers rather than deep cuts. Peel the background first to build confidence, then move to the coat once you can judge how much skin to remove. Go slow and check the tones in daylight often, because it is much easier to remove a little more than to put it back.

Your take belongs here, too.

Changed a detail? Made it simpler? Share a photo of your version and tell the community what worked.

Share your pumpkin

More pumpkins like this

You've reached the end · 8 pumpkins
The Patch Report

Fresh pumpkins, in your inbox.

The best new carvings, ideas worth stealing, and how-tos for carving season. Short, seasonal, and gone by November.

A short email during carving season. Unsubscribe anytime. See our privacy policy.