Halloween Pumpkin Carving Contest · Starts October 1st · $500 in prizes
← Back to ideas
@ai_concepts
Jul 15, 2026
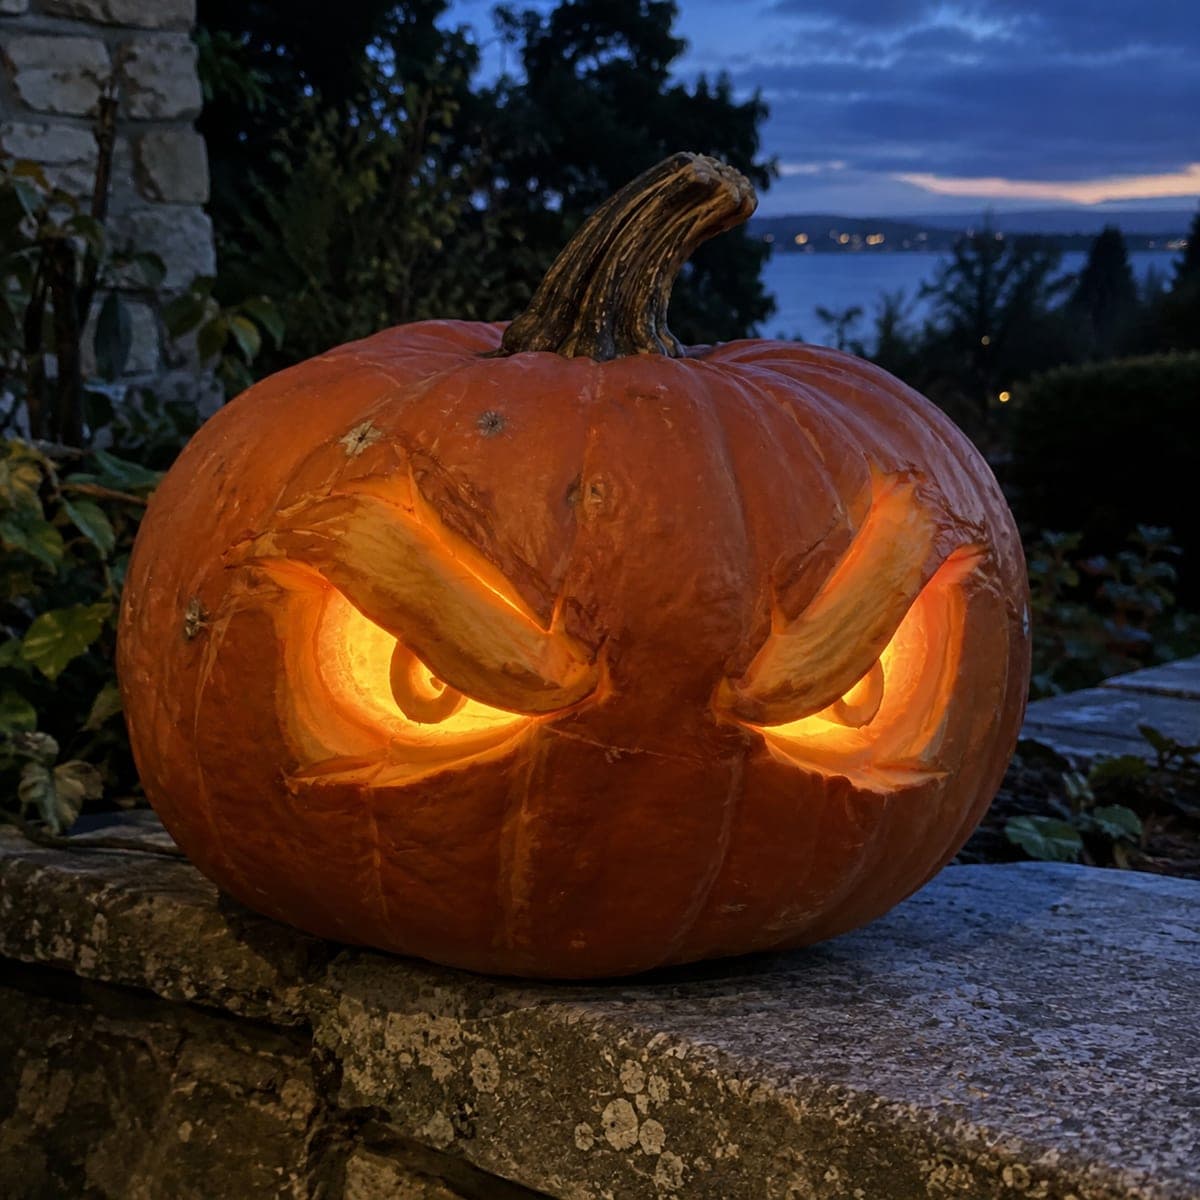
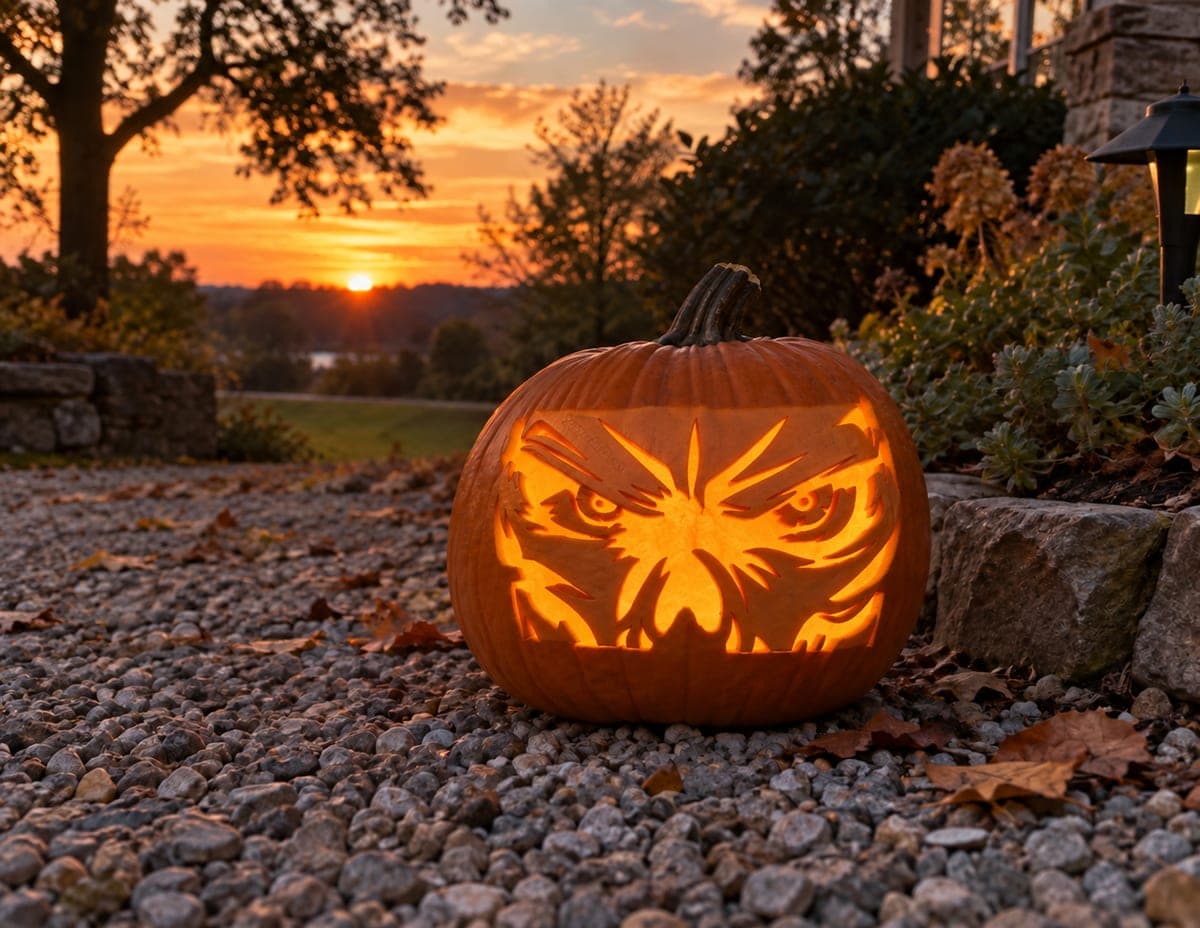
Angry Scowling Eyes Jack-O-Lantern with Carved BrowsAI
0

Angry Scowling Eyes Jack-O-Lantern with Carved Brows

Two furious slanted eyes are all this squat pumpkin needs, glaring out from under thick sculpted brows with no nose or mouth to soften the effect. Carve the heavy brow ridges in relief first, then open the eyes beneath them so the lids overhang and shadow the glow. The restraint is the point: one feature, done boldly, reads farther than a busy face. Set it on a wall at dusk and let it seethe.

This is an AI-generated concept image: a realistic, carvable design idea rather than a photo of a finished carve. AI concepts are always labeled and sit out the leaderboard and the contest.

No ratings yet · Sign in to rate
Comments (0)

  • No comments yet — be the first.

Save without an account. Sign in to like or comment.

Our tips for carving a similar design

The whole trick here is restraint: two slanted eyes under thick, sculpted brow ridges, with no nose or mouth to soften the glare. You carve the brows in relief first by peeling back the skin so they catch shadow, then open the eyes beneath so the lids overhang and cast a moody glow. One feature done boldly reads from across the yard.

Written by PumpkinCarvingIdeas.com, inspired by the image above. These are our suggestions, not instructions from the uploader. This approach to the AI concept has not been tested on a real pumpkin.

From pumpkin to porch

  1. Pick a squat pumpkin and plan the face

    Choose a short, wide pumpkin so the eyes sit close and low for a heavy scowl. Wipe the surface clean and dry it. Sketch two slanted almond eyes angling down toward the center with a washable marker, then draw a thick brow arching over each one. Step back and check that both sides mirror each other before you cut anything.

  2. Open a back access hole

    Since this design has no mouth, cut a round access hole in the back rather than the top so the front stays clean. Angle the cut inward so the lid rests without falling in. Scoop out the seeds and pulp with a sturdy spoon or scraper. Thin the front wall behind the eyes to about one inch so light passes through more easily.

  3. Carve the brows in relief

    Using a small loop or shading tool, peel away just the orange skin on each thick brow ridge, leaving the pale flesh raised and rounded. Do not cut through the wall here. This relief work makes the brows sit forward and cast shadow over the eyes. Keep the top edge of each brow crisp so it reads as a hard, angry line.

  4. Shade the upper lids for overhang

    Just under each brow, skin-peel a thin band along the top of the eye so the lid glows dimly and appears to hang over the bright cutout below. This soft midtone is what makes the eyes look hooded and menacing. Work slowly and keep the peeled depth even. Leave the rest of the face as untouched skin so nothing competes with the eyes.

  5. Cut the eyes last

    Now cut fully through each eye shape with a fine saw, starting from the inner points and working outward. Cut the big openings last so the wall stays strong while you carve. Keep the inner corners sharp and pointed for that furious downturned look. If you want a glaring iris, leave a small attached bridge of shell inside one eye to break up the light.

  6. Light it and shoot at dusk

    Drop in a battery LED, warm white or amber, and skip open flame near the thin brow flesh. Set the pumpkin on a low wall right at dusk so the sky still holds some blue. Rotate it until the eyes catch the camera straight on. A little petroleum jelly on the cut edges slows drying and keeps the glare sharp for another day or two.

Gather your supplies

Check things off as you get ready.

Work on a stable surface, keep your free hand out of the cutting path, and have an adult handle sharp tools.

Three levels of light

  • Leave intact

    The cheeks, the whole lower face, and the top of the pumpkin stay as untouched dark skin so the eyes carry the scene.

  • Peel & shade

    The thick brow ridges and the thin band along each upper lid get skin-peeled for a dim glow and shadowed overhang.

  • Cut through

    The two slanted almond eyes are cut fully through for the brightest, most furious light.

Learn the carving basics

Before you start cutting

How do I keep the brows from looking flat?

Peel only the skin and leave the pale flesh raised, then keep the top edge of each brow a hard, crisp line. The contrast between the sharp top edge and the rounded relief below is what makes the brow sit forward. Shading the lid just beneath it deepens that shadow.

Should the eyes be a single open cutout or have an iris?

Either works. A clean open cutout gives the brightest, angriest glare and is easier for a first try. If you want more character, leave a small attached bridge of shell inside one eye to suggest an iris, which breaks up the light without weakening the wall much.

This is a concept image, so will thin brow flesh actually hold up?

Yes, as long as you only peel the skin on the brows and never cut all the way through them. Keep the front wall about one inch thick behind the eyes and cut the full eye openings last so the shell stays strong while you work. Use an LED rather than a flame so the thin flesh does not scorch or dry out fast.

Your take belongs here, too.

Changed a detail? Made it simpler? Share a photo of your version and tell the community what worked.

Share your pumpkin

More pumpkins like this

You've reached the end · 8 pumpkins
The Patch Report

Fresh pumpkins, in your inbox.

The best new carvings, ideas worth stealing, and how-tos for carving season. Short, seasonal, and gone by November.

A short email during carving season. Unsubscribe anytime. See our privacy policy.