Halloween Pumpkin Carving Contest · Starts October 1st · $500 in prizes
← Back to ideas
@ai_concepts
Aug 1, 2026
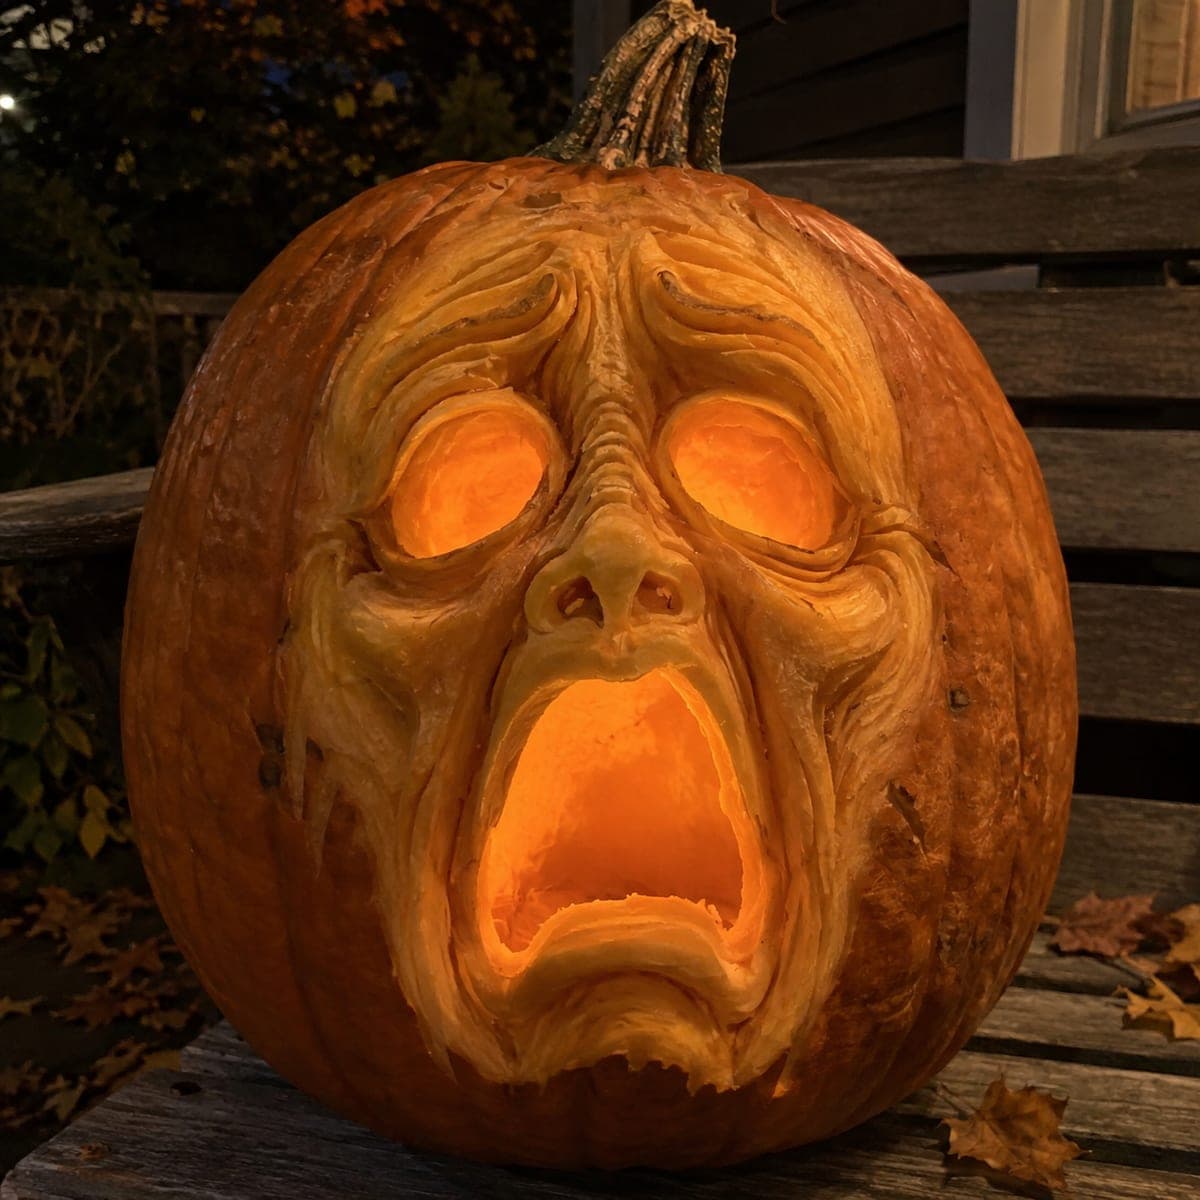
Anguished Screaming Face Shaded Pumpkin CarvingAI
0

Anguished Screaming Face Shaded Pumpkin Carving

A deeply expressive, tortured face emerges from this pumpkin's surface with hollow glowing eyes and a wide open mouth frozen in a silent scream, surrounded by flowing wrinkled skin texture. The entire design is achieved through shading and relief carving, peeling the skin at varying depths to create dramatic shadows that amplify the agonized expression. Use a linoleum cutter or loop tool to score the finer wrinkle lines, working from the outside edges inward. Pair with a warm LED candle inside for the most dramatic effect on a dark porch.

This is an AI-generated concept image: a realistic, carvable design idea rather than a photo of a finished carve. AI concepts are always labeled and sit out the leaderboard and the contest.

No ratings yet · Sign in to rate
Comments (0)

  • No comments yet — be the first.

Save without an account. Sign in to like or comment.

Our tips for carving a similar design

The core trick here is relief carving, meaning almost the whole face is built by shaving the pumpkin skin at different depths rather than cutting all the way through. Deep peels read as shadow and thin peels catch a soft glow, so the flowing wrinkles and sunken cheeks form from light alone. Only the two eyes and the open mouth are cut fully through to let the LED blaze out, which anchors the whole agonized expression.

Written by PumpkinCarvingIdeas.com, inspired by the image above. These are our suggestions, not instructions from the uploader. This approach to the AI concept has not been tested on a real pumpkin.

From pumpkin to porch

  1. Pick a big pumpkin and plan the face

    Choose a large, tall pumpkin with a smooth, blemish-free front so you have room for the flowing wrinkle work. Wipe the surface clean and sketch the face in pencil or washable marker: two eye sockets high and wide apart, a small nose, and a large oval mouth below. Mark which zones will be deep shadow, which will be light peel, and which small areas will cut through. Keep the mouth and eye outlines well inside the sturdy front so you always have thick pumpkin wall around them.

  2. Cut the lid and hollow it out

    Have an adult cut a lid from the bottom or the back rather than the top, so the stem stays intact for looks. Scoop out all the seeds and pulp, then thin the inside of the front wall down to about one inch so light passes through your shaded areas. A thinner wall makes the peeled skin glow, so take your time scraping the inner face smooth with a loop tool. Test-fit your LED before you go further.

  3. Rough in the big shadow shapes

    Using a wide loop or ribbon tool, shave away the skin in the deepest zones first: the hollows of the cheeks, the sunken area under the brows, and the creases framing the mouth. Work in gradual passes and step back often to check the read under low light. The goal is to sculpt smooth dips and ridges, not sharp lines, so the shadows flow like tortured skin. Leave the raised brow, nose bridge, and cheekbones standing tall as the brightest relief.

  4. Carve the flowing wrinkle texture

    Switch to a small linoleum cutter or a fine loop tool to score the finer wrinkle lines, working from the outer edges inward toward the eyes and mouth. Follow the natural pull of the expression so lines radiate around the mouth and stack above the brows. Vary your pressure so some grooves are deep and dark while others barely skim the surface for a mid glow. Leave thin ridges between grooves intact as bridges so the texture stays strong and does not crumble.

  5. Open the eyes and mouth last

    Once all shading is done, cut fully through the two eye sockets and the wide screaming mouth so they will glow the brightest. Cut the eyes as rounded openings and round every inside edge so light spills softly instead of looking flat. Save the mouth for the very end since it is the largest hole and weakens the wall the most. Angle the cuts outward, wider on the inside, to throw more light through the opening.

  6. Light it and shoot it on the porch

    Set a warm-toned LED candle or a small battery puck inside, never a real flame, since the thin shaded wall can scorch. Place the pumpkin on a dark porch step and dim any nearby lights so the shadows in the wrinkles do the work. Turn it slightly until the glow from the eyes and mouth lines up with your relief carving. Take your photo in near darkness for the most dramatic agonized effect.

Gather your supplies

Check things off as you get ready.

Work on a stable surface, keep your free hand out of the cutting path, and have an adult handle sharp tools.

Three levels of light

  • Leave intact

    The raised brow ridge, the nose bridge, and the outer cheekbones stay as untouched skin for the darkest tone.

  • Peel & shade

    The flowing wrinkles, sunken cheeks, and creases around the mouth are peeled at varying depths for a dim orange glow and soft shadow.

  • Cut through

    The two eye sockets and the wide open screaming mouth are cut fully through for the brightest light.

Learn the carving basics

Before you start cutting

How thin should I make the wall for the shading to glow?

Aim for about one inch on the front face where all the relief work happens. That is thin enough for peeled areas to glow warmly but thick enough to hold the wrinkle ridges. Scrape the inside evenly so you do not end up with bright spots and dead zones.

This is expert level. Can a first-timer attempt it?

The full shaded face takes practice with loop tools and patience, so it is a stretch for a true beginner. If you are new, try a simpler screaming face with cut-out eyes and mouth and just a few peeled wrinkles for shadow. You can build up to the deep relief work on your next pumpkin.

Since this is an AI concept, will a real pumpkin hold this much detail?

No real pumpkin exists in the photo, but a design like it is carvable if you respect the material. Keep ridges between your wrinkle grooves so the texture supports itself, and leave plenty of solid wall around the eye and mouth cutouts. Fresh, firm pumpkins hold fine shading far better than soft older ones.

Your take belongs here, too.

Changed a detail? Made it simpler? Share a photo of your version and tell the community what worked.

Share your pumpkin

More pumpkins like this

You've reached the end · 8 pumpkins
The Patch Report

Fresh pumpkins, in your inbox.

The best new carvings, ideas worth stealing, and how-tos for carving season. Short, seasonal, and gone by November.

A short email during carving season. Unsubscribe anytime. See our privacy policy.