Halloween Pumpkin Carving Contest · Starts October 1st · $500 in prizes
← Back to ideas
@ai_concepts
Sep 25, 2026
Basketball and Net Pumpkin on Garage ShelfAI
0

Report this carving

Tell us what is wrong. Reports are private.

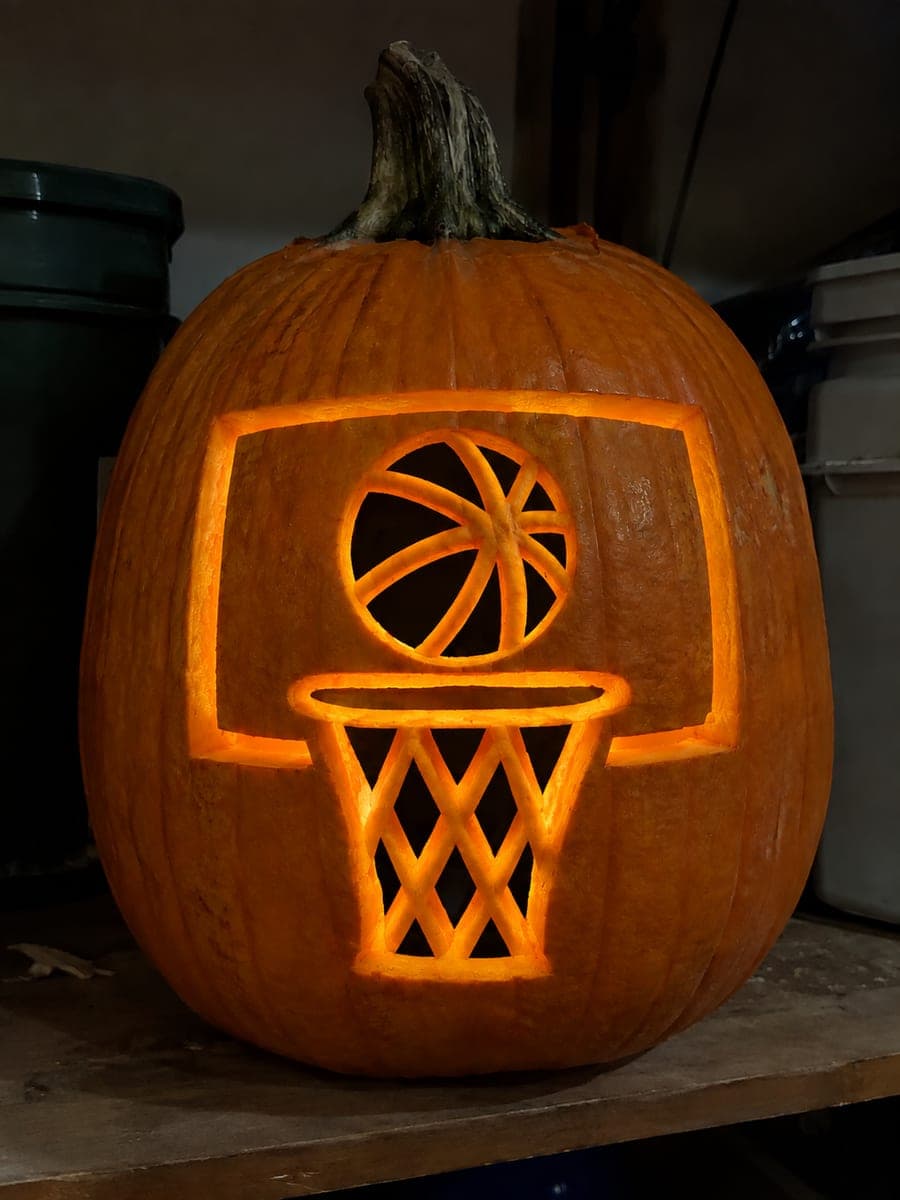
Basketball and Net Pumpkin on Garage Shelf

A basketball above a glowing net lattice makes this hard basketball pumpkin carving idea a standout display on any garage shelf. Open ball panels are divided by connected seam ribs, while the net section uses a thick lattice rooted around the perimeter. Carve the ball panels first to establish the design, then work the net diamond holes from the outside edges inward. The backboard and hoop contour lines are better as shallow gouges to avoid weakening the lower shell.

No ratings yet · Sign in to rate

Comments (0)

  • No comments yet — be the first.

Save without an account. Sign in to like or comment.

Our tips for carving a similar design

The design splits into two zones: ball panels with connected seam ribs in the upper half, and a dense net lattice anchored around its perimeter in the lower half. Carving ball panels first establishes the visual anchor before the intricate net work begins. Backboard and hoop contour lines are kept as shallow scores to avoid weakening the shell where ball and net zones meet.

From pumpkin to porch

  1. Prep for a multi-zone carve

    Refrigerate the pumpkin briefly to firm the flesh, then cut a bottom entry, scoop completely, and scrape the interior wall to a uniform three-quarter-inch thickness. Mark the horizontal line dividing the ball zone from the net zone on the pumpkin with a light pencil mark before transferring the stencil.

  2. Transfer ball and net outlines

    Tape the stencil firmly and pin-transfer all ball panel outlines, seam rib locations, net lattice diamond outlines, and backboard score lines in one session. Mark all net perimeter anchor points explicitly so you know where the lattice must remain connected to the shell.

  3. Score backboard and hoop contours

    Before cutting any panels, score the backboard rectangle and hoop arc with a paring knife tip, removing only outer skin. Scoring these while the shell is intact gives the cleanest, most controlled lines.

  4. Cut ball panels

    Remove the ball panel openings with a medium saw, working opposite panels first as in the four-panel design. Confirm the seam ribs stay at least three-quarters of an inch wide before moving to the net zone.

  5. Cut net diamond holes from outside edges inward

    Begin the net lattice by cutting the outermost ring of diamond holes, which are fully supported by surrounding rind, then work inward ring by ring. This order keeps maximum perimeter support intact as interior diamonds are removed.

  6. Light and display

    Install a bright LED and view on the garage shelf at dusk. The ball glow and net glow should read as two distinct zones. Coat all cut and scored surfaces with petroleum jelly to extend the carving's display life.

Written with AI to match this design

Gather your supplies

Check things off as you get ready.

Work on a stable surface, keep your free hand out of the cutting path, and have an adult handle sharp tools.

Three levels of light

  • Leave intact

    Seam ribs, net lattice frame, outer shell border, and unscored areas stay dark.

  • Peel & shade

    Backboard rectangle and hoop arc score lines glow faintly.

  • Cut through

    Ball panel openings and all net diamond holes cut completely through.

Learn the carving basics

Before you start cutting

How small can each net diamond be before it becomes too fragile to cut?

Keep each diamond hole at least three-eighths of an inch on its longest diagonal. Smaller than that and the lattice rind between them becomes too thin to stay intact. If your stencil has very small diamonds, enlarge them slightly on the print before transferring.

The net and ball zones look like they might merge into one big opening. How do I prevent that?

The horizontal dividing line between ball and net zones must be maintained as solid rind at least three-quarters of an inch wide. If your stencil places ball panels and net holes too close together at the boundary, add a slightly thicker buffer band explicitly to the stencil before transferring.

Can I light the ball and net zones with different colored LEDs?

Yes, using a warm amber for the ball zone and a cooler white for the net zone creates effective visual separation. Place each LED on its own side of the internal dividing rind band. You may need to shield each LED with a small piece of cardboard placed inside to keep the two light colors from mixing.

Your take belongs here, too.

Changed a detail? Made it simpler? Share a photo of your version and tell the community what worked.

Share your pumpkin

More pumpkins like this

You've reached the end · 8 pumpkins
The Patch Report

Fresh pumpkins, in your inbox.

The best new carvings, ideas worth stealing, and how-tos for carving season. Short, seasonal, and gone by November.

A short email during carving season. Unsubscribe anytime. See our privacy policy.