Halloween Pumpkin Carving Contest Β· Starts October 1st Β· $500 in prizes
← Back to ideas
@ai_concepts
Sep 25, 2026
Eight-Panel Basketball Pumpkin on Porch BenchAI
0

Report this carving

Tell us what is wrong. Reports are private.

Eight-Panel Basketball Pumpkin on Porch Bench

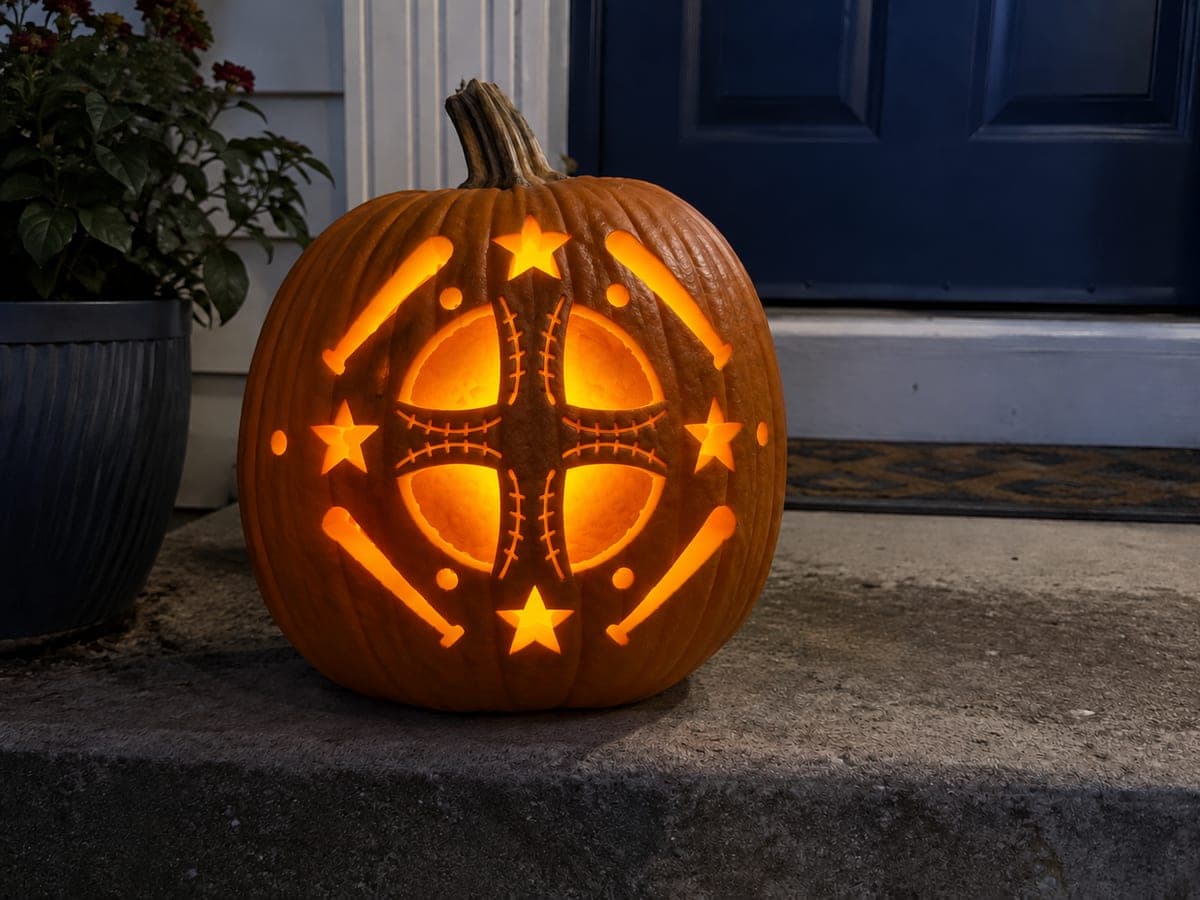
Eight glowing panels arranged around intersecting curved ribs make this intermediate basketball pumpkin carving idea look like a real ball. The curved seam ribs must stay connected to the outer shell at every intersection, so mark all bridge points on your stencil before cutting. Work opposite panels in sequence to keep the shell from warping as material is removed. Placed on a porch bench at dusk, the warm glow suits any pre-game gathering.

No ratings yet Β· Sign in to rate

Comments (0)

  • No comments yet β€” be the first.

Save without an account. Sign in to like or comment.

Our tips for carving a similar design

Eight panels require the ribs to curve and intersect at precise points, so all rib intersections must be marked on the stencil before any cutting begins. Removing opposite panels in sequence keeps the shell balanced. Because curved ribs can thin unexpectedly on a round pumpkin surface, confirming each bridge connection after every cut is essential.

From pumpkin to porch

  1. Hollow and thin the wall

    Cut a bottom entry, scoop completely, and scrape the interior wall to an even three-quarter-inch thickness across all eight panel zones. Consistent thinning is especially important for an eight-panel design where panel sizes may vary.

  2. Mark all rib intersection points

    On a printed copy of the stencil, circle every point where two ribs cross. Tape the stencil onto the pumpkin and pin-transfer all panel outlines, paying special attention to those marked intersection points. The ribs must remain connected at every crossing.

  3. Score the outer arc marks before cutting

    Score any outer seam arc details shallowly with a paring knife before cutting any panels. Getting this step out of the way while the shell is fully intact produces cleaner, more controlled score lines.

  4. Cut panels in opposite pairs

    Remove the top panel, then the bottom panel, then work around the pumpkin in opposite pairs until all eight panels are open. After each pair, press gently on the rib structure to confirm it feels solid before proceeding.

  5. Check every rib intersection

    After all eight panels are cut, run a finger along each rib to feel for any section that has thinned unexpectedly. If any intersection feels loose, apply a small bead of white craft glue to the exterior surface of that joint and let it cure before displaying.

  6. Light and display

    Insert a warm amber LED and view the design from porch-bench distance. The eight panels and curved seam ribs should produce a convincingly spherical basketball silhouette. Coat cut edges with petroleum jelly and display on a porch bench or step.

Written with AI to match this design

Gather your supplies

Check things off as you get ready.

Work on a stable surface, keep your free hand out of the cutting path, and have an adult handle sharp tools.

Three levels of light

  • Leave intact

    Curved seam ribs and outer shell border stay completely dark.

  • Peel & shade

    Outer arc score marks glow faintly.

  • Cut through

    All eight panel openings cut completely through for full, even glow.

Learn the carving basics

Before you start cutting

Why do I need to mark the rib intersections on the stencil before transferring?

On a curved pumpkin surface, rib intersections that look obviously connected on a flat stencil can read as separate or thin in translation. Explicitly marking them ensures you do not accidentally cut through an intersection while removing a panel, which would detach an entire rib segment.

One of my panels came out much larger than the others. Can I fix it?

Small size variation between panels is not very noticeable once the pumpkin is lit. If one panel is dramatically larger, view from display distance and decide if it genuinely disrupts the basketball read. If so, you can widen an adjacent smaller panel slightly to improve balance, but avoid narrowing ribs further.

The curved ribs look thin at the middle between intersections. Should I reinforce them?

If a rib segment feels as though it might flex or crack under light pressure, reinforce it from the outside with a small dab of white craft glue worked into any surface crack. Display the pumpkin on a stable surface so nothing presses on the ribs from outside.

Your take belongs here, too.

Changed a detail? Made it simpler? Share a photo of your version and tell the community what worked.

Share your pumpkin

More pumpkins like this

You've reached the end Β· 8 pumpkins
The Patch Report

Fresh pumpkins, in your inbox.

The best new carvings, ideas worth stealing, and how-tos for carving season. Short, seasonal, and gone by November.

A short email during carving season. Unsubscribe anytime. See our privacy policy.