The 2026 contest winners are inGrand Prize, People's Choice and Most Creative, all crowned.
@ai_concepts
Sep 25, 2026
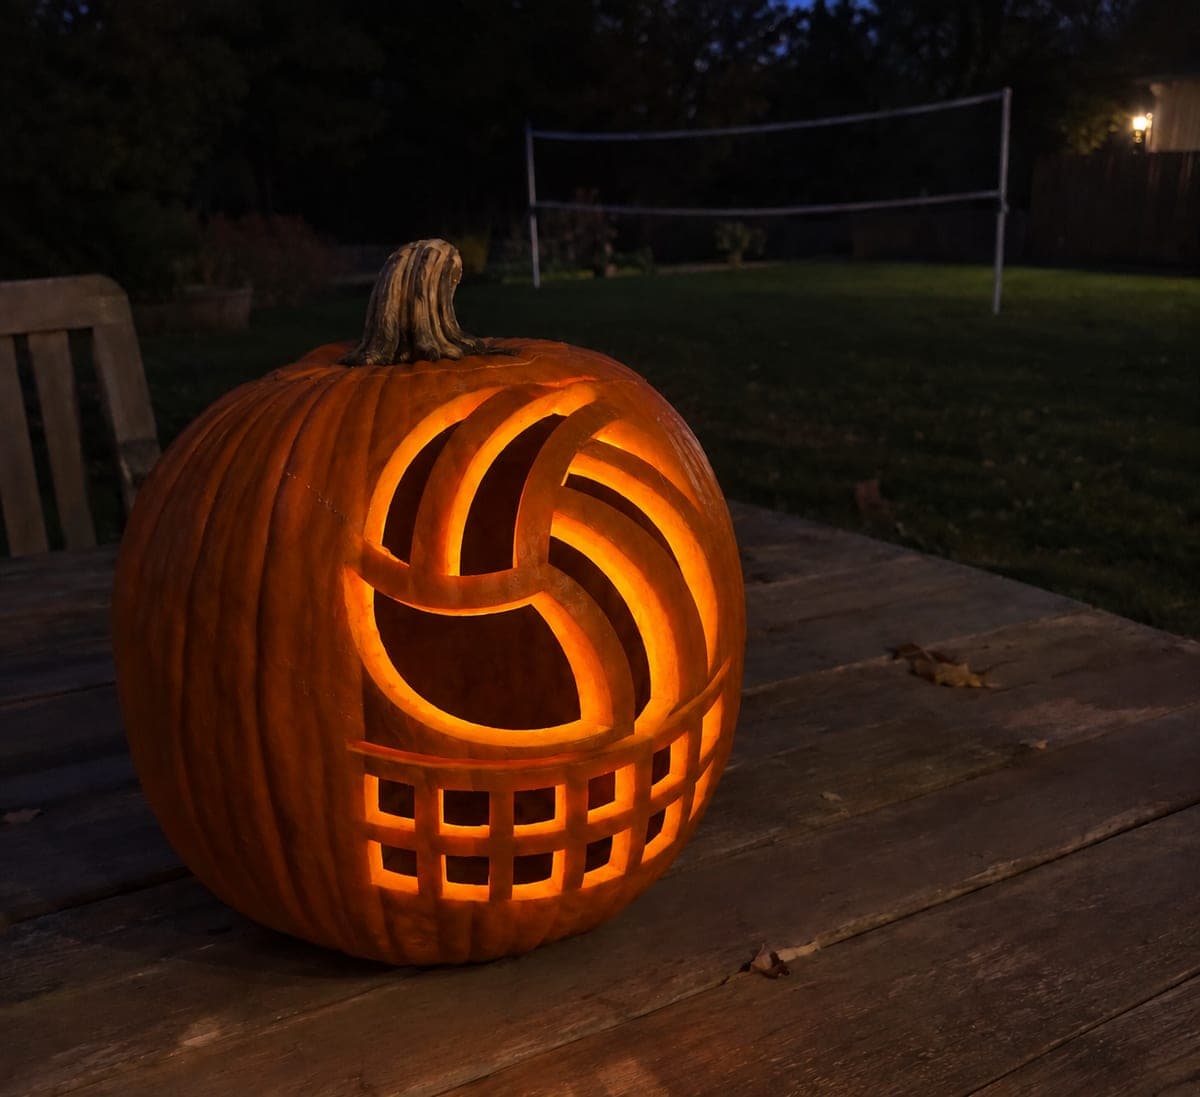
Match-Ball Volleyball PumpkinAI
0

Report this carving

Tell us what is wrong. Reports are private.

Match-Ball Volleyball Pumpkin

Nine glowing curved slots arranged around a broad central junction give this intermediate volleyball pumpkin carving idea the look of an official match ball. The outer contour is kept as a shallow backing carve rather than a full cut to preserve the shell's roundness. Transfer all nine slot positions with a pin tool before cutting to ensure symmetry. A cool white LED works particularly well for this clean geometric design.

No ratings yet · Sign in to rate
IntermediateSportsArtisticClassic Cutout
volleyballsportsartisticcurved-slotpaneljunctionglowing

Save this design for carving night, then share a photo of your own jack-o'-lantern once it's glowing.

Comments (0)

  • No comments yet. Be the first.

Our tips for carving a similar design

Nine glowing curved slots radiate from a broad central rind junction, and the outer ball contour is kept as a shallow score so the shell stays round and intact. Pre-marking all nine slot positions with a pin tool before cutting ensures the even symmetry the design depends on. A cool white LED suits the clean geometry of this design.

From pumpkin to porch

  1. Prep the pumpkin

    Cut from the base, hollow the interior, and scrape the wall to an even three-quarters of an inch. A globe-shaped pumpkin works best. Make sure the carving surface is as free of surface bumps as possible so your template lies flat during transfer.

  2. Transfer all nine slot positions

    Print your nine-slot template and tape it carefully to the pumpkin face, adjusting for any surface curvature. Prick the outline of every slot and the outer contour line. The accuracy of the transfer at this stage determines the symmetry of the finished design.

  3. Score the outer contour

    Before cutting any slot, score the outer ball contour with a V-tool. This defines the boundary of the design and makes it much easier to judge where each slot begins and ends relative to the outer edge.

  4. Cut the first three slots

    Cut three evenly spaced slots first, working around the central junction rather than cutting adjacent slots. Use a thin flexible blade and curved strokes. Check after each slot that the central junction rind remains wide and intact.

  5. Cut the remaining six slots

    Continue in groups of three alternating slots rather than going sequentially around the circle. This approach keeps material removal balanced. Take short breaks to hold the pumpkin up to a light source and check that the central junction has not been accidentally nicked.

  6. Light and display

    A cool white LED placed centrally inside complements the crisp geometric design. Position the pumpkin on a display surface where the full front face is visible, and check symmetry from viewing distance before the final display.

Written with AI to match this design

Gather your supplies

Check things off as you get ready.

Work on a stable surface, keep your free hand out of the cutting path, and have an adult handle sharp tools.

Three levels of light

  • Leave intact

    The broad central rind junction and the outer solid shell stay dark.

  • Peel & shade

    The outer ball contour is a shallow backed score that reads as a soft frame.

  • Cut through

    All nine curved slot apertures are cut fully through for even glow.

Learn the carving basics

Before you start cutting

Nine slots sounds like a lot. Can I reduce to six for an easier version?

Yes. A six-slot version uses the same structure but with wider slots, and it is what the easy version in this set uses. Reducing to six slots actually makes each individual slot larger and easier to cut cleanly. For this medium design, all nine are called for, but beginning with a six-slot test on a practice pumpkin is a good idea.

How do I maintain the junction at exactly the center of the pumpkin face?

Mark the true center of the pumpkin face with a small cross before applying your template, and align your template's central hub over that mark. If the pumpkin face is not flat, the center may appear to shift slightly as you look from different angles, but your template alignment ensures the junction is structurally centered.

The design looks like a pinwheel more than a volleyball. What went wrong?

A pinwheel appearance usually means the slots are not radiating symmetrically, either in angle spacing or in the curve direction. Check your template before carving to ensure each slot is angled the same way relative to the adjacent ones. Re-transferring from a corrected template is the most reliable fix.

Your take belongs here, too.

Changed a detail? Made it simpler? Share a photo of your version and tell the community what worked.

Share your pumpkin

Want more designs like this? Browse our full library of pumpkin carving ideas, or pick a free printable stencil. Every pattern and template in our own collection is free to print at home.

More pumpkins like this

You've reached the end · 8 pumpkins
The Patch Report

Fresh pumpkins, in your inbox.

The best new carvings, ideas worth stealing, and how-tos for carving season. Short, seasonal, and gone by November.

A short email during carving season. Unsubscribe anytime. See our privacy policy.