Halloween Pumpkin Carving Contest · Starts October 1st · $500 in prizes
← Back to ideas
@ai_concepts
Sep 25, 2026
Detailed Basketball Net Pumpkin With Diamond OpeningsAI
0

Report this carving

Tell us what is wrong. Reports are private.

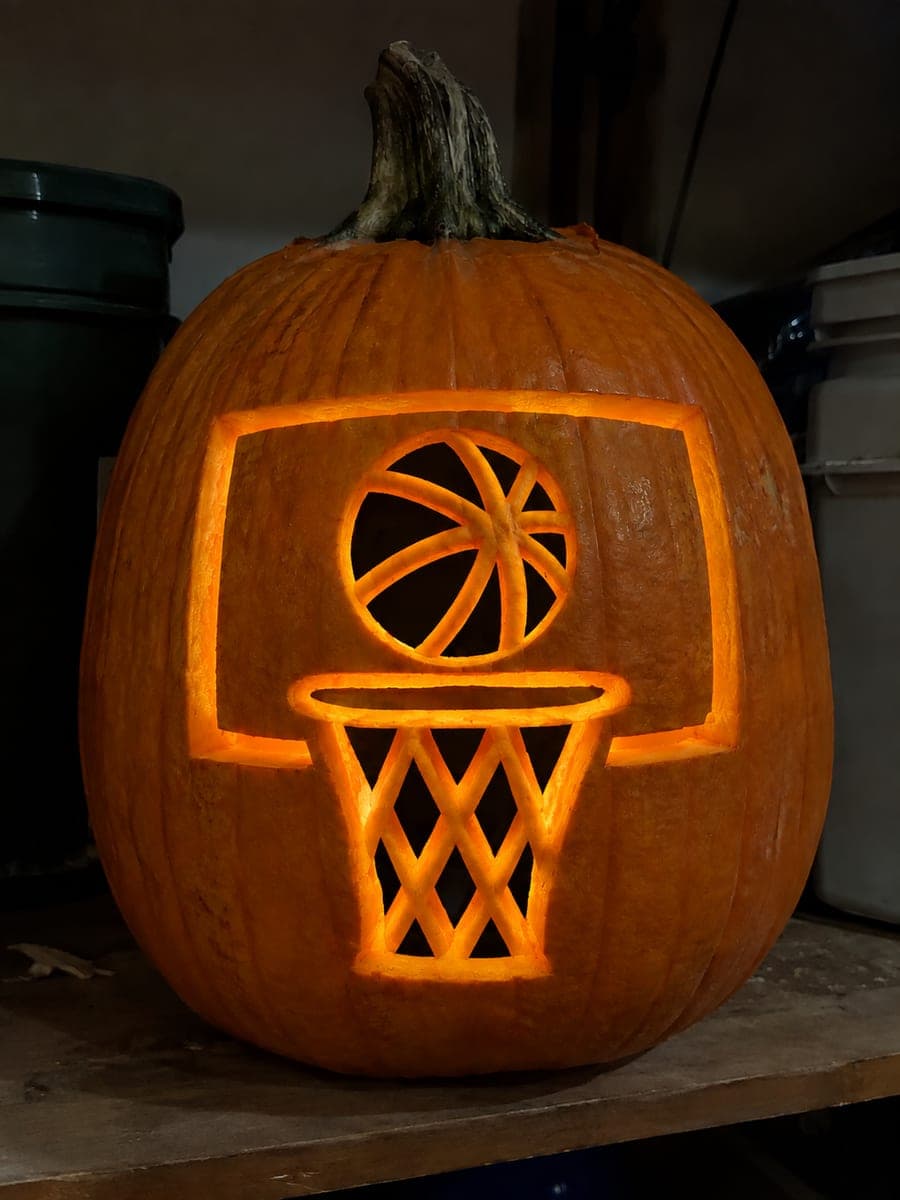
Detailed Basketball Net Pumpkin With Diamond Openings

Open ball panels and a dense grid of glowing diamond net holes combine in this expert basketball pumpkin carving idea, requiring both precision and patience. The net lattice must root firmly around the entire perimeter, so trace and confirm every connection point before cutting begins. Work the ball panels first, then cut net diamonds in a spiral from the outside ring inward to preserve the lattice structure. Backboard and hoop contours are kept as shallow scores for clean framing.

No ratings yet · Sign in to rate
Comments (0)

  • No comments yet — be the first.

Save without an account. Sign in to like or comment.

Our tips for carving a similar design

The net lattice must root firmly around its entire perimeter, so tracing and confirming every connection point is the most important pre-cut step. Ball panels come first to establish the upper design, then net diamonds are cut in a spiral from the outermost ring inward to preserve the lattice structure. Backboard and hoop contours stay as shallow scores to cleanly frame the design.

From pumpkin to porch

  1. Confirm all lattice perimeter connections

    Print the stencil and trace the net lattice perimeter. Mark every point where a lattice strand connects to the outer shell with a colored dot. Count the connections: there should be at least one every half inch around the net perimeter. Add bridges on the stencil where gaps exist before any transfer.

  2. Hollow and calibrate thoroughly

    Cut a bottom entry, scoop completely, and use a skewer to check wall thickness at a dozen points across ball panels and net zone. Three-quarter-inch uniformly is the target. The dense net lattice requires perfectly even thinning; thick patches cause blades to bind and lattice bars to crack.

  3. Transfer and review

    Use three pin spacings: dense for ball panels and net diamond holes, medium for lattice bar outlines, sparse for backboard and hoop score lines. After removing the stencil, hold the pumpkin under bright light and verify every zone is clearly readable before cutting.

  4. Cut ball panels first

    Remove ball panel openings with a medium saw, working opposite panels to balance the shell. Confirm all seam ribs are at least three-quarters of an inch wide after each panel cut before moving to the net zone.

  5. Cut net diamonds in a spiral from outside in

    Start at the outermost ring of net diamonds and cut each one fully before advancing to the next interior ring. This spiral sequence preserves the maximum perimeter support for as long as possible, preventing lattice collapse in the center before outer connections are secure.

  6. Score backboard and hoop, then finish

    Score the backboard rectangle and hoop arc after all cut-throughs are complete so the scored lines are not distorted by carving vibration from adjacent cuts. Apply petroleum jelly to all surfaces, install a bright LED, and evaluate from several feet back before displaying.

Written with AI to match this design

Gather your supplies

Check things off as you get ready.

Work on a stable surface, keep your free hand out of the cutting path, and have an adult handle sharp tools.

Three levels of light

  • Leave intact

    Seam ribs, net lattice bars, outer shell border, and all uncut areas stay completely dark.

  • Peel & shade

    Backboard and hoop contour score lines glow faintly.

  • Cut through

    Ball panel openings and every net diamond hole cut completely through.

Learn the carving basics

Before you start cutting

The net lattice collapsed in the center when I removed the last few diamonds. How do I prevent this?

The spiral-from-outside approach minimizes this risk, but if collapse still occurs it usually means the lattice bars between diamonds were too thin. On the next project, widen the bars to at least a quarter inch on all sides of each diamond. If the collapse is partial, a small bead of white craft glue applied from the interior can re-adhere loose bars.

How many diamonds can a pumpkin realistically hold in the net zone?

A large pumpkin with a net zone roughly six inches tall and four inches wide can hold twelve to sixteen diamonds comfortably at expert level. Beyond that, the bars between diamonds become too thin to remain structurally sound. Scale the diamond size to the available net zone area rather than trying to hit a specific count.

The ball panel glow and the net zone glow look the same brightness. Can I make the net zone brighter?

Because net diamonds are smaller than ball panels, each passes less total light. To boost the net zone, tilt the internal LED slightly toward the net side of the pumpkin. You can also scrape the interior wall a hair thinner behind the net zone specifically, making each diamond opening proportionally brighter without changing their cut size.

Your take belongs here, too.

Changed a detail? Made it simpler? Share a photo of your version and tell the community what worked.

Share your pumpkin

More pumpkins like this

You've reached the end · 8 pumpkins
The Patch Report

Fresh pumpkins, in your inbox.

The best new carvings, ideas worth stealing, and how-tos for carving season. Short, seasonal, and gone by November.

A short email during carving season. Unsubscribe anytime. See our privacy policy.