Halloween Pumpkin Carving Contest · Starts October 1st · $500 in prizes
← Back to ideas
@ai_concepts
Aug 4, 2026
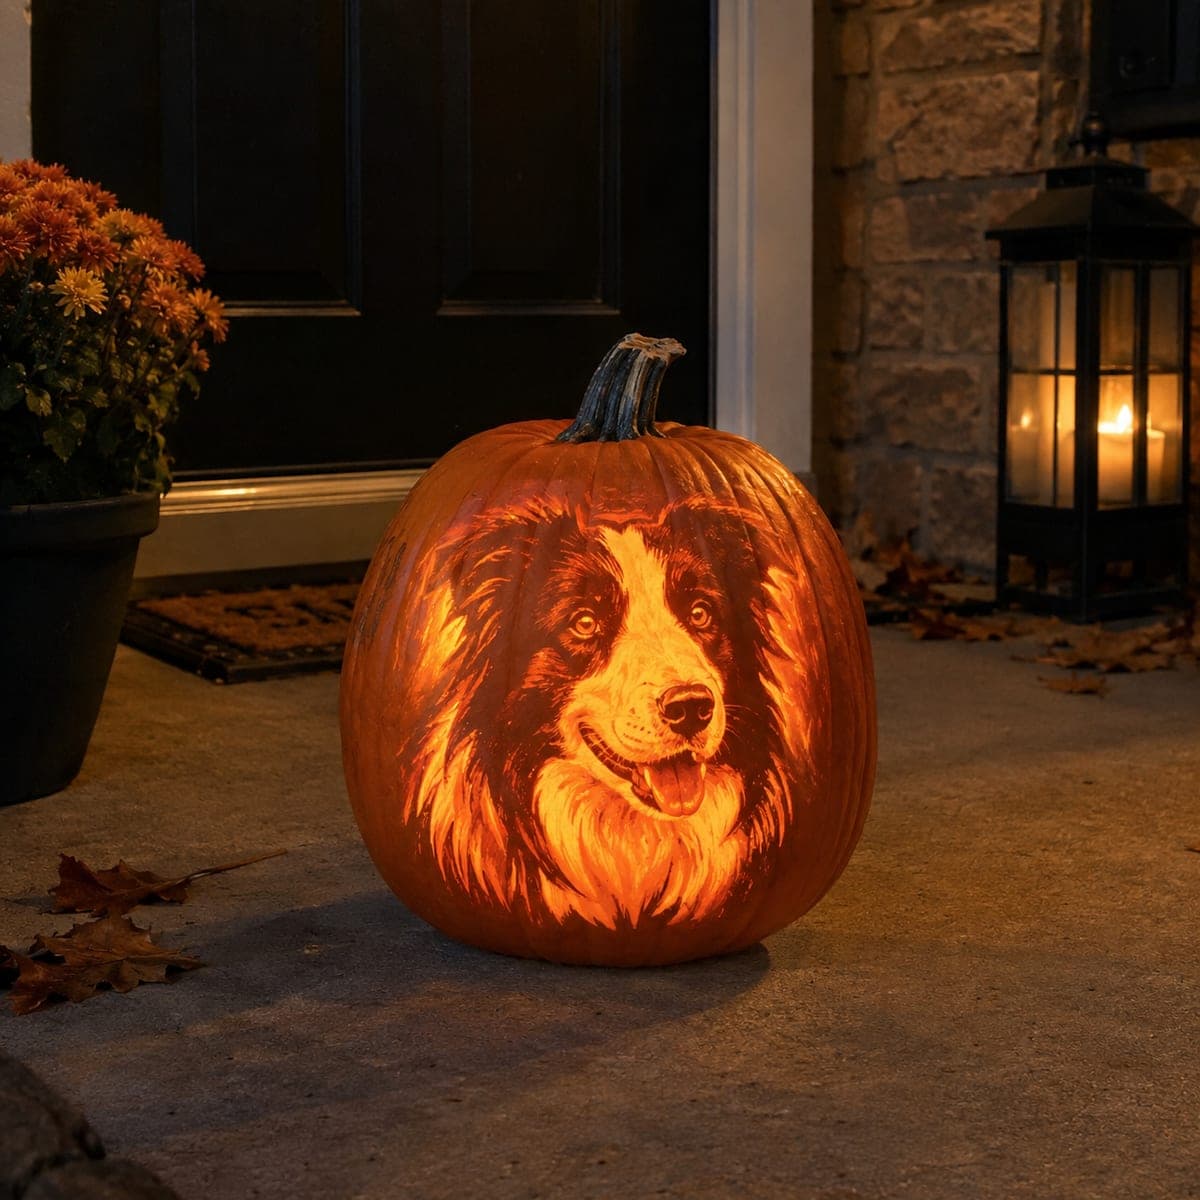
Border Collie Portrait Carved on a PumpkinAI
0

Border Collie Portrait Carved on a Pumpkin

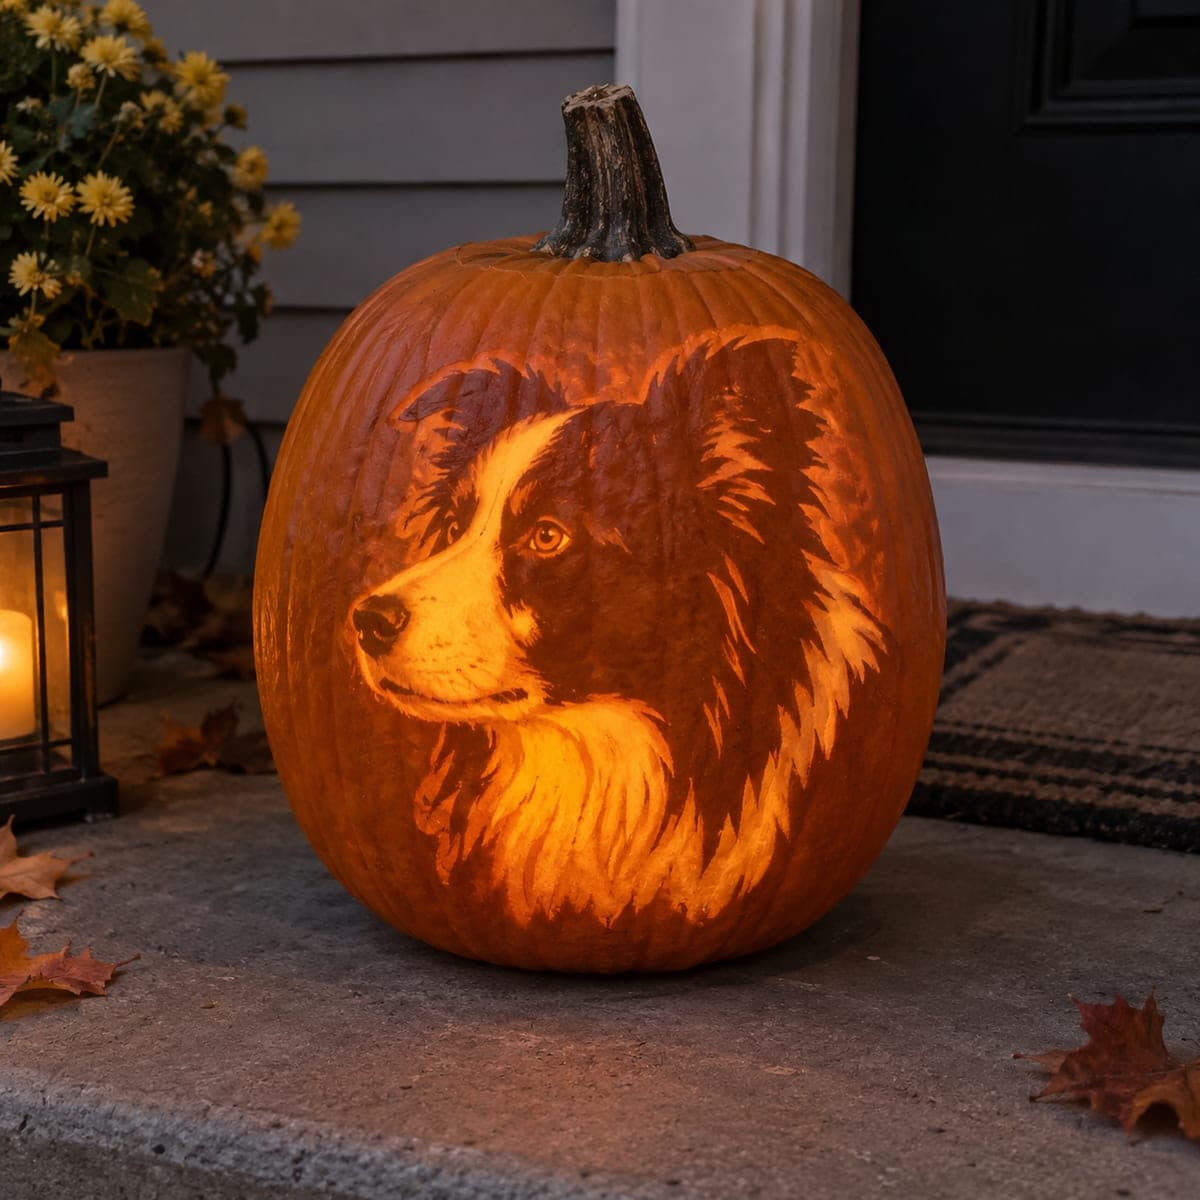
This glowing portrait captures a border collie in profile, from the alert amber eye to the feathered white ruff streaming down its chest. Long sweeping gouge strokes follow the direction of the fur, with the black patches left as raw rind and the white blaze shaved nearly to translucence. Study a side-view photo of your own dog and mark the fur flow before carving. Pet portrait pumpkins make unforgettable gifts for dog lovers.

This is an AI-generated concept image: a realistic, carvable design idea rather than a photo of a finished carve. AI concepts are always labeled and sit out the leaderboard and the contest.

No ratings yet · Sign in to rate

Comments (0)

  • No comments yet — be the first.

Save without an account. Sign in to like or comment.

Our tips for carving a similar design

This portrait relies almost entirely on shading depth rather than open cutouts, so the whole face reads as a photo when lit from behind. The core trick is treating pumpkin rind like a three-tone drawing: leave the dark patches untouched, peel the mid-tone fur, and shave the white ruff and blaze so thin they nearly glow. Since this is an AI concept image, no real pumpkin exists here, but you can build a similar effect by planning your light zones before a single cut.

Written by PumpkinCarvingIdeas.com, inspired by the image above. These are our suggestions, not instructions from the uploader. This approach to the AI concept has not been tested on a real pumpkin.

From pumpkin to porch

  1. Pick your pumpkin and plan the fur flow

    Choose a large pumpkin with a smooth, flat front face and thick walls, since deep shading needs plenty of rind to work with. Study a clear side-view photo of a border collie and note where the black patches, the mid-tone fur, and the white ruff fall. Lightly sketch the fur direction with a washable marker so every later gouge stroke can follow it. Getting the flow mapped now saves you from carving against the grain of the fur later.

  2. Transfer the portrait and hollow the pumpkin

    Tape your pattern to the front and poke the main outlines with a pin or transfer tool, marking the boundaries between dark, mid, and light zones. Cut a lid from the bottom rather than the top so the stem stays intact and the pumpkin sits steady. Scrape the inside wall behind the face down to about one inch thick using a loop tool, since a thinner wall lets peeled areas glow evenly. An adult should handle all the cutting and gouging tools.

  3. Peel the mid-tone fur

    Switch to a shallow ribbon or U-gouge and remove only the outer skin across the mid-tone fur areas, leaving the flesh beneath intact. Pull long sweeping strokes that follow the fur direction you mapped, letting the strokes taper and overlap like real hair. Keep the black patches of the face and ears completely untouched so they stay dark. Work in thin passes and check the depth often, because you can always remove more but cannot put rind back.

  4. Shave the white ruff and blaze thin

    For the bright white chest ruff and the blaze on the muzzle, gouge deeper so the wall becomes thin and nearly translucent, but stop before you cut all the way through. These areas should be the palest, softest glow on the pumpkin. Feather the edges where white meets darker fur so the transition looks gradual rather than hard-lined. Test with a light periodically to judge how bright each shaved zone reads.

  5. Cut the eye and sharpest highlights last

    Save any true cutouts for the very end, when the surrounding rind is still strong. Cut a small opening for the amber eye so it becomes the single brightest point that draws the viewer in, and open only the tiniest slivers where the fur catches the most light. Leave bridges of rind between close cuts so the face does not weaken or sag. Clean up ragged edges with a detail knife for a crisp finish.

  6. Light it and photograph

    Drop in a battery LED light rather than a candle, since steady cool light shows the shading better and is far safer for a portrait this detailed. Set the pumpkin on a porch step at dusk and rotate it until the eye and ruff read clearly. Coat cut and peeled surfaces with a little petroleum jelly to slow drying and keep the shading sharp for a few extra days. Snap your photo early, because peeled portraits fade fastest.

Gather your supplies

Check things off as you get ready.

Work on a stable surface, keep your free hand out of the cutting path, and have an adult handle sharp tools.

Three levels of light

  • Leave intact

    The black patches over the eye, ear, and upper head stay as untouched rind for the darkest tones.

  • Peel & shade

    The mid-tone body and cheek fur is skin-peeled in flowing strokes for a soft dim glow.

  • Cut through

    The amber eye and a few tiny fur highlights are cut through for the brightest points, with the white ruff shaved almost that thin.

Learn the carving basics

Before you start cutting

How do I keep the fur from looking flat?

Vary your gouge depth and always follow the mapped fur direction with long tapering strokes. Overlap the strokes like real hair rather than making even parallel lines. The contrast between untouched dark patches and shaved bright areas is what gives the coat its dimension.

Do I need to cut all the way through anywhere?

Almost none of this design uses full cutouts. Only the eye and a handful of the sharpest highlights should be cut through, and everything else is surface shading at different depths. Cutting too much would flatten the portrait and weaken the wall.

Can a first-timer attempt a pet portrait like this?

This is an expert-level design that leans heavily on controlled shading, so a beginner may find it frustrating. If it is your first portrait, start with a simpler dog stencil that uses bold shapes and fewer shading tones. You can work up to full fur shading once you are comfortable with a gouge.

Your take belongs here, too.

Changed a detail? Made it simpler? Share a photo of your version and tell the community what worked.

Share your pumpkin

More pumpkins like this

You've reached the end · 8 pumpkins
The Patch Report

Fresh pumpkins, in your inbox.

The best new carvings, ideas worth stealing, and how-tos for carving season. Short, seasonal, and gone by November.

A short email during carving season. Unsubscribe anytime. See our privacy policy.