Halloween Pumpkin Carving Contest · Starts October 1st · $500 in prizes
← Back to ideas
@ai_concepts
Jul 20, 2026
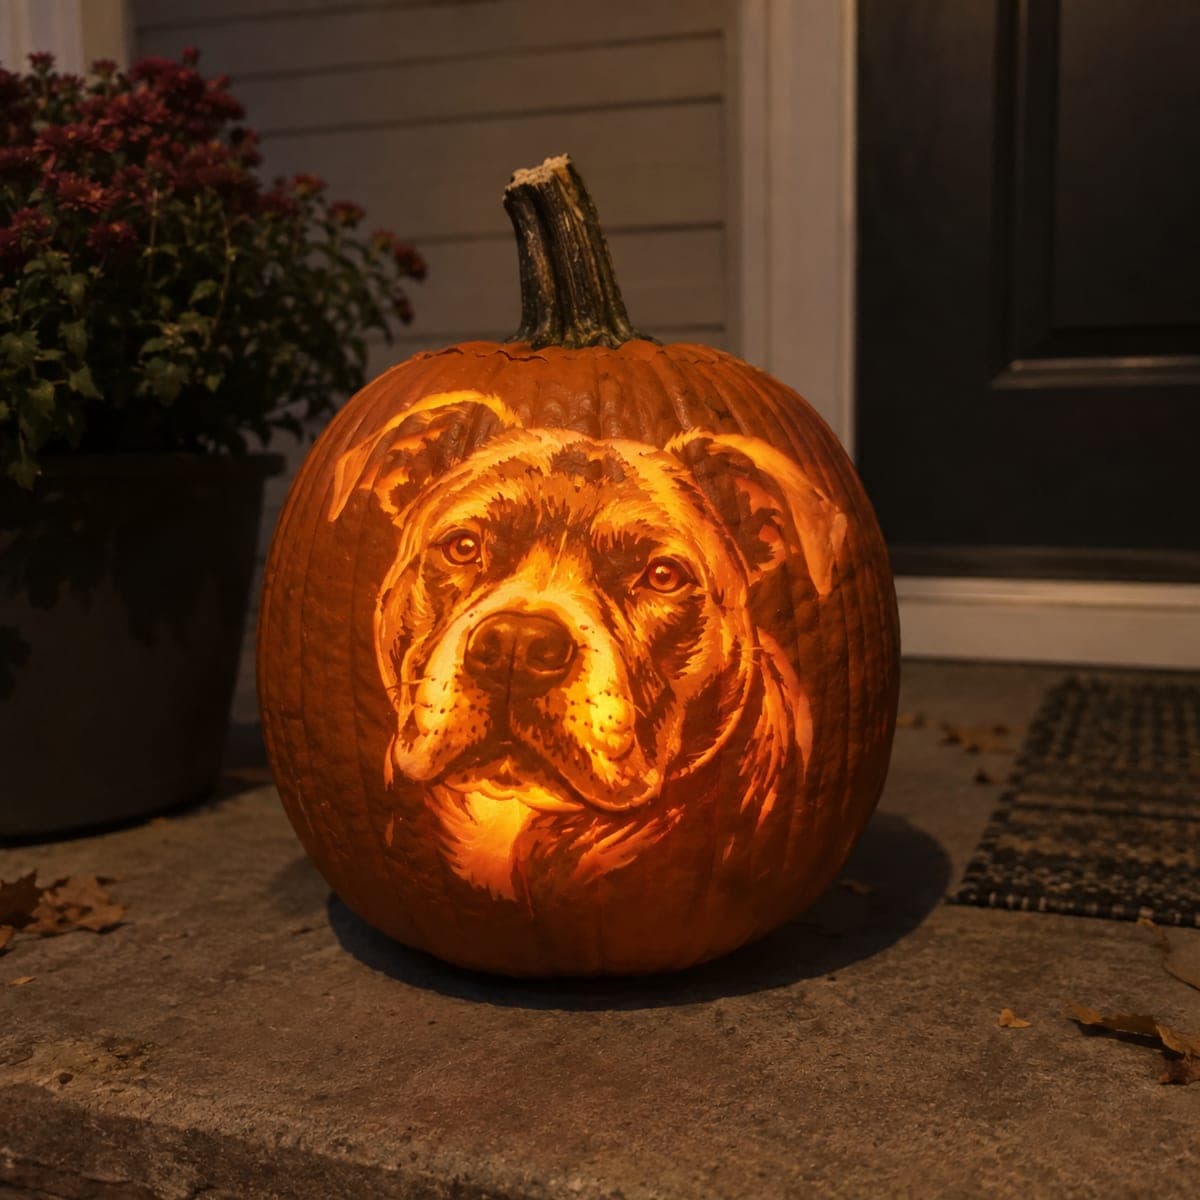
Bull Terrier Portrait Shaded Jack-O-LanternAI
0

Bull Terrier Portrait Shaded Jack-O-Lantern

A bull terrier's distinctive egg-shaped head and two-tone marking are captured in beautifully lit surface shading on this pumpkin, the candle glow making the lighter etched areas shine and the deeper carved shadow areas recede into darkness. The breed's characteristic dark patch around one eye is achieved with a deeper skin removal than the surrounding lighter areas. Sketch the head outline with a dry-erase marker before committing any cuts, and peel the pale face areas first. This pumpkin carving idea rewards precise tool control with a strikingly recognizable portrait.

This is an AI-generated concept image: a realistic, carvable design idea rather than a photo of a finished carve. AI concepts are always labeled and sit out the leaderboard and the contest.

No ratings yet · Sign in to rate

Comments (0)

  • No comments yet — be the first.

Save without an account. Sign in to like or comment.

Our tips for carving a similar design

This design is a shading portrait, so almost nothing gets cut all the way through. The trick is controlling depth: the pale face and chest are thinned so light shines through as a soft glow, the dark eye patch and shadowed edges stay thicker or untouched, and only a few tiny accents may be cut clean for a highlight. Think of the pumpkin wall as a dimmer switch you carve one layer at a time.

Written by PumpkinCarvingIdeas.com, inspired by the image above. These are our suggestions, not instructions from the uploader. This approach to the AI concept has not been tested on a real pumpkin.

From pumpkin to porch

  1. Plan and prep the pumpkin

    Pick a large pumpkin with a smooth, pale, evenly rounded front so the egg-shaped head has room to sit centered. Cut a wide access hole in the bottom rather than the top so the shape stays clean, then scrape the inside front wall down to about one inch so light passes evenly. Dry the surface and let an adult handle all the blades. A thinner front wall makes shading far easier to control.

  2. Transfer the portrait outline

    Sketch the head, ears, muzzle, and the boundary of the dark eye patch with a dry-erase marker before you commit to any cut. If you are working from a stencil, tape it in place and poke light dots along the main lines, then connect them. Step back often to check that the long muzzle and upright ears read correctly. Fixing a marker line is free, fixing a carved line is not.

  3. Peel the brightest pale areas first

    Using a shaving loop or ribbon tool, remove only the orange skin from the lightest parts of the face and chest so the flesh underneath glows. Keep these areas fairly even and shallow at first, then go a touch deeper where you want the strongest highlight along the muzzle bridge and forehead. Work slowly and check the effect by holding a light inside now and then. You can always remove more, but you cannot put pumpkin back.

  4. Build the mid tones and shadows

    Leave the darker fur and the eye patch as untouched skin so they stay dark, and use a very shallow scrape for the mid gray transitions between light and dark. Vary how deep you go to create the rounded feel of the cheek and jaw. Blend the edges of the eye patch gradually rather than as a hard line so it looks like fur. This depth-mapping is where the portrait comes to life.

  5. Refine details and any small cutouts

    Add fine texture with the tip of a detail tool for the whiskers, the shine in the eye, and the wet nose. If you want one or two true highlights, cut fully through only in the tiniest spots, such as a glint in the eye, and save those cuts for last so the wall stays strong. Clean up stray marker lines with a damp cloth. Resist over-carving, since restraint keeps the face recognizable.

  6. Light it and photograph

    Set a battery LED light or two inside, never a candle, since flames are unsafe and their heat softens thin shaded walls quickly. Warm white LEDs give the best skin-tone glow for this portrait. Place the pumpkin on a step in low ambient light and shoot at dusk for the strongest contrast. Rub a little petroleum jelly on cut edges to slow drying and keep the shading crisp for a few extra days.

Gather your supplies

Check things off as you get ready.

Work on a stable surface, keep your free hand out of the cutting path, and have an adult handle sharp tools.

Three levels of light

  • Leave intact

    The dark eye patch and the shadowed fur around the ears and jaw stay as untouched skin.

  • Peel & shade

    The pale face, muzzle, and chest are skin-peeled to a soft mid orange glow, deeper where highlights fall.

  • Cut through

    Only a tiny eye glint or single highlight point, if any, is cut all the way through and saved for last.

Learn the carving basics

Before you start cutting

Do I have to cut all the way through anywhere?

Almost never on this design. It is a shading portrait, so nearly everything is surface work at different depths. At most you might cut one tiny highlight, like a spark in the eye, and even that is optional.

How do I keep the dark eye patch looking like fur and not a blob?

Leave the patch as untouched skin so it reads dark, then blend its border with a very shallow scrape instead of a hard edge. Feathering the transition over a few millimeters makes it look like fur rather than a painted spot. Check it lit from inside to judge the blend.

This is shown as a concept image. Can a real pumpkin actually look like this?

Yes, a shaded pet portrait like this is achievable, though it takes patience and steady tool control. The key is thinning the front wall evenly and mapping your depths carefully before you start. Give yourself a couple of hours and a good reference photo.

Your take belongs here, too.

Changed a detail? Made it simpler? Share a photo of your version and tell the community what worked.

Share your pumpkin

More pumpkins like this

You've reached the end · 8 pumpkins
The Patch Report

Fresh pumpkins, in your inbox.

The best new carvings, ideas worth stealing, and how-tos for carving season. Short, seasonal, and gone by November.

A short email during carving season. Unsubscribe anytime. See our privacy policy.