@stemandseed
Sep 5, 2026
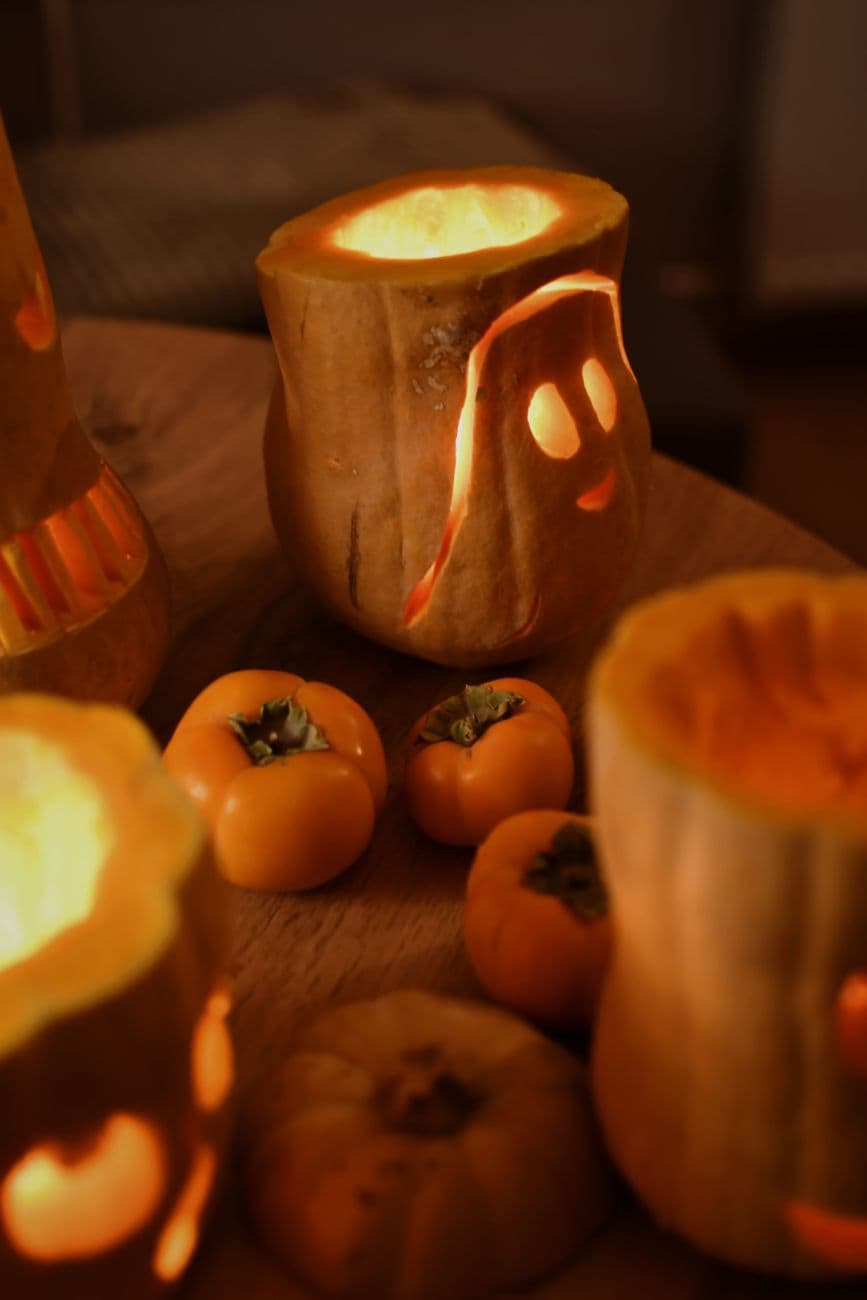
Butternut ghost
A butternut squash turned ghost luminary, its wavy silhouette and round eyes glowing over a table of persimmons. Proof that any gourd can join the party.
No ratings yet · Sign in to rate
A butternut squash turned ghost luminary, its wavy silhouette and round eyes glowing over a table of persimmons. Proof that any gourd can join the party.
The core trick here is using the tall, narrow shape of a butternut squash as the ghost's body, with a wavy vertical opening down one side and two round eyes for the face. You hollow it from the top like a tiny barrel, then let an LED glow leak out through the soft curving cut and the eye holes. The uneven silhouette of the squash does most of the spooky work for you.
Written by PumpkinCarvingIdeas.com, inspired by @stemandseed's photo above. These are our suggestions, not instructions from the uploader, and this approach hasn't been tested on their exact carve.
Choose a butternut with a wide, stable base so it stands on its own without rolling. Wipe it clean and dry, then set it on a cutting board with a towel underneath to keep it from sliding. Because squash skin is firm and slick, take your time and keep your free hand out of the blade path. An adult should handle all the cutting tools.
Cut a lid or a simple opening across the top of the squash, angling the blade slightly inward so the rim does not collapse. Scoop out the seeds and stringy pulp with a sturdy spoon, then thin the wall on the side where your face will go. A wall about half an inch to three quarters thick lets light pass and stays strong. Butternut flesh is dense, so work in small scoops rather than forcing the spoon.
With a washable marker, draw two round eyes and a small oval mouth on the front. Then sketch a long, gently curving line running from near the top down toward the base, like a soft flame or drip shape. Keep the curve smooth and avoid making it so wide that the front and back separate. Step back and check that the eyes sit above the mouth at a friendly, slightly surprised angle.
Using a small detail saw or a sharp paring knife, cut out the two round eyes and the little mouth. Push the pieces out from the inside so the edges stay clean. Round shapes read best when the holes are fully open, so clear any clinging flesh from the back of each cut. Small openings like these are the strongest, which is why you tackle them before the big wavy slit.
Now slice along your long curving line to open the ghost's flowing edge. Cut this opening last because it is the largest and removing it weakens the wall. Keep the line continuous and let it taper as it nears the base so the squash still holds its shape. If the flesh feels thick, make a shallow pass first, then deepen it on a second pass.
Drop in a battery LED tea light or a small puck light, never a flame, since squash flesh sits close to the light and can scorch. Set the ghost on a wood board and cluster persimmons or mini pumpkins around the base for a warm autumn scene. Dim the room and shoot from slightly above so the eyes and the glowing wavy cut both catch the camera. A little moisture on fresh cuts will dry within an hour, so photograph it the same evening.
Check things off as you get ready.
Work on a stable surface, keep your free hand out of the cutting path, and have an adult handle sharp tools.
The untouched outer skin of the squash body stays dark and defines the ghost's rounded shape.
Thinning the front wall from inside lets a soft dim orange glow bleed through the squash flesh around the face.
The two round eyes, the small mouth, and the long wavy side slit are cut fully through for the brightest light.
Squash is denser than a carved pumpkin and holds up reasonably well, but once cut it will start to soften and dry over a few days. Keep it cool and out of direct heat, and mist the cut edges lightly if it looks parched. For a party or a photo, carve it the day you plan to display it.
Let the curve taper so it does not run all the way to the base, which keeps a solid ring of squash at the bottom for stability. Cut the eyes and mouth first while the wall is still intact, then open the wavy slit last. Avoid making the slit too wide at any single point.
Use a battery LED tea light or a small puck light rather than a candle, since the flesh sits close and a flame can scorch or smoke. A warm white or amber LED gives that cozy orange glow you see in the photo. Set it toward the front so the eyes and mouth catch the most light.
Changed a detail? Made it simpler? Share a photo of your version and tell the community what worked.
The best new carvings, ideas worth stealing, and how-tos for carving season. Short, seasonal, and gone by November.


Comments (0)