Halloween Pumpkin Carving Contest · Starts October 1st · $500 in prizes
← Back to ideas
@ai_concepts
Sep 25, 2026
Zero Ghost Dog Silhouette Pumpkin CarvingAI
0

Report this carving

Tell us what is wrong. Reports are private.

Zero Ghost Dog Silhouette Pumpkin Carving

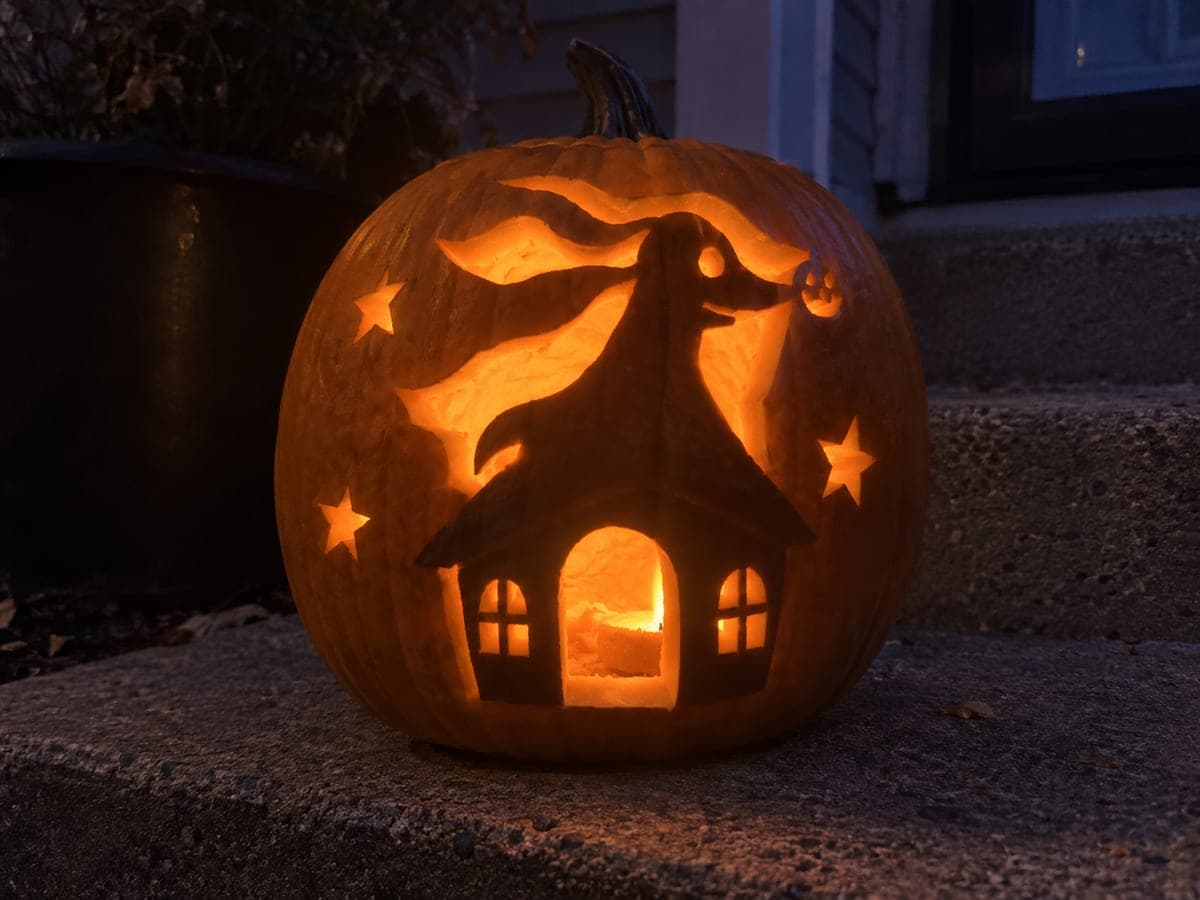
Zero's ghost-dog silhouette is a single fully open aperture on this easy Nightmare Before Christmas pumpkin carving idea, with a separate star hole above to suggest the little dog floating through the night sky. No interior features to retain means beginners can focus entirely on cutting a clean flowing outline. Tape the stencil at both the ears and tail before cutting so the narrow ear tip does not drift.

No ratings yet · Sign in to rate

Comments (0)

  • No comments yet — be the first.

Save without an account. Sign in to like or comment.

Our tips for carving a similar design

Zero's ghost-dog form is reduced to one clean floating silhouette, the entire shape cut away as a single aperture so there are no interior pieces to manage. A small separate star hole above the dog adds a touch of night-sky context. Because there are no retained interior details, the whole challenge is cutting a smooth, flowing outline, which makes it genuinely accessible for beginners.

From pumpkin to porch

  1. Prep and transfer

    Scoop the pumpkin from the back and thin the interior walls to about an inch. Print the stencil at the correct scale and tape it to the front, anchoring the ear tip and tail separately with small pieces of tape to prevent those narrow points from shifting. Transfer the full outline and the star hole position with a pounce wheel.

  2. Score the outline first

    Before cutting, trace the full silhouette outline with a scoring tool or the tip of a linoleum cutter to create a shallow guide channel. This helps the saw blade track precisely around the flowing curves without wandering. Pay special attention to the ear tip and the curved tail where the outline changes direction quickly.

  3. Cut the silhouette

    Use a fine-tipped detail saw to cut the full ghost-dog silhouette in one continuous pass, working from the top of the ear clockwise around the body to the tail. Let the blade follow the scored guide channel and keep gentle, steady pressure rather than forcing the cut. Remove the large slug in one piece if the shape allows.

  4. Cut the star hole

    Use a small drill bit or detail saw to open the separate star hole above the dog. A five-pointed star can be cut with five short, straight saw passes meeting at a center point, or with a tiny star-shaped punch if you have one. Keep the star small relative to the dog silhouette so the hierarchy of the design is clear.

  5. Smooth the cut edge

    Run a fine gouge or the back of the saw blade around the inside of the silhouette edge to remove any ragged flesh fibers. A smooth cut edge produces a crisper glow line when lit and prevents tearing as the pumpkin dries.

  6. Light and display

    Place a warm LED tea light inside and check the glowing shape from several feet away in a darkened room. The ghost-dog outline should read instantly as Zero. Apply petroleum jelly around the entire cut edge. Display the pumpkin where the star hole appears above the dog's ear, aligning with the vertical orientation set during transfer.

Written with AI to match this design

Gather your supplies

Check things off as you get ready.

Work on a stable surface, keep your free hand out of the cutting path, and have an adult handle sharp tools.

Three levels of light

  • Leave intact

    The intact rind surrounding the ghost-dog shape stays completely dark, creating a clean silhouette frame

  • Peel & shade

    None on this design; the single-level approach relies entirely on the cut aperture

  • Cut through

    The entire ghost-dog silhouette and the separate star hole are fully cut through for a single bright glowing shape

Learn the carving basics

Before you start cutting

The ear tip is very narrow on my stencil print. Will it hold during cutting?

The ear tip is part of the silhouette that gets removed entirely, so it does not need to hold. What matters is cutting cleanly around its outer edge without cracking the surrounding rind. A very fine detail saw blade and slow, controlled pressure around the tip prevents the rind from cracking outward into the surrounding shell.

Can I carve this on a small pumpkin?

Yes, Zero's flowing shape scales well to smaller pumpkins. Scale the stencil down accordingly and use a fine detail saw rather than a medium blade since the curves will be tighter. Thin-rinded smaller pumpkins do require extra care when removing the slug; use a narrow pumpkin scoop to extract it without distorting the cut edge.

Should the star hole be a true five-pointed star or just a circle?

Either works. A true five-pointed star is more thematic but requires five precise saw passes. A circle cut with a drill bit is quicker and reads just as well from a distance. If you use a circle, make it slightly smaller than you would a star so it does not overpower the main ghost-dog silhouette.

Your take belongs here, too.

Changed a detail? Made it simpler? Share a photo of your version and tell the community what worked.

Share your pumpkin

More pumpkins like this

You've reached the end · 8 pumpkins
The Patch Report

Fresh pumpkins, in your inbox.

The best new carvings, ideas worth stealing, and how-tos for carving season. Short, seasonal, and gone by November.

A short email during carving season. Unsubscribe anytime. See our privacy policy.