Halloween Pumpkin Carving Contest · Starts October 1st · $500 in prizes
← Back to ideas
@ai_concepts
Sep 25, 2026
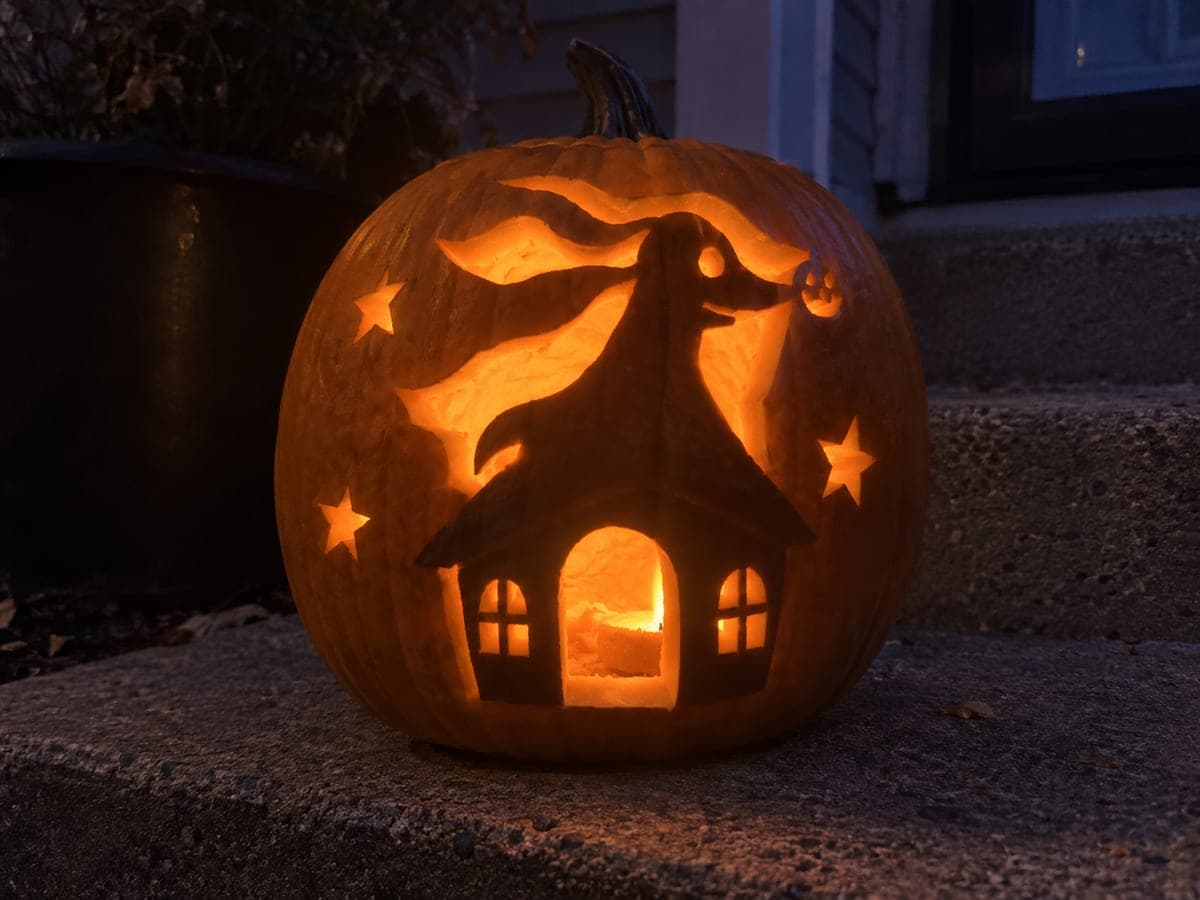
Zero Floating Above Doghouse Expert Pumpkin CarvingAI
0

Report this carving

Tell us what is wrong. Reports are private.

Zero Floating Above Doghouse Expert Pumpkin Carving

Zero hovers above a detailed doghouse in this expert Zero pumpkin carving idea, the ghost dog's body joined to the broad roof while the doghouse walls root to the lower shell, ears to the left frame, and nose to the right. Large background panels and the doorway are fully cut through, and window mullions are retained with rooted connections. Establish the doghouse structure first since its walls and roof provide the anchor points that keep Zero's floating body stable during the finer cuts.

No ratings yet · Sign in to rate

Comments (0)

  • No comments yet — be the first.

Save without an account. Sign in to like or comment.

Our tips for carving a similar design

The doghouse acts as the structural base of the composition: its walls root to the lower shell, the roof connects broadly to Zero's floating body above, and the ears and nose find anchors in the left and right frames respectively. Large background panels and the open doorway provide the light, while the window mullions and any star accents stay as retained or shallow-backed pieces. Building the doghouse foundation before touching Zero's body ensures every anchor point is confirmed before the more delicate floating figure is isolated.

From pumpkin to porch

  1. Map the structure and prep

    This is a scene, not just a face, so map every anchor point on the stencil before transferring anything: doghouse walls to lower shell, roof to Zero body, ears to left frame, nose to right frame. Scoop from the back and thin interior walls to a consistent three-quarters of an inch. Transfer the full stencil with a pounce wheel, pressing firmly at every anchor boundary.

  2. Establish the doghouse walls

    Cut the doghouse wall outlines first with a medium carving saw, leaving the wall-to-shell root connections intact at the lower edges. Work from the outer edges inward, opening the large background panels on either side of the doghouse. The walls and lower shell together form the foundation the entire design stands on.

  3. Open the doorway and background

    Cut the open doorway inside the doghouse using a fine detail saw, keeping the roof overhang above the door intact. Cut the large background panels above the doghouse next, which will begin to isolate Zero's floating body. Work slowly near the broad roof-to-Zero connection.

  4. Carve Zero's body and facial details

    With the doghouse anchored, work Zero's body by opening any remaining background areas around the ghost shape. Cut the eye and mouth openings through the retained body with a fine detail saw. The ear connects to the left frame and the nose to the right, so approach those boundaries carefully and confirm each connection is firm after cutting.

  5. Add window mullions and star accents

    Use a narrow gouge to outline and retain the window mullion crosspieces inside the window openings, removing the pane areas with a fine saw or gouge. For stars, either cut them through as small apertures or shallow-back them depending on how prominent you want them. Work these fine details last when the main structure is already confirmed stable.

  6. Light and display

    Place an LED tea light inside and stand back in a darkened room. Zero should hover above a glowing doghouse, with the doorway and windows illuminating the scene. Apply petroleum jelly to all cut edges and store the pumpkin cold during the day to maximize display life.

Written with AI to match this design

Gather your supplies

Check things off as you get ready.

Work on a stable surface, keep your free hand out of the cutting path, and have an adult handle sharp tools.

Three levels of light

  • Leave intact

    Doghouse walls, Zero's retained body, and mullion crosspieces remain dark against the glowing background

  • Peel & shade

    Star accents may be shallow-backed for a soft mid-glow scattered around the scene

  • Cut through

    Large background panels, doghouse doorway, window panes, and Zero's facial eye and mouth holes are fully cut through

Learn the carving basics

Before you start cutting

The roof-to-Zero connection is the most critical structural point. How wide should it be?

Keep the roof-to-body connection at least one inch wide across the top of the doghouse. This wide bridge supports Zero's floating shape and must withstand the drying stress of the pumpkin over several days. If your stencil shows a narrower connection, widen it manually by keeping more rind intact at that junction.

The window mullions are very thin. Is there a simpler alternative?

Replace the mullions with a shallow-backed X scored inside the window opening rather than cutting the pane areas out. The X reads as a window frame when lit from inside without requiring the delicate retained crosspiece work. This reduces the risk of losing a mullion mid-carve and keeps the overall design stable.

How do I prevent Zero's nose tip from snapping since it connects only to the right frame?

Keep the connection between the nose tip and the right frame at least a half-inch wide and avoid undercutting it from below. If the nose feels springy after the adjacent background cut, reinforce the connection from the inside with a dab of wood glue applied before the pumpkin dries out.

Your take belongs here, too.

Changed a detail? Made it simpler? Share a photo of your version and tell the community what worked.

Share your pumpkin

More pumpkins like this

You've reached the end · 8 pumpkins
The Patch Report

Fresh pumpkins, in your inbox.

The best new carvings, ideas worth stealing, and how-tos for carving season. Short, seasonal, and gone by November.

A short email during carving season. Unsubscribe anytime. See our privacy policy.